When preparing artwork for professional printing, understanding and implementing essential pre-press elements like crop marks is crucial. These seemingly small details ensure that your final printed piece is precisely trimmed, free from unwanted white edges, and that your design elements are positioned correctly. While Photoshop is a powerful tool for image manipulation and design, it doesn't offer a built-in, one-click solution for generating crop marks. This leads many designers to seek manual methods, often involving saving to PDF, prompting questions about workflow efficiency and potential quality implications.
The Indispensable Role of Crop Marks and Bleed
At its core, the need for crop marks arises from the printing process itself. Printers, whether using large rolls of paper (offset printing) or individual sheets (sheetfed printing), invariably trim the printed material to its final dimensions. If a design extends precisely to the edge of the intended final size, there's a significant risk that the trimming process could either cut off parts of the artwork or leave unsightly white borders. To prevent this, a concept known as a "bleed" is employed.
A bleed is essentially an extension of your design beyond the intended trim line. A common practice is to create an extra border, typically 1/8th of an inch, all around the design. This means your Photoshop document should be larger than the final desired print size by this amount. Your design elements should then extend to fill this larger canvas. The purpose of this bleed is to ensure that when the printer trims the paper, even if there's a slight shift or inaccuracy in the paper's positioning during the printing or cutting process, the design will still extend to the very edge of the trimmed piece, resulting in a clean, professional finish. The 1/8th inch border acts as a safety margin, guaranteeing a visually appealing result even with minor mechanical variations.
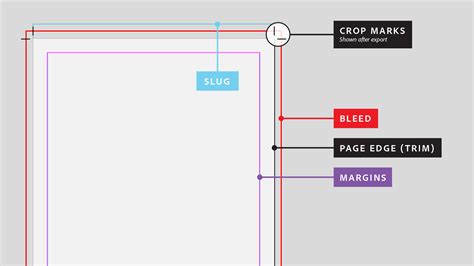
Crop marks, therefore, serve as precise guides for the printer, indicating exactly where the paper should be cut to achieve the final intended dimensions. They are essentially small lines placed at the corners of the intended final print area, aligning with the trim edge. Without them, a printer would have to guess or eyeball the cut, leading to unpredictable and likely unsatisfactory results.
Why Photoshop Requires Manual Crop Mark Creation
Unlike dedicated page layout software like Adobe InDesign or vector graphics editors like Adobe Illustrator, Photoshop lacks a native function to automatically generate crop marks. These other programs are specifically designed for multi-page documents and print production workflows, and as such, they include features that streamline the creation of print-ready files, including automated crop and bleed mark generation.
This absence in Photoshop means that designers who work primarily within the software must resort to manual techniques to add these crucial elements. This often involves creating lines or shapes manually within the Photoshop document that mimic the appearance of crop marks. These manual marks are then typically used in conjunction with a specific export setting.
Exploring Manual Crop Mark Techniques in Photoshop
The process of manually creating crop marks in Photoshop generally involves several steps, often outlined in various online tutorials. While the exact method can vary slightly, the core principle is to draw lines that will serve as trimming guides.
One common approach involves defining the trim size within your Photoshop document and then drawing thin lines, usually black, at the edges of this trim area. These lines are strategically placed to extend beyond the actual artwork. For instance, if your final print size is 8x10 inches, you would design on a canvas that includes the bleed area (e.g., 8.25x10.25 inches). You would then draw your crop marks on the outer edges of the 8x10 inch area, extending them into the bleed.
How to Add Bleed in Adobe Photoshop & Save with Trim Marks for Print
After creating these manual crop marks, a recurring step observed in many tutorials is the export of the Photoshop file as a PDF. This PDF then contains both the artwork with the bleed and the manually added crop marks, which can then be sent to a professional printer.
The PDF Export Question: Photoshop, InDesign, and Illustrator
The frequent practice of exporting a Photoshop file to PDF after manually adding crop marks raises an important question for designers: why not use InDesign or Illustrator from the outset, given their built-in capabilities for handling crop marks and bleed during PDF export?
The underlying concern is whether placing a Photoshop file into InDesign or Illustrator and then exporting to PDF introduces any quality loss or undesirable differences compared to creating the crop marks directly in Photoshop and exporting from there. This is a valid consideration, especially when dealing with designs that have undergone extensive pixel-based manipulation in Photoshop.
When you place a Photoshop file (e.g., a .PSD or .JPEG) into InDesign or Illustrator, the software essentially embeds or links to that Photoshop artwork. If the Photoshop file is a raster image (like a .JPEG or flattened .PSD), it retains its pixel-based nature. InDesign and Illustrator are primarily vector-based applications, and while they can handle raster images, they are not designed for pixel-level editing. When you export a PDF from InDesign or Illustrator that contains a placed Photoshop image, the image data is generally preserved. However, the process of embedding and then re-exporting can sometimes lead to subtle changes in color profiles or compression artifacts, depending on the export settings chosen.
The advantage of creating crop marks and bleed directly in InDesign or Illustrator is that these applications are built for print production workflows. They manage these elements natively and have robust PDF export options that are specifically designed to maintain image quality and embed all necessary print information. When you set up a document in InDesign, you can specify the bleed and slug areas, and the software will automatically generate the crop marks and other printers' marks during PDF export, ensuring a print-ready file without manual intervention.
Therefore, if a project's primary purpose is print, and it involves page layout or vector elements, starting in InDesign or Illustrator is generally the more efficient and reliable workflow. However, there can be specific scenarios where a designer might prefer to add crop marks in Photoshop. This could be due to familiarity with the software, the nature of the artwork being predominantly pixel-based and heavily edited in Photoshop, or a desire to have complete control over the placement of the marks within the Photoshop environment before exporting.
Understanding Potential Quality Implications
When a Photoshop file is placed into InDesign or Illustrator and then exported to PDF, the quality is largely dependent on the original Photoshop file's resolution and the export settings. If the Photoshop file is created at a sufficiently high resolution (e.g., 300 dpi for print) and saved in a lossless format (like TIFF or a high-quality PSD), then placing it into another application and exporting as a high-quality PDF should result in minimal to no discernible quality loss.
The potential issues arise from:
- Resolution: If the original Photoshop artwork is not at a high enough resolution for print, no amount of manipulation in other software will magically improve it.
- Compression: When exporting to PDF, choosing appropriate compression settings is vital. Overly aggressive compression can lead to pixelation and loss of detail, especially in photographic elements.
- Color Profiles: Mismatched color profiles between Photoshop, InDesign/Illustrator, and the final PDF can lead to color shifts. Ensuring consistent color management throughout the workflow is crucial.
The reason some tutorials advocate for manual crop mark creation in Photoshop and direct PDF export might stem from a desire to keep the workflow entirely within one application. This can simplify the process for users who are less familiar with InDesign or Illustrator, or for projects that are essentially single-page designs primarily created in Photoshop. The concern about quality loss is valid, but it can be mitigated by understanding the export settings and ensuring the original Photoshop artwork is of print-ready quality.
The "Why Not InDesign/Illustrator" Dilemma
The persistent question of why designers might opt for manual crop marks in Photoshop when InDesign and Illustrator offer automated solutions points to a few likely reasons:
- Familiarity and Skillset: Many designers are most proficient in Photoshop, especially those with a background in digital photography, digital painting, or extensive photo retouching. Transitioning to InDesign or Illustrator might require learning new software and workflows.
- Nature of the Project: For purely pixel-based designs, such as complex photo manipulations or digital paintings intended for single-page printing, a Photoshop-centric workflow might feel more intuitive. The design is already "in" Photoshop, so adding the print marks there can seem like a logical extension.
- Specific Design Requirements: In rare cases, a designer might need very precise, custom-designed crop marks or registration marks that are easier to create manually within Photoshop's pixel-editing environment.
- Learning Curve of Other Software: While powerful, InDesign and Illustrator can have a steeper learning curve for beginners compared to the more widely known Photoshop.
However, it's important to reiterate that for most professional print production workflows, using InDesign or Illustrator is the recommended and most efficient approach. These applications are built for the task, offering automated crop mark generation, bleed setup, and robust PDF export options that minimize the risk of errors and ensure a print-ready file.
Best Practices for Print-Ready Files
Regardless of the software used, adhering to best practices for print-ready files is paramount:
- Resolution: Ensure all raster images are at a minimum of 300 dots per inch (dpi) at the intended print size.
- Color Mode: Design in CMYK color mode for professional printing. RGB is for digital displays.
- Bleed: Always include a bleed area, typically 1/8th of an inch (3mm) around the trim edge.
- Safe Area: Keep critical design elements (text, logos) within a safe margin, well away from the trim edge, to avoid them being cut off.
- File Format: Export to a high-quality PDF format (e.g., PDF/X-1a or PDF/X-4) that is compatible with professional printing standards.
- Fonts: Ensure all fonts are either embedded in the PDF or converted to outlines (curves). Embedding is generally preferred as it preserves text editability if needed.
While manual crop mark creation in Photoshop is a viable workaround, understanding the strengths of InDesign and Illustrator for print production can lead to more streamlined and error-free workflows. For those exclusively using Photoshop, mastering the manual techniques and understanding the export settings is key to achieving professional print results.