Creating a vibrant, glowing neon text effect in Adobe Photoshop can transform ordinary text into eye-catching graphics, reminiscent of the iconic signage found in bustling bars and eclectic window displays. This tutorial will guide you through a straightforward method, primarily utilizing Photoshop's powerful layer styles, to achieve this captivating visual. We will delve into the nuances of applying these styles, from initial setup to the finer details that bring a neon sign to life.
Setting the Stage: Document and Background
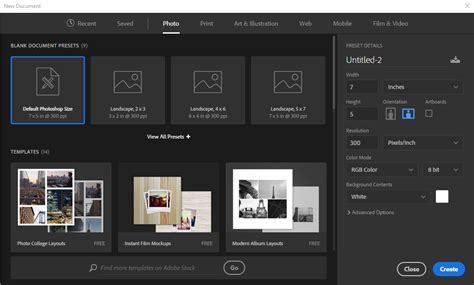
The first step in learning how to make neon text in Photoshop is to establish your canvas. Open Photoshop and begin by creating a new document. The dimensions of this document are flexible and should be chosen based on the intended size and prominence of your text within the final design. For the purposes of this tutorial, a document size of 400x150 pixels is suggested. A crucial element for achieving a convincing neon glow is a dark background. If your new document defaults to a white background, use the Paint Bucket Tool to fill the background layer with black. This provides the necessary contrast for the luminous text to stand out effectively.
Crafting the Neon Core: Text and Initial Styles
Now, select the Text Tool (T) and type out the text you wish to transform into a neon masterpiece. While various fonts can be used, some will yield more impactful results than others. Fonts with rounded edges often lend themselves well to a smooth, authentic neon glow. However, for demonstration purposes, a universally accessible font like Times New Roman, set to bold and italic, can effectively showcase the effect. Scale the font size up as much as possible within your document to maximize its presence.
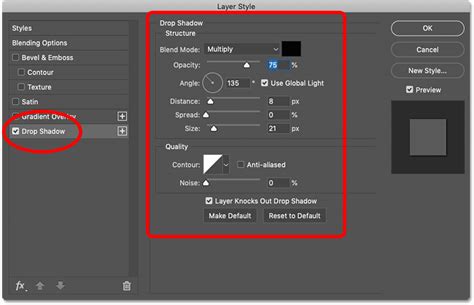
Once your text is in place, the magic truly begins by applying layer styles. Right-click on the text layer in the Layers window and select "Blending Options." This opens up a panel where you'll meticulously adjust various effects.
Drop Shadow: Begin by selecting the "Drop Shadow" option. Set the color to your desired neon hue. Reduce the opacity to approximately 50%. For the distance, a value of 6 pixels is recommended, with a spread of 14 pixels and a size of 8 pixels. This initial shadow will help to lift the text from the background and provide a subtle depth.
Inner Shadow: Move to the "Inner Shadow" option. Set the blending mode to "Normal." The color for this shadow should be a darker shade of the primary neon color you selected for the drop shadow. Reduce the opacity to around 40%. Crucially, set the distance, choke, and size all to 8 pixels. This inner shadow will create a subtle darkening effect on the inner edges of the text, contributing to the illusion of depth and the way light would bend within a glass tube.
Outer Glow: Next, select "Outer Glow" and push the opacity all the way up to 100%. Set the glow color to the same darker shade used for the inner shadow. Increase the "Size" of the glow to approximately 16 pixels. This outer glow is fundamental to creating the signature luminous halo that surrounds neon lights.
Inner Glow: Proceed to "Inner Glow." Set the blend mode to "Normal" and reduce the opacity to about 25%. The glow color here should revert to the original neon color you chose for your drop shadow. Ensure the technique is set to "Precise" and increase the size to around 13 pixels. This precise inner glow will add a subtle, internal luminescence to the text, mimicking the light radiating from within the neon tube.
Bevel and Emboss: Navigate to "Bevel and Emboss." Set the style to "Stroke Emboss" and the size to 2 pixels. Increase the highlight opacity to 100%. The shadow color should match the color used for the inner glow and drop shadow, with its opacity reduced to 25%. This effect adds a slight dimensionality to the edges of the text, giving it a more physical presence.
Satin: Below Bevel and Emboss, you'll find "Satin." Set its color to the same primary neon color used previously. Adjust the opacity to 50%. A distance of 11 pixels and a size of 14 pixels will contribute to a softer, more diffused internal sheen.
Stroke: Finally, select "Stroke." Set the size to 2 pixels and ensure the position is set to "Inside." This stroke will define the outer edge of your neon tube, providing a clean boundary for the glow.
Enhancing Realism: Texture and Advanced Adjustments
To further enhance the realism of your neon sign, incorporating a textured background can be highly effective.
Background Texture: The first step in learning how to make neon text in Photoshop involves the background. Go to File > Place Embedded and open a suitable texture image, such as a grunge grey brick wall texture. This textured background will provide a more authentic setting for your neon sign, moving beyond a simple flat color.
How To Photoshop A Realistic Neon Glow In One Click!
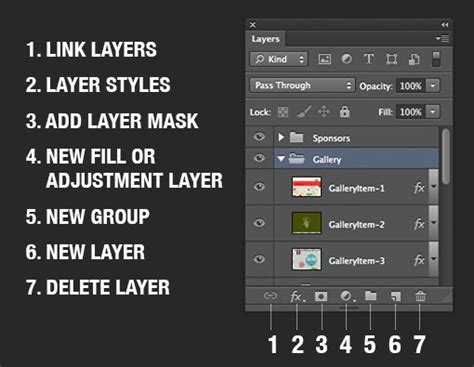
Hue/Saturation Adjustment: After placing the texture, create a new fill or adjustment layer by clicking the "Create new fill or adjustment layer" icon. Choose "Hue/Saturation." This adjustment layer, placed above the background texture, allows for fine-tuning the overall color balance and saturation of your background, ensuring it complements the neon text without overpowering it.
Advanced Text Layer Manipulation: For more intricate control and to achieve specific nuances of light diffusion and form, you can delve into more advanced layer manipulation.
Text Separation: Create the text using a font like "Meragen" in all caps, with a size of 295 pt and the color #a33e88. Duplicate this text layer and make the original invisible by clicking the eye icon next to it. The subsequent steps involve separating the vertical and diagonal parts of the neon text letters from the horizontal ones. This is achieved by going to Edit > Cut, and then Edit > Paste Special > Paste in Place. This action places the selected parts onto a new, separate layer.
Adding Neon Light with Inner Glow: Now, we'll add some neon light in Photoshop to these separated text layers. A key technique here is to add an "Inner Glow" to the neon text.
Working with Layers: Learning how to make a neon sign in Photoshop is a matter of working on all the layers. As the neon letters in Photoshop start to come together, it becomes evident that each layer plays a critical role.
Bevel and Emboss Refinements: For the original "Vertical" layer, double-click to adjust the Bevel and Emboss settings. Change the Angle and Altitude values to 1 and 97, respectively. This adjustment is tailored to suit the vertical and diagonal segments of the letters.
Layer Style Transfer and Adjustments: Next, copy and paste the layer style from the first horizontal copy layer to the first vertical copy layer. Then, double-click the vertical copy layer to modify the Bevel and Emboss effect's Angle to 180 and its Altitude to 72.
For the second vertical copy layer, copy and paste the layer style from the second horizontal copy layer. Double-click the "Vertical copy 2" layer to alter the Bevel and Emboss effect's Angle to 139 and its Altitude to 12. Within the Inner Glow settings for this layer, change "Choke" to 61 and "Size" to 15. These precise adjustments fine-tune the light diffusion and highlight intensity for different segments of the text.
Finishing Touches and Cable Integration
With the core neon effect established, it's time to add the final details that bring the neon sign to life.
Foreground Color and Brush Tool: Set your Foreground color to #98338b. Select the Brush Tool and choose a very large, soft, round tip. At this stage, your creation should resemble a neon light font against a textured background.
Cable Creation: To enhance the realism further, you can add the appearance of power cables. Create a new layer below the "Background Light" layer and name it "Cable." Using the Pen Tool, meticulously create paths where you want the cable to appear. You can click to add anchor points for sharp corners or click and drag to create smooth curves. Once the path is defined, you can stroke it with a brush to create the visual representation of a cable.
Rectangle Layer Transformation: To add more elements or refine existing ones, you might duplicate a "Rectangle" layer (this might be a placeholder for a specific element in your design). Then, go to Edit > Transform > Rotate 90° Clockwise to alter its orientation.
The neon Photoshop letters are now nearing completion.
Final Color Overlay: As a final touch, click the "Create new fill or adjustment layer" icon and choose "Solid Color." Use the color #a34799. Place this adjustment layer below the "Cable" layer and change its Blend Mode to "Vivid Light." This final color overlay can subtly unify the color palette and add another layer of visual interest.
Congratulations! In this neon effect Photoshop tutorial, we have modified a brick texture background and darkened it slightly. Once the main neon light text was created and styled, we added more glow to the background and used the Pen Tool to create the cable's path.
Exploring Alternatives and Additional Resources
For those seeking to expedite the process or explore a wider array of effects, several alternatives exist.
Pre-made Text Effects: If you wish to save time, you can download hundreds of text effects for Photoshop from platforms like Envato Elements. These often include pre-designed neon Photoshop text effects and layer styles, offering a vast selection for various projects. Such bundles can provide text effects that mimic shiny metal, wood, and numerous other materials.
Illustrator Neon Effects: If you prefer to achieve a neon effect without downloading a specific Photoshop font, consider exploring resources for Adobe Illustrator. There are downloads available that offer ten different effects, compatible with both shapes and text within Illustrator.
Customizable Neon Typefaces: For those who prefer not to create neon text in Photoshop from scratch, downloadable resources are available that allow customization of neon sign colors and the addition of braces for increased realism. These are not merely neon fonts in Photoshop but full typefaces that can be integrated across multiple projects with a stylish aesthetic.
Modern Neon Fonts: If a modern neon light font is desired, consider exploring options like "Saberz." This type of neon sign font often includes numbers, symbols, and multilingual characters, offering extensive typographic flexibility.
Beyond Neon Text: It's important to remember that Photoshop's capabilities extend far beyond neon text effects. For instance, you can work alongside graphic artists to learn how to add a cool neon effect to various elements using Photoshop tools. Erica Larson, an Associate Creative Director on the Adobe Studio team, has demonstrated techniques using the Pen Tool to draw shapes, such as a triangle around a hand, to integrate neon elements seamlessly into designs. Experimenting with different colors and settings for the Outer Glow is encouraged, as Larson herself opted for a vivid magenta. Converting shapes to Smart Objects by right-clicking on the Shape layer and choosing "Convert To Smart Object" allows for non-destructive editing. To hide parts of a neon shape, set the Brush tool to black, select the layer mask (the white icon on the layer), and brush over the areas you wish to conceal, effectively refining the placement and form of your neon elements.