Procreate, the immensely popular digital illustration app, offers artists a vast landscape of creative possibilities, with brush customization being a cornerstone of its appeal. Among the many ways to tailor your digital tools, creating a unique square brush stands out as a fundamental yet versatile skill. This guide will walk you through the intricate process of crafting your own square brush in Procreate, from understanding the foundational elements to advanced customization and practical application. Whether you're aiming for precise pixel art, unique lettering, or distinctive graphic design elements, mastering the square brush will undoubtedly enhance your digital art workflow.
Getting Started: Navigating the Procreate Interface
Before diving into brush creation, it's essential to familiarize yourself with Procreate's intuitive yet feature-rich interface. Think of it as getting to know your new digital sketchbook - initial exploration can seem daunting, but a clear understanding of its layout will lead to a smooth and efficient drawing experience.
Understanding the Core Interface Elements
Procreate's interface is designed for clarity and ease of use. Key components include:
- Actions Menu (Wrench Icon): Located on the top left, this menu is your gateway to crucial settings, including Canvas settings, Share options, Add, Save, and Help functions.
- Adjustments Menu (Magic Wand Icon): Positioned next to the Actions menu, this allows you to apply various filters and effects to your artwork, such as Liquify, Gaussian Blur, and Hue, Saturation, Brightness adjustments.
- Layers Menu (Two Squares Icon): Found on the top right, this panel is vital for managing your artwork's composition. Here, you can add new layers, duplicate, group, delete, adjust opacity, and apply layer masks.
- Toolbars (Right Side): The right-hand side of the screen houses your primary tools: the Brush, Smudge, Eraser, and Color palettes.
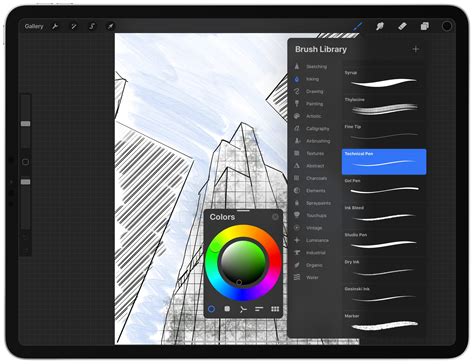
Exploring the Brush Library
Procreate comes pre-loaded with an extensive collection of brushes, thoughtfully categorized into sets like Sketching, Painting, Calligraphy, and more. Each brush possesses a distinct texture, behavior, and feel. Dedicate time to experiment with these default brushes to grasp their individual characteristics. This exploration is crucial, as you can modify existing brushes or build entirely new ones, such as the square brush we aim to create. Remember, while you can adjust the size and opacity of any brush using the slider on the left side of your screen, the true power lies in delving into the Brush Studio for deeper customization.
Selecting and Preparing Your Base Brush
The foundation of any custom brush is a suitable base. Understanding how Procreate brushes work will help you choose the most effective starting point for your square brush.
Understanding Default Brush Characteristics
Every brush in Procreate is a unique digital tool with specific properties. Some are designed for fluid sketching, others for textured painting, and some for precise line work. For our square brush, selecting a base that already exhibits some form of solid or blocky behavior can simplify the process. Experimenting with the default brushes will reveal their distinct behaviors on the canvas, giving you insight into how size, opacity, and texture interact.
Choosing a Base Brush for Your Square Brush
A good starting point for creating a square brush is often a brush with a simple, solid fill. The Hard Airbrush from the Airbrushing set is an excellent candidate. Its uncomplicated nature makes it easier to manipulate into the desired square shape. Select this brush from the library to begin.
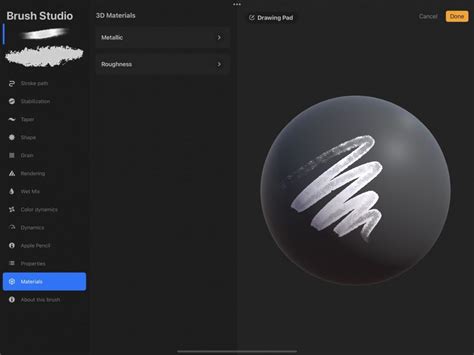
Crafting the Square Brush: The Brush Studio Deep Dive
Now, the creative process truly begins as we enter the Brush Studio to sculpt our custom square brush.
Accessing the Brush Settings
With your chosen base brush (e.g., Hard Airbrush) selected, tap on its thumbnail again within the Brush Library. This action opens the Brush Studio, a comprehensive environment where all brush settings can be adjusted. While the studio presents a multitude of options, for our square brush, we will primarily focus on the Shape and Grain settings, along with a few others to refine its behavior.
Adjusting the Brush Shape Source
The Shape tab within the Brush Studio dictates the fundamental form of your brush tip. The Shape Source is the image that Procreate stamps repeatedly to create your brush strokes. To achieve a square brush, we need to replace the default shape with a square.
- Accessing the Shape Editor: Navigate to the Shape tab on the left-hand menu.
- Editing the Shape Source: Tap on Edit next to the Shape Source thumbnail.
- Importing a Square:
- You can create a simple square directly within Procreate. Launch Procreate, tap the '+' icon to create a new canvas, and press the brush icon to access the Brush Library. Select a brush like the Hard Airbrush, draw a perfect square, and fill it with a solid color.
- Once your square is drawn, open the Actions menu (wrench icon), tap Add, and then Copy canvas.
- Return to your Brush Studio settings for the square brush. In the Shape Editor, tap Import, then Paste. Your square shape is now loaded.
- To ensure the square is solid and not a gradient, make sure the imported shape is 100% white on a black background. In the Shape Editor, you can invert colors if needed.
- Confirming the Shape: Tap Done in the Shape Editor. You should now see your square as the brush's Shape Source.
Refining Brush Strokes: Stroke Path and Spacing
The Stroke Path settings control how the brush shape is stamped along a drawn line.
- Accessing Stroke Path: In the Brush Studio, navigate to the Stroke Path tab.
- Adjusting Spacing: Drag the Spacing slider to None. This ensures that the square shape is stamped continuously without gaps, creating a solid line or fill rather than a series of individual squares. If you wanted a pixelated effect with visible squares, you would increase this spacing.
Fine-Tuning Brush Behavior: Taper and Properties
The Taper and Properties tabs allow for further refinement of how the brush responds to input.
Pressure Taper Settings
The Taper settings define how the brush's size or opacity changes at the beginning or end of a stroke.
- Accessing Taper: Navigate to the Taper tab.
- Pressure Taper: For a consistent square brush, particularly for pixel art or lettering, we want to minimize the influence of pressure on the taper.
- In the Pressure Taper section, set the Size and Opacity sliders to Max.
- Set the Pressure slider to None. This ensures that the taper effect, if any is applied, isn't driven by how hard you press with the Apple Pencil, leading to a more uniform stroke.
- Touch Taper: This affects strokes drawn with a finger. For a consistent square brush, you might also set the Touch Taper sliders similarly, or leave them as is if you primarily use an Apple Pencil.
Properties Tab Settings
The Properties tab contains global settings that affect the brush's overall behavior.
- Accessing Properties: Navigate to the Properties tab.
- Maximum Size: For a pixel brush, you often want precise control over size.
- Change the Maximum Size slider to None. This allows you to manually set the brush size precisely without it defaulting to a large maximum. You can also adjust the Minimum size if needed.
- Brush Behaviour: This section allows you to set limits on the brush's size and opacity. Adjusting the Maximum Size here is crucial for maintaining consistent pixel dimensions.
- Smudge Slider: If this brush were to be used as a Smudge tool, this slider would control the intensity of the smudge effect. For a drawing brush, this is less critical.
Controlling Color Interaction: Wet Mix
The Wet Mix tab governs how the brush interacts with existing colors on the canvas, simulating traditional paint blending.
- Accessing Wet Mix: Navigate to the Wet Mix tab.
- Disabling Paint Application: For a clean, opaque square brush that doesn't blend or interact with existing colors, you'll want to disable most of these settings.
- Charge: This controls how much "paint" is applied at the start of a stroke. For an opaque and even amount of paint with every stroke, the Charge should be disabled or set to a level that ensures full opacity immediately.
- Other sliders like Dilution, Pull, and Blend Mode are primarily for blending brushes and can be adjusted to their minimum or default settings if you want a non-blending square brush.
Apple Pencil Settings: Opacity and Tilt
The Apple Pencil tab allows you to control how the brush responds to the Apple Pencil's pressure and tilt.
- Accessing Apple Pencil Settings: Navigate to the Apple Pencil tab.
- Opacity Slider:
- Drag the Opacity slider to None. This setting controls the transparent-to-opaque range of the brush under pressure. Setting it to None ensures that the opacity is consistent regardless of pressure, which is often desired for pixel art or sharp graphic elements.
- Tilt Settings: If you don't want the tilt of your Apple Pencil to affect the brush's size, opacity, or other properties, ensure the relevant sliders are set to None or their default neutral positions.
Testing and Saving Your Custom Brush
Once you've configured the settings, it's time to test your creation and ensure it meets your expectations.
Drawing and Adjusting
With your new square brush selected, start drawing on the canvas.
- Observe the Strokes: Pay attention to how the square shape is applied. Is the spacing correct? Is the opacity consistent? Does it feel responsive?
- Iterative Refinement: If the brush isn't behaving as expected, revisit the Brush Studio. You might need to tweak the Spacing in Stroke Path, adjust Taper settings, or refine Properties like Maximum Size. The Drawing Pad on the right-hand side of the screen within the Brush Studio is invaluable for testing your edits in real-time.
- Testing on a Larger Canvas: If you're creating a brush for detailed pixel art, you'll need to zoom in significantly on your canvas to see individual pixels. Pinching the screen with two fingers allows you to zoom in. When pixels appear at a large size, you can start to draw your design.
Saving Your Custom Brush
After you're satisfied with your square brush's performance, it's crucial to save it.
- Naming Your Brush: At the top left of the Brush Studio screen, you'll see the current name of your brush (often a copy of the base brush name). Tap on this name to rename it to something descriptive, such as "My Square Brush" or "Pixel Square."
- Creating a Custom Brush Set: To keep your custom brushes organized, it's best to create a new brush set.
- Return to the Brush Library.
- Tap the '+' icon at the top of the brush sets list.
- Name your new set (e.g., "Custom Brushes," "Pixel Art Tools").
- Drag your newly created square brush from its current location into your new custom set.
Your square brush is now saved and readily available for use in all your Procreate projects.
Practical Application: Using Your Square Brush
Creating a brush is only half the battle; knowing how to use it effectively is key to unlocking its potential.
Pixel Art and Detailed Graphics
The square brush is a natural fit for pixel art due to its inherent blocky nature.
- Creating Pixel Art: By zooming in closely on your canvas and utilizing the square brush with the spacing set to create distinct pixels, you can construct detailed pixel art characters, scenes, or icons.
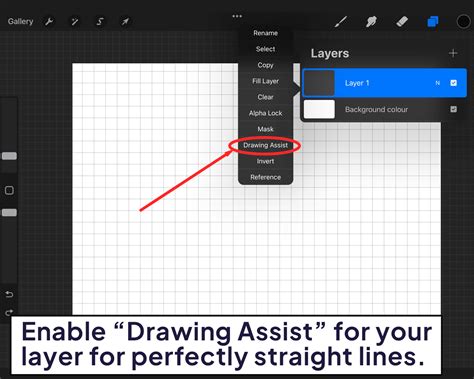
- Symmetrical Designs: For symmetrical artwork, Procreate's Drawing Guide feature is invaluable.
- Open the Actions menu (wrench icon).
- Tap Canvas.
- Toggle Drawing Guide on.
- Tap Edit Drawing Guide.
- Select Symmetry from the options at the bottom. You can adjust the opacity and thickness of the guideline.
- Choose a symmetry type (e.g., Vertical) and position the guideline by dragging the blue dot.
- Anything drawn on one side of the symmetry line will be mirrored on the other, allowing for efficient creation of symmetrical shapes like hearts or complex patterns.
- Resizing Elements: Once your design is complete, you may need to resize it to fit your canvas. Use the Transform tool (arrow icon) to scale and position your artwork.
How to make a PIXEL ART BRUSH for procreate in LESS THAN 4 MINUTES (sorry for yelling)
Lettering and Graphic Design
Beyond pixel art, the square brush can be adapted for various lettering styles and graphic design elements.
- Block Lettering: Use the square brush to create bold, impactful block letters. Adjusting brush size and opacity can add subtle variations.
- Creating Textures: Experiment with different spacing and opacity settings to create unique textures for backgrounds or overlays.
- Geometric Patterns: Combine the square brush with Procreate's symmetry tools or manual placement to generate intricate geometric patterns.
Advanced Tips and Further Exploration
The journey of brush creation doesn't end with a single square brush. Procreate's Brush Studio offers endless possibilities for customization.
Experimenting with Other Shapes
The process described for creating a square brush can be applied to any shape. You can import or create custom shapes like circles, triangles, stars, or even more complex forms to generate a diverse range of brushes. The Shape Source is your canvas for creating unique brush tips.
Understanding the Impact of Pressure and Tilt
Procreate's sensitivity to the Apple Pencil's pressure and tilt can add dynamic qualities to your brushes.
- Pressure Curve: Within the Apple Pencil tab, the Pressure Curve allows you to precisely control how pressure affects properties like size and opacity. By adjusting this curve, you can make a brush more sensitive to light touches or require a firmer press for full effect. This is particularly useful for creating expressive lines.
- Tilt Effects: The Tilt settings allow properties like size, opacity, or color dynamics to change based on the angle of your Apple Pencil. Experimenting with these can lead to brushes that mimic real-world tools like pencils or paintbrushes with varying stroke characteristics depending on how they are held.
Exploring Brush Taper and Stroke Path Further
- Brush Taper: Beyond pressure, taper settings can be influenced by touch (finger) input. Understanding how the Size and Opacity sliders work in conjunction with the taper line allows for fine control over stroke beginnings and ends.
- Stroke Path Spacing: While we set spacing to 'None' for a solid square, adjusting this value can create dotted lines, dashed lines, or repeating patterns of your square shape.
The Power of Wet Mix for Blending
If you ever want to create a brush that interacts with color, revisit the Wet Mix settings. Adjusting Dilution, Charge, and Pull allows you to create custom blending brushes that can mimic oil paints, watercolors, or gouache.
Backup Your Brushes
Before making significant changes to any brush, especially a default one, it's a good practice to create a backup. In the Brush Library, swipe left on the brush thumbnail and select Duplicate. This ensures you can always revert to the original if your modifications don't yield the desired results.
Procreate's Brush Studio is a powerful tool that empowers artists to create bespoke digital instruments. By understanding the fundamental settings and practicing iterative refinement, you can craft a square brush that perfectly suits your artistic needs, opening up new avenues for creativity in pixel art, lettering, and beyond. The possibilities are truly as endless as your imagination.