QR codes have become ubiquitous, acting as digital doorways that connect the physical world to online information. Whether for marketing, information dissemination, or simply adding an interactive element to a design, understanding how to effectively create and integrate QR codes is a valuable skill. This guide delves into the process of generating and manipulating QR codes, with a particular focus on using Adobe Photoshop for customization and application.
Generating Your Initial QR Code
Before you can manipulate a QR code in Photoshop, you first need to generate one. This is a straightforward process that doesn't require specialized software.
Online QR Code Generators
Several online platforms offer free QR code generation services. These tools allow you to encode various types of information, including URLs, text, telephone numbers, and SMS messages.
- Selecting Content: Choose the type of content you wish to embed. For instance, if you want to direct users to a website, select the "URL" option and paste the web address.
- Setting Size: Opt for a larger size for your QR code, such as "XL." This is crucial because it provides more pixels, which are essential for detailed editing and manipulation in Photoshop without significant loss of quality.
- Generating the Code: Once you've entered your content and selected the size, click the "Generate" button. The platform will then produce your QR code, typically as a downloadable image file.
- Saving Your Code: Right-click on the generated QR code image and save it to your computer. It's advisable to name it descriptively. You will likely receive a
.pngfile, which is a versatile format suitable for editing in Photoshop.

The Role of Adobe Express
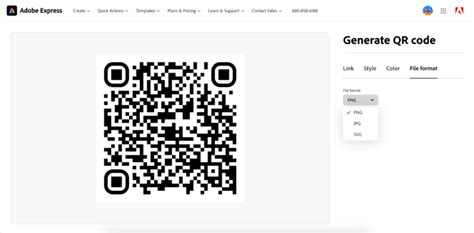
For those seeking a streamlined and integrated approach, Adobe Express offers a free QR code generator. This tool is part of a larger creative suite designed for ease of use, eliminating the need to download separate applications.
- Accessibility: Adobe Express allows you to create QR codes directly from your mobile device or computer's web browser.
- Customization: The platform enables personalization of QR codes to match brand aesthetics or personal styles, including changes to colors and styles.
- Template Integration: Adobe Express provides thousands of expertly designed templates for various projects, such as social media posts, flyers, and presentations. You can easily add a generated QR code to these templates to enhance their functionality.
- Content Versatility: QR codes can be created to highlight different categories of content, including videos, campaigns, landing pages, brochures, work examples, and feedback pages. A common use case is to include a download link for a PDF version of a flyer or brochure.
- Longevity: A significant advantage of using Adobe Express is that your generated QR codes do not expire, ensuring your content remains accessible over time.
- Ease of Use: The online editor offers features like generating color palettes for your QR code and adding custom frames for visual appeal and recognizability. You can even incorporate your brand logo using a drag-and-drop editor.
Preparing Your QR Code in Photoshop
Once you have your QR code image file, the next step is to import it into Photoshop and prepare it for editing.
Importing and Color Mode Adjustment
- Open in Photoshop: Launch Adobe Photoshop and open the saved QR code image file.
- Change Color Mode: The first crucial step is to adjust the color mode. QR codes are often generated in RGB, but for print or specific design workflows, converting to CMYK might be necessary. Navigate to
Image > Modeand select your desired color mode. For general editing and web use, RGB is usually sufficient. For print, CMYK is often preferred.
Resizing and Layer Management
- Initial Resizing: If you have a general idea of the final size for your QR code, you can adjust it immediately. Go to
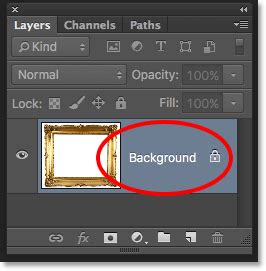
Image > Image Size. Here, you can specify the dimensions (e.g., 5x5 inches) and resolution (e.g., 300 dpi, which is standard for print). - Unlocking the Background Layer: By default, imported images often come with a locked background layer. To enable editing, double-click on the "Background" layer in the Layers panel and press "Return" (or "Enter") to convert it into a regular layer. This is essential for manipulating the QR code's elements.
Customizing and Integrating QR Codes
This is where the creative process truly begins. Photoshop offers a powerful suite of tools to alter, enhance, and composite QR codes into your designs.
Selecting and Copying QR Code Elements
- Targeting Specific Colors: To isolate the QR code's pattern for manipulation, you can use the
Select > Color Rangecommand. Click on the black areas of the QR code. - Handling Variations: If the selection process yields shades of gray or incomplete coverage, use the eyedropper tool with the "+" icon. Click around the QR code to add similar shades to your selection until you have captured all the black elements.
- Copying the Selection: Once the black areas are accurately selected, you can copy them (
Edit > CopyorCtrl/Cmd + C). This isolates the QR code's pattern from its background.
Artistic Integration and Layering
The decision to incorporate a QR code into a design often stems from a creative impulse. Consider the context and purpose. For instance, a QR code could be part of an artistic statement about privacy, embedded into a digital artwork, or used to link to additional information about a piece.
- Pasting onto a Background: With your QR code pattern copied, you can now paste it onto another image or background. If you have a background image open in Photoshop, simply paste the copied QR code (
Edit > PasteorCtrl/Cmd + V). It will appear as a new layer. - Creating a QR Code Layer with No Background: After copying the black elements of the QR code, you have effectively created a layer of the QR code pattern without its original background. This allows for seamless placement over other visuals.
Advanced Layering Techniques: Clipping Masks
Clipping masks are an excellent way to confine an image or layer's visibility to the shape of another layer. This is particularly useful for integrating a QR code into a specific area of a background image.
- Duplicate Background: Duplicate your background photo layer.
- Sandwich the QR Code: Arrange the layers in the Layers panel so that your QR code layer is positioned between the original background layer and the duplicated background layer.
- Create the Clipping Mask: With the top (duplicated background) layer active, hold down the
Option(orAlt) key. Move your cursor between this top layer and the QR code layer. Your cursor will change to two intersecting circles. Click to create the clipping mask. The content of the top layer will now only be visible within the bounds of the QR code layer.
How to create a Clipping Mask in Photoshop | Adobe Tutorial
Adding Backgrounds and Logos
- New Background Color: To ensure sufficient contrast, you might want to add a solid background color behind your QR code. Create a new layer below your QR code layer and use the Paint Bucket tool to fill it with a color. White is often a safe choice for high contrast.
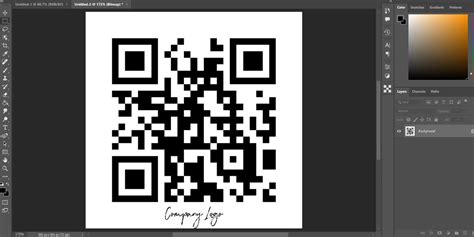
- Incorporating a Logo: For branding purposes, you can place your logo in the center of the QR code. Ensure the logo is not too large, as it can interfere with scanability. A common practice is to use a solid background behind the logo if its colors might blend with the QR code pattern.
Ensuring Scanability and Effective Design
While creative customization is important, the primary function of a QR code is its ability to be scanned reliably. Several factors influence this.
The Importance of Contrast and Quiet Zones
- High Contrast: The most significant factor for scanability is high contrast between the QR code's pattern and its background. Cameras need a clear distinction to read the data. Ideal color combinations include black on white, deep navy on cream, or dark green on pale beige.
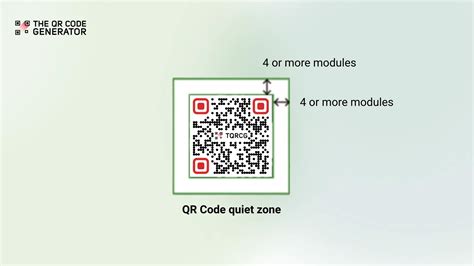
- Quiet Zone: The empty border surrounding a QR code, known as the "quiet zone," is not optional. It provides essential "breathing room" for scanners to recognize the code's edges. Avoid placing text, icons, borders, or busy patterns too close to the code.
Data Density and Error Correction
- Data Density: The more information encoded into a QR code, the denser and more complex its pattern becomes. This can sometimes slow down scanning, especially on older camera models.
- Error Correction: QR codes have built-in error correction, which allows them to be scanned even if partially damaged or obscured. However, higher levels of error correction can also increase data density.
- Balancing Act: The key is to balance the amount of information with the need for scanability. Treat scanability as non-negotiable.
Avoiding Common Pitfalls
- Busy Backgrounds: Placing QR codes directly over busy photo backgrounds can severely hinder scanning. If your design features a textured or complex image, consider isolating the QR code within a clean, solid-colored shape (like a white square) that includes a clear quiet zone.
- Distortion: QR codes rely on precise geometry. Stretching, squashing, tilting, or wrapping them can break the scanner's ability to read the pattern. If placing on a curved surface, use the flattest panel available or consider alternative methods like hang tags.
- Color Customization Risks: While you can customize colors, always prioritize dark-on-light combinations. Be cautious with gradients; ensure contrast remains strong across the entire code.
- Transparency Issues: Transparent QR codes overlaid on images might look good in mockups but can fail in real-world scanning scenarios due to varying print conditions and lighting.
Testing and Deployment
Before a QR code is finalized, rigorous testing is essential.
Real-World Scanning Tests
- Device Variety: Test your QR code on a range of mobile devices, including both iPhones and Android phones, and ideally, a mix of newer and older models.
- Print Testing: Designs that look perfect on a screen can sometimes be distorted when printed. Print out a test version of your design and attempt to scan the QR code.
- Destination Experience: Verify that the destination page loads quickly, is mobile-friendly, and presents the intended action or information immediately. Slow loading times or a poor user experience can lead to distrust and fewer subsequent scans.
Considerations for Placement and Size
- Scan Distance: The farther away a user is expected to scan the code, the larger the QR code needs to be. A code on a distant billboard requires significantly more size than one on a business card.
- Contextual Design: Adapt QR code design to its placement. A poster might need higher contrast and larger size than a product insert.
- Call to Action: Include a clear "Scan to…" line near the QR code to inform users of what they can expect upon scanning.
By understanding the generation process, leveraging Photoshop's editing capabilities, and prioritizing scanability through careful design and testing, you can effectively integrate QR codes into your projects, creating engaging and functional links between the physical and digital realms.