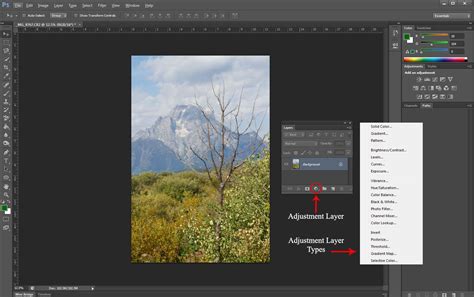
In the world of portrait photography, Adobe Photoshop stands as a powerful tool to transform good images into great masterpieces. Our journey through the realm of retouching and enhancement begins with a comprehensive understanding of Photoshop’s robust feature set. As we explore the vast capabilities of Photoshop, we delve into layer manipulation, skin retouching methods, and the intricate task of hair and background editing. Adjusting color and tone becomes an essential step in our process, ensuring that each portrait conveys the desired mood and aesthetic. When we open Adobe Photoshop, our journey in enhancing portrait photography begins. First, let's ensure our workspace is set up effectively. Before making any changes, always duplicate the background layer by pressing Ctrl+J (Cmd+J on Mac). Remember, the key to professional-looking portraits lies in moderation. As we proceed, we’ll look to strike a balance between realism and aesthetic improvement.
The Foundation of Non-Destructive Editing: Layers and Masks
When we edit portraits in Photoshop, layers are the foundation of our workflow. By creating a new layer, we isolate adjustments without affecting the original image. This non-destructive approach is paramount for professional results.
- New Layer for Healing: To heal imperfections, we add a new layer and utilize tools like the Spot Healing Brush. This is done non-destructively, as changes are made on the new layer, leaving the original intact. This allows for easy adjustments and revisions without fear of permanently altering the source image.
- Layer Masks for Precision: Layer Masks are powerful tools allowing us to apply changes to specific areas. For instance, if we adjust skin tone, a mask can limit this to just the skin, leaving other details like hair or clothing unchanged. This granular control ensures that edits are targeted and natural-looking.
- Smart Objects for Transformative Edits: For adjusting facial features, transforming a layer into a Smart Object lets us apply filters like Liquify non-destructively. This means that the Liquify filter's effects can be re-edited or removed at any time without degrading image quality. Using layers and masks allows us to maintain the integrity of our work, tweak adjustments on the fly, and achieve professional results.
Refining Facial Features with Precision
In portrait photography, refining facial features is key to creating a memorable image. Photoshop offers a suite of tools to subtly enhance these elements, ensuring the subject's natural beauty shines through.
- Enhancing the Eyes: Eyes are the focal point of any portrait. With the Face-Aware Liquify tool, we can enlarge or reduce the size of the eyes, raise or lower the height, and adjust the tilt to convey the desired emotion. Subtle adjustments here can dramatically impact the portrait's expressiveness.
- Shaping the Brows: Brows also play a critical role in expression. While not explicitly detailed in the provided text for direct manipulation, their prominence in framing the eyes means that any work on the eyes can indirectly influence the perception of the brows.
- Sculpting the Nose: Adjusting the nose involves subtle shaping to align it with the subject’s natural contours. Using the Face-Aware Liquify tool, we modify the width of the nose bridge and nostrils to enhance the nose's appearance without distorting the face's proportionality. The goal is to achieve a more balanced and aesthetically pleasing nose that complements the overall face.
- Defining the Mouth and Lips: The mouth and lips hold the power to change the portrait's mood. We use the Face-Aware Liquify tool to refine the mouth's width and height, giving a slight lift to the corners to suggest a smile or adjusting them for other expressions. This allows for fine-tuning the subject’s expression to match the intended narrative of the photograph.
- Subtle Jawline Definition: For details that make a portrait stand out, we rely on techniques like dodging and burning. The Burn and Dodge tools are our allies for defining the jawline, adding subtle shadows and highlights to sculpt and enhance the facial structure.

Achieving Flawless Skin: Retouching Techniques
In portrait photography, skin retouching is a critical step to achieving a polished look in our final images. The key is to remove imperfections while preserving the natural texture and character of the skin.
- Blemish Removal: To remove blemishes, we commonly utilize the Healing Tool and the Healing Brush Tool. These tools work by blending the imperfection with the surrounding skin tones and textures. We zoom in on the portrait and carefully click on each blemish, allowing the Healing Tool to seamlessly blend the areas. For a more controlled approach, creating a new layer and sampling from the surrounding skin with the Healing Brush is a best practice. By hitting the Alt or Option key, we sample a clean area and then paint over the blemish on the new layer, ensuring the original image remains untouched.
- Smoothing Skin Texture with Frequency Separation: For smoothing skin texture while maintaining detail, we often start with Frequency Separation. This technique separates the skin texture from the color and tone information, allowing us to smooth out the skin's color layer without affecting the underlying texture. This is a highly effective method for achieving a natural, yet smooth, complexion.
- Correcting and Enhancing Skin Tone: Adjusting the Skin Tone can be done using various adjustment layers. We focus on achieving a uniform skin tone while preserving the natural shadows and highlights. Using the Curves and Hue/Saturation adjustment layers, we can correct color inconsistencies and enhance the overall skin tone. For instance, a Hue/Saturation adjustment layer, masked to affect only the skin, can be used to subtly shift colors or reduce saturation in specific areas.
- Addressing Under-Eye Concerns: To tackle under-eye darkness or puffiness, a common technique involves creating a new layer, setting its blend mode to Overlay or Soft Light, and filling it with 50% gray. Then, using a soft-edged brush with low opacity (around 20-30%), we can paint with white to lighten the under-eye area or with black to add subtle shadows, contouring and defining. The opacity of this layer can be adjusted to achieve a natural look.
Photoshop Tutorial | Advanced Skin Retouching Techniques
Meticulous Hair and Background Editing
When it comes to hair editing, our focus is on maintaining texture while making the hair look well-groomed and natural. For backgrounds, the goal is to ensure they complement the subject without distracting.
- Hair Grooming: To do this, we often make use of the Healing Brush and Clone Stamp tools to remove stray hairs and fill in gaps. For more intricate work, like separating hair from its background or dealing with fine hair textures, we employ techniques like layer masks and refined selections. The Clone Stamp tool, for example, allows us to sample a clean area of hair and then paint over stray strands, effectively removing them.
- Background Enhancement: We pay close attention to backgrounds, as they frame and complement the subject. The Liquify filter can be strategically applied to adjust elements in the backdrop without compromising the integrity of the portrait. When replacing or adjusting the background, it’s essential to match the new backdrop’s blurriness and color temperature with the subject to ensure a cohesive look. This might involve applying a Gaussian Blur to the background to match the depth of field of the foreground subject or adjusting its color balance to harmonize with the portrait.
The Art of Color and Tone Adjustment
In portrait photography, mastering color and tone adjustments is crucial for achieving a pleasing aesthetic and true-to-life results. These adjustments breathe life into the image and set the mood.
- Color Correction: We often begin by correcting any color imbalances in our image. This can involve using the White Balance tool in Camera Raw Filter or adjustment layers like Hue/Saturation and Selective Color.
- Hue/Saturation Adjustment: We adjust the hue to correct color casts and change overall color tones. For example, if the image has a green cast, we can adjust the Hue slider for greens or introduce a complementary magenta tone.
- Selective Color Adjustment: For more control, we manipulate individual color channels. This allows for precise adjustments to specific colors within the image, such as making the blues in the eyes more vibrant or adjusting the reds in the lips.
- Contrast and Depth: Contrast is vital for adding depth and dimension to a portrait. By adjusting contrast, we accentuate the differences between lights and shadows, adding depth. This can be achieved with the Contrast slider in Camera Raw or by creating an S-curve in a Curves adjustment layer. Pulling down the blacks slightly and lifting the highlights can add punch without crushing details.
- Toning for Mood: Beyond basic corrections, toning can dramatically alter the mood of a portrait. Using Curves adjustment layers, we can target specific color channels (Reds, Greens, Blues) to introduce subtle color shifts. For instance, increasing reds in the highlights can add warmth, while increasing blues in the shadows can create a cooler, more cinematic feel. Playing with the green channel can also introduce subtle variations, shifting towards magenta or green. The opacity of these toning layers can be reduced to ensure a subtle and sophisticated effect.
Advanced Techniques and Final Touches
The final stages of perfecting a portrait in Photoshop emphasize subtlety and precision, ensuring the final image is both polished and authentic.
- Puppet Warp for Subtle Adjustments: With the Puppet Warp tool, we gain granular control over facial features. By adding pins to specific areas of the face, we are able to meticulously rotate and adjust elements to perfect a subject's look. This can be used for very minor repositioning or subtle reshaping, always with the aim of maintaining a natural appearance.
- Dodging and Burning for Dimension: Dodging and burning, the age-old photographic techniques of lightening and darkening specific areas, can be non-destructively applied in Photoshop. Creating a new layer set to Overlay or Soft Light and filled with 50% gray allows for this. Using a soft brush with low opacity, we can lighten areas (dodge) to bring them forward and draw attention, or darken areas (burn) to create depth and shadow. This is particularly effective for defining cheekbones, the bridge of the nose, and under the eyes.
- Enhancing Eyes with Dodging and Burning: A favorite technique for many retouchers is to use dodging and burning to subtly enhance the eyes. Lightening the iris area can make the eye color pop and draw more attention to the subject's gaze. This should be done with extreme subtlety to avoid an unnatural look.
- Black and White Conversion for Artistic Effect: Sometimes, converting a portrait to black and white can create a timeless and dramatic effect. This can be achieved with a Hue/Saturation adjustment layer, simply by taking the saturation all the way down. For more control over the tonal range of the black and white image, a Black & White adjustment layer is preferred, offering sliders to control the luminance of individual color channels.
- Cleaning Up Fine Details: Even after major retouching, small imperfections can remain. Using a very small Healing Brush, sampling from clean skin, allows for the removal of minor blemishes or distractions like prominent veins, ensuring a smooth and flawless finish.
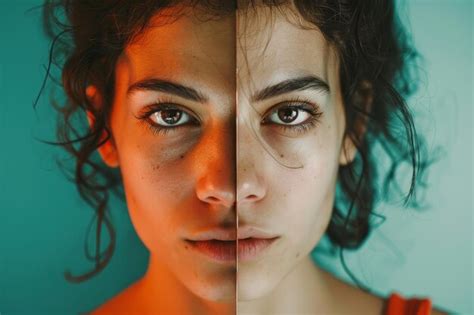
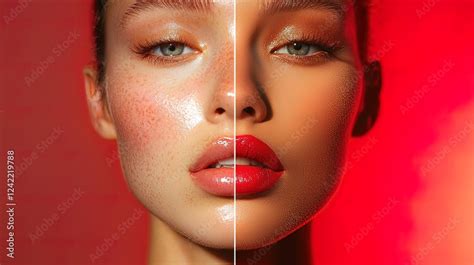
- Subtlety is Key: It’s crucial that the final touches both honor the subject’s natural features and align with the client's expectations. Professional edits often involve a combination of tools like the Liquify tool, Healing Brush, Clone Stamp, and frequency separation for skin textures. The philosophy followed here is to start big and go small, addressing overall toning and coloring first, then moving to larger blemishes and wrinkles, and finally onto smaller pores and stray hairs. Another philosophy to follow is to only retouch out things that are temporary, such as acne or bags under the eyes, rather than changing fundamental proportions. The goal is often a subtle “tune-up” that enhances the natural face, where the retouching is invisible unless you compare the before and after results.
Exporting Your Masterpiece
In the final stages of perfecting a portrait in Photoshop, it's essential to ensure our work is showcased at its best.
- Choosing the Right File Format: We usually save the file as a PSD (Photoshop Document) to preserve layers for future edits. This layered file is crucial for maintaining flexibility and allowing for revisions down the line.
- Exporting for Different Uses: Use 'Export As' or 'Save As' options through the File menu. 'Export As' allows more control over the final size and optimization of the image, enabling us to choose between formats like JPEG for web use or TIFF for high-quality printing, and to manage compression levels.
Frequently Asked Questions in Portrait Editing
During the process of portrait editing in Photoshop, several common questions arise regarding specific techniques and tools.
- Reshaping the Jawline: We often use tools like the Liquify filter’s ‘Push Left’ tool to subtly push up from the edge of the chin and neck. The Burn and Dodge tools are also used to define the jawline, adding subtle shadows to enhance its contour.
- Realistic Facial Feature Adjustments: Yes, the Face-Aware Liquify feature allows us to make adjustments to facial features with realism. It's designed to understand facial anatomy and apply changes in a way that minimizes distortion.
- Nose Reshaping: We typically use the Liquify tool for reshaping noses. With the 'Forward Warp' tool, one can push and pull specific areas to subtly change the shape, for example, to straighten a slight curve or refine the tip.
- Comprehensive Professional Edits: Professional edits often involve a combination of tools like the Liquify tool, Healing Brush, Clone Stamp, and frequency separation for skin textures. These tools are used synergistically to achieve a polished yet natural result.
- Sharpening for Detail: We start by using subtle amounts of Unsharp Mask or Smart Sharpen. Over-sharpening can lead to an artificial look, so it's important to apply it judiciously, often after all other retouching is complete.
A Note on Philosophy and Approach
The philosophy followed here is to start big and go small. To deal with the largest areas first, such as overall toning and coloring. Then you move to large blemishes and wrinkles, then onto smaller pores and flyaway hair. Another philosophy I like to follow is only retouch out things that are temporary, such as acne, bags under the eyes, those kinds of things. I don’t change the proportions of facial features etc. I have seen too many retouched photos that don’t resemble the original person. So when we go to retouch a portrait photograph, what we want to do is just remember, start big and then go small. So what does that mean? Well, that means essentially we fix the biggest problems first and then, move on to the smallest ones.
Photoshop Tutorial | Advanced Skin Retouching Techniques
The Face Swap Technique
When all else fails, it’s Photoshop to the rescue. In this post, I am going to walk you through how to do a face-swap in Photoshop step-by-step.
- Choosing Compatible Images: First, you want to choose images that were taken at the same time in the same lighting. Of course, you can use another photo from a different time but the lighting will almost certainly be off and it will require you to do a lot more work and much more advanced Photoshop techniques. Edit the photos exactly the same.
- Layering and Masking: Now the fun begins. Right-click and choose “layer via copy”. This will create a new layer of just the face. Make sure the face layer is selected and click on the face. Once it is in place, make the face layer 100% opacity. Choose the face layer, and hit the camera-looking icon in the layer’s panel (this adds a layer mask). With the mask layer chosen, choose the brush tool and make sure black is the color. If you erase too much, no worries, you can switch to white to bring parts back. So there you have it, step-by-step of how to do a face swap in Photoshop!
For those of us seeking more detailed guidance on these steps, we highly recommend a video tutorial from Phlearn.