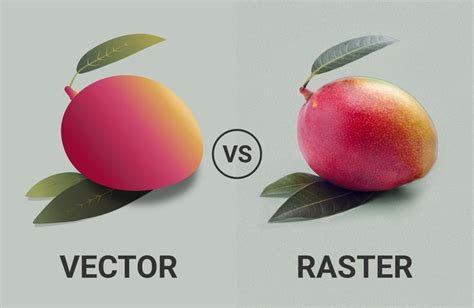
Two-dimensional digital images are broadly categorized into two types: vectors and rasters. Understanding the fundamental differences between these formats is crucial for any digital artist or designer. Raster images, often referred to as bitmap images, are composed of a fixed grid of pixels. When you zoom in or out of a raster image, these pixels remain the same size, which can lead to a noticeable degradation in quality, resulting in a blurry or pixelated appearance. In contrast, vector images are constructed from mathematical equations that define geometric shapes, lines, and curves. This mathematical foundation allows vector graphics to scale infinitely without any loss of quality; they always remain crisp and clean, regardless of the viewing size. This inherent scalability makes them exceptionally popular and valuable assets in graphic design and digital arts, particularly for elements that need to be resized frequently, such as logos, icons, and other graphical elements that must look good in a variety of contexts.
While Adobe Photoshop is primarily renowned as a raster graphics editor, it offers a surprising array of tools and techniques that can be leveraged to create and work with vector-based imagery. This capability is incredibly useful for artists and designers who are already proficient in Photoshop and wish to incorporate vector elements into their workflow without necessarily adopting a specialized vector graphics program like Adobe Illustrator, which is the go-to Adobe Creative Cloud application for true vector art. The process of converting an image into a vector format within Photoshop often involves transforming raster data into paths, which are the fundamental building blocks of vector graphics.
The Core Concepts: Vector vs. Raster
To truly appreciate how to create vector art in Photoshop, it's essential to grasp the underlying principles that differentiate vector and raster graphics.
Raster Graphics: The Pixelated Foundation
Raster images, such as digital photographs and paintings, are essentially a mosaic of tiny colored squares called pixels. Each pixel has a specific location and color value. When you enlarge a raster image, Photoshop must guess what colors to fill in the new pixels, leading to interpolation and a loss of detail. This is why a low-resolution photograph, when printed large, will appear jagged and blurred. The quality of a raster image is tied to its resolution - the number of pixels per inch.
Vector Graphics: The Mathematical Canvas
Vector graphics, on the other hand, are defined by mathematical equations. Imagine a circle: in a vector format, it's not a collection of pixels approximating a circle, but rather a command that says "draw a circle with a radius of X at position Y with color Z." This mathematical description means that the software can redraw the shape at any size and at any resolution, always maintaining perfect clarity. This is achieved through the use of paths, which are essentially lines with defined anchor points. These anchor points allow for precise manipulation of curves and shapes.
Harnessing Photoshop's Vector Capabilities
Although Photoshop's primary function is raster manipulation, it provides several ways to create and export vector-based elements. These methods are particularly effective for simpler graphics like logos, icons, and geometric shapes.
Method 1: Creating Vector Masks from Selections
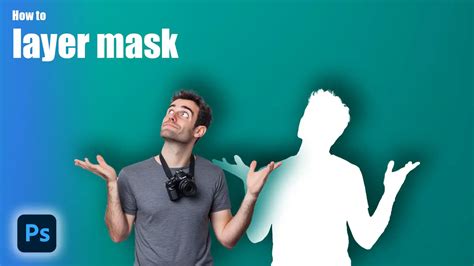
One of the most direct ways to introduce vector properties into Photoshop is by utilizing the vector mask feature. This method is excellent for isolating subjects and preparing them for vectorization.
- Isolate Your Subject: Begin by selecting the part of the image you wish to vectorize. Photoshop offers a variety of selection tools for this purpose. If you need to select a rectangular area, the Rectangular Marquee tool is ideal. For selecting areas based on color similarity, the Magic Wand tool can be useful. For more complex shapes, the Pen Tool is indispensable, offering precise control over curves and edges.
- Create a New Layer: Once you have made your selection, copy the selected area and paste it onto a new layer. This ensures that your subject is isolated from the background and any other elements in the original image.
- Apply a Vector Mask: With your subject on its own layer and the selection active, navigate to the Layers panel. Click on the "Add Layer Mask" icon at the bottom of the panel. Photoshop will then create a vector mask based on your selection. This mask defines the visible area of the layer using vector paths.
- Refine and Edit: The vector mask can be further refined using Photoshop's vector tools. You can edit the anchor points and paths to achieve the desired shape with precision.
- Exporting as Vector: While the mask itself is vector-based, to export the entire image as a vector file, you'll need to save it in a compatible format. Go to
File > Save Asand select "Photoshop EPS" as the file type. EPS (Encapsulated PostScript) is a vector format that Photoshop can export, preserving the vector data of your mask.
Method 2: Converting Selections to Paths and Saving as SVG
The Scalable Vector Graphics (SVG) format is a web-standard for vector images. Photoshop can export SVGs, though it's important to understand the limitations.
- Prepare Your Image: Before you begin, it's advisable to prepare your image. For optimal results, set the image resolution to 300 pixels per inch using the
Image > Image Sizewindow (Ctrl + Alt + I or Cmd + Alt + I). - Isolate the Subject: As with the previous method, separate the element you want to vectorize from its background. This can be done using any of Photoshop's selection tools.
- Create a Work Path: With your selection active, you can convert it into a "work path." Right-click inside the selection and choose "Make Work Path." You'll be prompted to set a tolerance value, which determines how closely the path will adhere to the contours of your selection. A lower tolerance creates a path that follows the selection more precisely, while a higher tolerance allows for smoother, more generalized curves.
- Convert to a Shape Layer (Optional but Recommended): For a truly editable vector object within Photoshop, it's best to convert your path into a shape layer. You can do this by creating a new "Fill Layer" or "Adjustment Layer" from the Layers panel, choosing "Solid Color," and then using the path to define the shape of this new layer. This effectively creates a vector shape on its own layer.
- Export as SVG: Once your vector shape is ready, you can export it. Right-click on the layer containing your vector shape and select "Export As." In the export options, choose "SVG" as the file format. This will generate a resolution-independent SVG file.
It's important to note that Photoshop's SVG export is best suited for relatively simple graphics. Complex effects, layer styles, and blurs may not translate perfectly into the SVG format. For intricate vector designs, dedicated vector software is still the preferred choice.
How To Convert a PNG To Vector in Photoshop
Method 3: Leveraging Photoshop Actions for Automatic Vectorization
For those seeking a quicker, more automated approach, Photoshop actions can be a valuable tool. These pre-recorded sequences of commands can transform your images into vector-like graphics with a single click.
There are numerous Photoshop actions available, both free and paid, designed to convert images into vector art or even cartoon styles. These actions often employ techniques similar to those described above, automating the process of selection, path creation, and color simplification.
- Find and Install an Action: Search online for "Photoshop vector actions" or "Photoshop cartoonify actions." Once you've found an action you like, download and install it into Photoshop.
- Prepare Your Image: For best results with automated actions, it's often beneficial to prepare your image beforehand. This might involve adjusting contrast, sharpness, or simplifying colors. Some actions may also have specific requirements for the input image.
- Run the Action: Open your desired image in Photoshop, navigate to the Actions panel (
Window > Actions), select the vector action you want to use, and click the "Play" button. - Review and Refine: The action will run, and your image will be transformed. While these actions can produce impressive results quickly, they may not always yield perfect outcomes, especially with complex imagery. You might need to manually refine the resulting vector shapes or colors.
It's worth noting that while these actions can create visually vector-like results, the underlying data might still retain some raster elements depending on the action's complexity. However, for creating stylized graphics or icons rapidly, Photoshop actions are a powerful shortcut.
The Benefits of Vectorizing Your Art
The decision to vectorize an image, whether for a logo, an illustration, or any other design element, comes with significant advantages:
- Scalability: As previously discussed, vector graphics are infinitely scalable. This means a logo designed in a vector format can be used on a tiny business card and a massive billboard without any loss of crispness or detail.
- Editability: Vector paths are made of editable points and curves. This allows for easy modification of shapes, colors, and proportions. Changing a color in a vector logo is a simple task, unlike recoloring a raster image where you might have to redraw or adjust multiple pixel areas.
- Smaller File Sizes (Often): For simple graphics like logos and icons, vector files are often smaller than their raster counterparts. This is because they store mathematical descriptions rather than pixel data. However, for highly complex vector illustrations with many intricate paths and gradients, file sizes can increase.
- Clean Lines and Sharp Edges: Vector art is characterized by its clean, sharp lines, which are ideal for print production, digital displays, and animation.
Understanding the Nuances: Photoshop's Vector Data
It's crucial to understand how Photoshop handles vector data. When you create vector shapes or use vector masks in Photoshop, the software embeds this vector information within a raster image file. This means that a Photoshop document (.PSD) containing vector elements is still fundamentally a raster file.
The EPS and PDF Dilemma
When you save a file from Photoshop in formats like EPS or PDF, it often contains both raster and vector data. The vector paths will scale crisply, but if the image also contains raster elements (like gradients or effects applied to shapes), those raster parts will still be resolution-dependent. This means that if you scale up a Photoshop EPS in another application like Adobe InDesign, the vector edges will remain sharp, but any embedded raster data will still be subject to pixelation.
The True Vector File
A "true" vector file, such as those created in Adobe Illustrator, CorelDRAW, or Inkscape, contains only vector data and zero raster data. These files are 100% resolution-independent. Photoshop does not natively create these types of files. While it can export EPS and SVG, these exports are essentially the vector elements contained within a raster context.
The Role of Shape Layers
Within Photoshop, shape layers are the closest you get to working with native vector objects. As long as your artwork is composed entirely of shape layers and you do not merge or rasterize them, you can scale the original .PSD file up and down within Photoshop, and the vector elements will remain perfect and unpixelated.
Advanced Techniques for Complex Vectorization
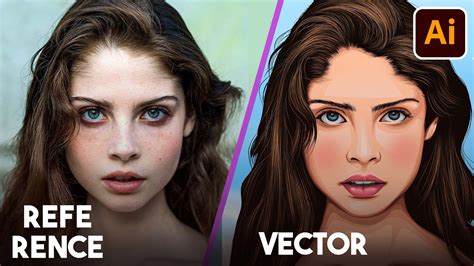
For more intricate images, such as portraits or detailed illustrations, the process of vectorization in Photoshop becomes more of a manual redrawing task, requiring significant skill and patience.
The Manual Redrawing Approach
This method involves using Photoshop's vector tools, primarily the Pen Tool, to meticulously trace over the original image, creating new vector paths for each shape and color.
- Choose Your Image Wisely: Select a high-resolution image with clear details. A minimum of 600x600 pixels is recommended to allow for sufficient zoom and detail work.
- Posterize for Guidance: As a helpful guide, you can use the
Image > Adjustments > Posterizefunction to simplify the image into a limited number of color tones. This posterized layer can serve as a visual blueprint, but it's crucial not to create your vector art directly from it. Use it only as a reference. - Isolate and Define Base Colors: Begin by isolating the main subject and identifying the dominant color areas. You'll often start by creating shape layers for the base colors.
- Master the Pen Tool: The Pen Tool is your most important asset here. Practice creating smooth curves and sharp corners by clicking and dragging anchor points. Set your Pen Tool to "Shape Layers" mode in the options bar.
- Build Layer by Layer: Create a new shape layer for each distinct color and shape. This meticulous process involves tracing outlines, filling them with color, and then building up subsequent layers for highlights, shadows, and finer details.
- Focus on Details: Pay close attention to elements like eyes, hair, and textures. For instance, when creating eyes, consider their reflective qualities and use multiple layers with varying opacities to achieve a semi-lifelike appearance. Never use pure white for eyeballs, as it often looks unnatural.
- Organize with Layers and Groups: As your artwork grows, use layer groups to organize different elements (e.g., "Hair," "Eyes," "Skin"). This will keep your Layers panel manageable.
- Compare and Refine: Regularly toggle the visibility of your original image or posterized guide layer to compare your vector creation with the source. This helps ensure accuracy and allows for necessary adjustments.
This manual method is time-consuming and requires a good understanding of Photoshop's tools, but it yields highly detailed and customizable vector art. Some artists have even created incredibly complex vector portraits in Photoshop using hundreds of layers, demonstrating the software's potential when used with dedication.
Alternatives and Considerations
While Photoshop can be used for vector creation, it's important to acknowledge its limitations and consider alternative workflows.
Adobe Illustrator: The Dedicated Vector Program
For any serious vector work, especially complex illustrations, logos with intricate details, or typography-heavy designs, Adobe Illustrator remains the industry standard. Its entire architecture is built around vector graphics, offering a far more robust and intuitive experience for creating and manipulating vector paths, gradients, and effects.
Photoshop Express and Photoshop on the iPad
It's worth noting that some simplified versions of Photoshop, such as Photoshop Express and Photoshop on the iPad, currently do not offer features for vectorizing images. Their focus tends to be on photo editing and simpler graphic manipulations.
The "Hybrid" Workflow
Many designers adopt a hybrid workflow, using Photoshop for its powerful raster editing capabilities (e.g., photo manipulation, digital painting) and then exporting elements or sections to Illustrator for vectorization and finalization. This approach leverages the strengths of both applications to achieve the best possible results.
Conclusion: Photoshop as a Vector Tool
In conclusion, while Photoshop is fundamentally a raster-based program, it provides viable methods for creating and exporting vector art, particularly for simpler graphics like logos and icons. By understanding the differences between vector and raster formats, utilizing tools like vector masks and shape layers, and exploring Photoshop actions, artists can effectively incorporate vector elements into their projects. For more complex vector endeavors, however, dedicated vector graphics software like Adobe Illustrator offers a more specialized and powerful environment. Ultimately, the choice of tool depends on the complexity of the project and the desired outcome, but Photoshop can certainly serve as a valuable stepping stone or a supplementary tool in the vector art creation process.