Photoshop offers a vast library of pre-installed patterns, and the internet abounds with downloadable designs. However, the true creative power lies in your ability to craft unique, repeating patterns from scratch. This tutorial will guide you through the process of creating your own custom patterns in Adobe Photoshop, transforming your designs into infinitely tileable textures for any project. We will explore the essential tools and techniques, from defining your artwork as a pattern to applying it across your designs, ensuring a seamless and professional finish.
The Foundation: Understanding Seamless Patterns
At its core, a seamless pattern is a block of artwork that can be repeated infinitely without any visible seams or interruptions. This concept is fundamental to various design applications, from digital textures and website backgrounds to textiles and product packaging. The key to achieving this seamless repetition lies in how the edges of your design interact when tiled.
Before the advent of tools like Photoshop's Pattern Preview, creating seamless patterns required manual calculation and precise offsetting of elements. Any element that extended beyond the edge of your canvas needed to be mirrored or continued on the opposite edge to ensure a continuous flow. This could be a meticulous and time-consuming process, especially for complex designs.
Preparing Your Artwork for Pattern Creation
The journey to creating a custom Photoshop pattern begins with defining the artwork that will form your repeatable tile. This design needs to be conceived with repetition in mind, ensuring that its edges align perfectly when tiled.
Designing Your Pattern Tile
You can start with a blank canvas and draw, paint, or add images and text directly. Alternatively, you can import existing artwork, such as scanned paintings or graphics from other files. Regardless of your source, the goal is to create a single, self-contained tile that, when duplicated, forms an unbroken visual flow.
For practice, starting with a simple element, like a dot placed in the center of your canvas, is an effective way to grasp the concept. As you become more comfortable, you can incorporate more intricate designs, including multiple elements, text, or even other images.
The size of your initial canvas will directly determine the size of each repeated element in your final pattern. Therefore, it's crucial to choose dimensions that suit your intended use. For large-scale products or high-resolution digital applications, a larger canvas (e.g., 3000px x 3000px or even 12,000px x 12,000px for maximum flexibility) is recommended. For smaller projects or initial practice, a more modest size will suffice. Always ensure your canvas is a perfect square for straightforward repetition.

Digitizing and Layering Your Elements
If your artwork originates from analog sources like paintings, the first step is to digitize it and remove any white paper backgrounds. This ensures that only your artwork is incorporated into the pattern. Subsequently, each individual element you plan to use in your pattern should ideally be placed on its own separate layer. This granular control makes it significantly easier to reposition, resize, and manipulate elements during the arrangement process.
To isolate elements onto their own layers, you can use selection tools like the Lasso Tool (L), particularly the Polygonal Lasso, to select an element. Once selected, cut the element (Cmd+X or Ctrl+X) and then paste it in place (Cmd+Shift+V or Ctrl+Shift+V). This action places the copied element onto a new, independent layer without altering its original position.
Converting Layers to Smart Objects
For enhanced flexibility and non-destructive editing, it's highly recommended to convert each element layer into a Smart Object. A Smart Object is essentially a container that preserves the original image data of a layer, allowing you to transform, scale, or rotate it multiple times without degrading its quality. To convert a layer to a Smart Object, right-click on the layer in the Layers panel and select "Convert to Smart Object" from the context menu. You can identify a Smart Object layer by the small icon that appears on its thumbnail in the Layers panel.
The Magic of Pattern Preview
Photoshop's Pattern Preview tool is a revolutionary feature that simplifies the creation of seamless patterns by providing a live, tiled preview of your design as you work. This eliminates the guesswork and manual effort previously required to ensure perfect repetition.
Activating Pattern Preview
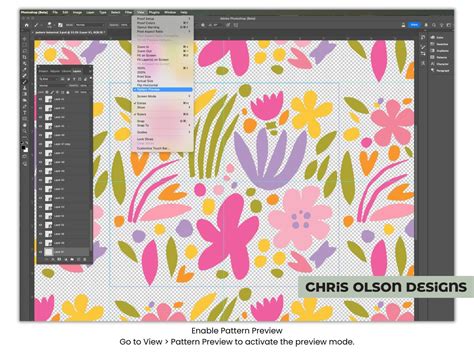
To enable this powerful tool, navigate to View > Pattern Preview in the top menu bar. A pop-up message will explain the feature; simply click "OK." Your canvas will now appear to be tiled infinitely across your screen, allowing you to see how your design repeats in real-time.
Arranging Your Elements with Pattern Preview
With Pattern Preview active, you can begin arranging your digitized and layered elements. Ensure that the "Auto-Select" option is enabled in the Move Tool options (keyboard shortcut: V). This allows you to click on an element and have it automatically selected in the Layers panel, facilitating quick repositioning.
When arranging elements, a strategic approach can lead to more cohesive and visually appealing patterns. A common workflow is to start with the largest elements, placing them strategically across the canvas. Then, incorporate medium-sized elements to fill in the spaces, followed by smaller elements to add detail and refine the composition. The goal is to create a fluid and organic look where the transitions between tiles are imperceptible.
As you move elements, you'll observe their mirrored appearances on adjacent tiles due to the Pattern Preview. For instance, if a portion of an element is cut off at the top edge of your canvas, you'll see its continuation at the bottom edge of the tile below. This visual feedback is crucial for ensuring that edges align perfectly.
Duplicating and Transforming Elements
To create variations and fill your pattern space efficiently, you can duplicate elements. Select an element and use the keyboard shortcut Cmd+J (Mac) or Ctrl+J (Windows) to copy it onto a new layer.
Transforming your elements adds further depth and interest. Use the Transform tool (keyboard shortcut: T) to access the bounding box around an element, allowing you to resize, rotate, or skew it. Flipping elements horizontally or vertically can also introduce asymmetry and prevent the pattern from appearing too uniform.
Pattern Fills: How to Scale and Transform Patterns in Illustrator
Defining and Saving Your Pattern
Once you are satisfied with the arrangement of your elements and are confident that the design will repeat seamlessly, it’s time to define it as a pattern in Photoshop.
The "Define Pattern" Command
Navigate to Edit > Define Pattern. This action prompts you to name your new pattern. Choose a descriptive name that will help you identify it later. Click "OK" to save the pattern to your Photoshop library.
Organizing Your Patterns
As you create more patterns, your Patterns menu can become cluttered. To maintain organization, you can create custom groups or subfolders for your patterns. In the Patterns menu, click the folder icon located in the bottom-left corner. You will then be prompted to name your new group. Drag and drop your custom patterns into these folders to keep your workspace tidy.
Renaming and Deleting Patterns
If you need to change the name of a saved pattern, locate it in the Patterns menu, right-click on it, and select "Rename." To remove unwanted patterns, simply select them and click the trash can icon at the bottom of the Patterns menu.
Applying Your Custom Pattern
With your custom pattern saved, you can now apply it to any document within Photoshop.
Using the Paint Bucket Tool
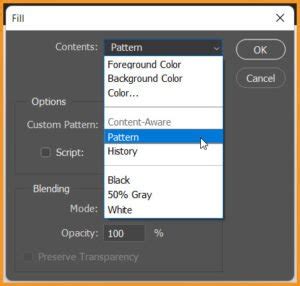
Select the Paint Bucket Tool (G). In the top toolbar, change the "Fill" option to "Pattern." A dropdown menu will appear, allowing you to select your newly created pattern from the Pattern Picker. Click anywhere on your canvas to fill it with your pattern.
Applying as a Pattern Fill Layer
For more control and non-destructive editing, you can apply your pattern as a Pattern Fill Layer. Go to Layer > New Fill Layer > Pattern. In the Pattern Fill settings, you can select your pattern, adjust its scale using the Scale slider, and even rotate it. This method allows you to easily modify the pattern's appearance after it has been applied.

Beyond Photoshop: Alternative Pattern Creation Tools
While Photoshop is a powerful tool for pattern creation, several other applications and online services offer specialized features or simplified workflows.
- Adobe Illustrator: Illustrator's dedicated Pattern Tool (
Object > Pattern > Make) provides a vector-based approach to pattern design, which can be advantageous for scalability and crisp lines. - Procreate (iPad): This popular drawing app on the iPad features a straightforward canvas tiling option, making it intuitive to create repeating designs directly on a tablet.
- Online Tools: Websites like Patterninja, PatternPad, and Adobe Capture offer user-friendly interfaces for generating complex patterns, often requiring less technical expertise than dedicated design software.
Advanced Techniques and Considerations
While the core process of creating a Photoshop pattern is relatively straightforward, several advanced techniques can elevate your designs.
Utilizing Layer Styles
Effects like drop shadows, gradient overlays, and blending modes can add significant visual appeal to your pattern elements. However, when considering manufacturing or print production, it's crucial to consult with your manufacturer about their capabilities and limitations regarding these effects. Some effects might not translate well to certain production methods.
Cleaning Up Your File
Before finalizing a pattern and defining it, taking a few extra minutes to clean up your file can prevent future issues. This might involve ensuring elements are perfectly aligned, removing stray pixels, or consolidating layers where appropriate.
Understanding the Offset Filter (Pre-Pattern Preview Method)
Although Pattern Preview is the modern and preferred method, understanding the Offset Filter (Filter > Other > Offset) is still valuable. This filter allows you to manually shift your artwork horizontally and vertically by a specified amount. By offsetting your pattern by half of its width and height, you can check for seamlessness and make adjustments where elements meet across the edges. This was the primary method for ensuring seamlessness before Pattern Preview.
Conclusion
Mastering the art of creating custom patterns in Photoshop opens up a world of creative possibilities. From intricate illustrations to simple graphic motifs, the ability to design infinitely repeating textures empowers you to personalize your projects and create truly unique visual assets. By understanding the principles of seamless design, leveraging tools like Pattern Preview, and organizing your workflow, you can transform your ideas into professional-quality patterns that enhance any design.
The process, while seemingly complex initially, becomes intuitive with practice. Don't let the software's depth intimidate you; the fundamental steps to define a pattern are easily accomplished. The true art lies in the design itself - in creating artwork that flows harmoniously when repeated. With these techniques, you are well on your way to becoming a proficient pattern designer in Photoshop.