Cropping an image in Adobe Photoshop is a fundamental yet powerful technique that extends far beyond simply resizing a photo. It's an essential part of the photo editing workflow, allowing for creative adjustments to composition, focus, and overall visual impact. Whether you aim to straighten a skewed horizon, eliminate distracting background elements, or achieve a specific aspect ratio for print or web, understanding the nuances of Photoshop's crop tools is paramount. This guide will delve into the various methods and considerations for effectively cropping and manipulating your canvas in Photoshop, catering to users from novice to advanced.
The Versatile Crop Tool: More Than Just Cutting
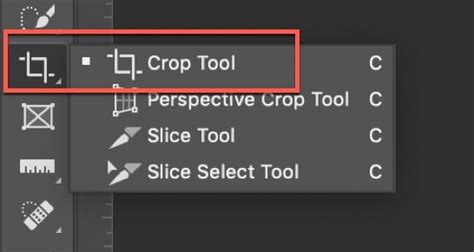
At its core, the Crop Tool (shortcut 'C') is your primary instrument for adjusting the boundaries of an image. However, its functionality is multifaceted, enabling precise control over composition and aspect ratio.
Selecting and Framing Your Image
The process begins with selecting the Crop Tool from the Photoshop toolbar. Once active, a bounding box with handles appears around your image. You can then frame your photo by dragging these corner handles to define the portion of the image you wish to retain. This interactive process allows for intuitive adjustments to composition, enabling you to shift focus and draw attention to specific subjects while removing unwanted areas.
Fine-Tuning Composition and Focus
There are all kinds of reasons to crop an image. You might need to straighten a photo, resize your canvas, or shift focus and composition. Sometimes you might want to crop out a distracting object in the background or give the image more vertical or horizontal emphasis. The Crop Tool is instrumental in achieving these goals. By dragging the handles, you can effectively "cut away" extraneous parts of the image, thereby changing the composition and highlighting your intended subject. This is particularly useful to focus on a portion of the photo, while removing distractions.
The Straighten Tool: Correcting Imperfect Angles
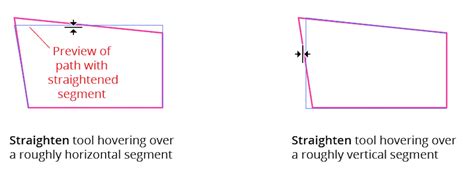
It can be challenging to perfectly straighten an image with precise lines, like a horizon or a tall building. Camera shake or shooting from an angle can lead to off-kilter results. In cases like these, the Straighten tool, accessible within the Crop Tool's options, becomes invaluable. To use it, simply draw a line along an edge that should be straight, such as a horizon or a vertical building. Photoshop will then subtly adjust the cropped area to correct these off-kilter angles, ensuring your image has a professional and balanced appearance. For instance, to align horizontally, draw a horizontal line along an edge. To align vertically, draw a vertical line along an edge.
Precise Cropping with Aspect Ratios and Dimensions
When it comes to cropping in Photoshop, you can be as precise as you want to be. If you need to crop an image to a specific size, you can do it in Photoshop. The Crop Tool allows for exact measurements, which is crucial for print or specific digital formats.
In the tool options bar at the top, you can change the option to "W x H x Resolution." This enables you to input your desired width, height, and resolution values. For example, to crop to an 8x10 inch format for printing, you would type "8 in" for width and "10 in" for height. If you don’t enter anything in the resolution field, it will just set an aspect ratio without any resolution. For resolution, enter the desired final resolution. For print, it’s usually 300ppi (DPI printed). For online, 72 is common. Now, when you change the crop area, it stays locked at the specified aspect ratio, ensuring your final image meets your precise requirements.
Alternatively, you can select the "Ratio" preset to maintain a specific aspect ratio without defining exact dimensions. This is useful when you want to preserve the relative proportions of your image for different platforms or layouts.
Beyond Cropping: Manipulating the Canvas
While the Crop Tool is primarily associated with removing image areas, it also possesses the remarkable ability to expand the canvas, effectively adding space around your existing image. This feature can be used to create borders, accommodate new elements, or simply adjust the overall dimensions without discarding any of the original image content.
Extend Image Background in Adobe Photoshop Tutorial for beginners
Expanding the Canvas with the Crop Tool
Think the Crop Tool is only for cropping images? So far in this series on cropping images in Photoshop, we've seen several examples of how the Crop Tool is used to crop away unwanted areas of an image. But a lesser-known feature of the Crop Tool is that it can also be used to add more canvas space around an image, giving us a quick and easy way to add a decorative border around a photo!
To add extra space around an image, select the Crop Tool. Instead of dragging the handles inward to crop, drag them outward. Photoshop will then expand the size of the canvas to match the new size of the crop border. Initially, this added space will appear as a checkerboard pattern, signifying transparency.
Controlling Canvas Expansion
When expanding the canvas, you have granular control over how the space is added. You can drag individual handles to add space on specific sides. To add an equal amount of space on opposite sides simultaneously, press and hold the Alt (Windows) or Option (Mac) key while dragging a handle. This ensures symmetry in your canvas expansion.
Furthermore, to maintain the original aspect ratio of your image while adding canvas space, press and hold Shift + Alt (Windows) or Shift + Option (Mac) as you drag any of the corner handles outward. This method allows you to enlarge the canvas uniformly while preserving the image's proportions.
Filling the Expanded Canvas
Once you've expanded the canvas, the transparent areas need to be addressed. When you commit to the crop with an expanded canvas, Photoshop will prompt you to choose a color to fill the new space. This can be done through the Color Picker, allowing you to select any hue. Alternatively, you can sample a color directly from your image using the eyedropper tool that appears when you hover over the image with the Color Picker active. This is particularly useful for creating seamless borders that complement the existing image tones.
The added space appears as a new layer. To use it as a border, you'll typically move this new fill layer below your image layer in the Layers panel. You can then apply layer styles, such as drop shadows, to the image layer to create depth between the photo and its new border.
Advanced Cropping and Canvas Manipulation Techniques
Photoshop offers specialized tools and commands for more intricate canvas adjustments and cropping scenarios.
The Perspective Crop Tool
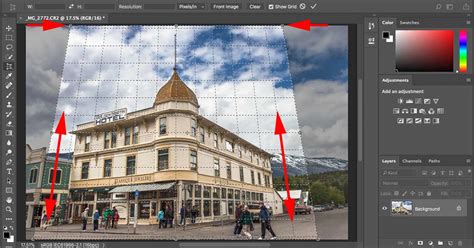
The Perspective Crop tool is designed to correct distortion in images, particularly those shot from an unusual angle or with wide-angle lenses. It allows you to transform the perspective of an image while cropping. You define a bounding box and then adjust its corners to align with the vanishing points of the perspective in your image. Photoshop then re-renders the image to correct the distortion, effectively creating a "straightened" perspective view. This is incredibly useful when dealing with architectural photography or scenes where converging lines are a concern.
The Cookie Cutter Tool
For creative and unconventional cropping, the Cookie Cutter tool allows you to crop an image into a predefined shape. After selecting the Cookie Cutter tool, you can choose from a variety of shapes in the Options bar. Dragging the selected shape over your image will crop it to that specific form, enabling unique presentations for social media, graphic design projects, or artistic endeavors.
Adjusting Canvas Size Directly
While the Crop Tool can expand the canvas, the "Canvas Size" command (Image > Canvas Size) offers more direct control over the dimensions of your entire workspace. This command allows you to precisely input new width and height values for the canvas. You can choose to anchor the expansion or contraction from a specific point within the image. Crucially, this command can also be used to trim the canvas, effectively cropping away parts of the image if the new canvas dimensions are smaller than the current image dimensions. When increasing canvas size, you can select a background extension color, or let Photoshop fill it with the current background color or transparency.
Dividing Scanned Photos
If you've scanned multiple photos into a single image file, Photoshop provides a command to automatically divide and straighten these individual images. Select Image > Divide Scanned Photos. This feature works best on images with clearly delineated outlines and a uniform background, simplifying the process of separating and organizing multiple captured moments from a single scan.
Understanding Canvas vs. Image Size
It's important to distinguish between "canvas size" and "image size." The canvas is the total editable area of your image document, including any transparent or background areas. The image size refers to the dimensions of the pixel data itself. The Crop Tool primarily manipulates the image size by discarding pixels. The Canvas Size command, on the other hand, alters the dimensions of the canvas without necessarily removing pixels (unless you are trimming the canvas).
When you crop an image, the areas that fall outside the crop boundary are typically discarded. However, with the Crop Tool, you can also choose to "Delete Cropped Pixels" or uncheck this option. If unchecked, the cropped-away areas are retained but hidden, allowing you to revert to the original image dimensions later if needed. This non-destructive approach is a cornerstone of efficient Photoshop workflow.
By mastering these tools and techniques, you can elevate your image editing capabilities, transforming ordinary photographs into compelling visual narratives with precise control over composition, dimension, and aesthetic appeal.