DaVinci Resolve's Color page is an incredibly powerful tool for creative and artistic color manipulation, capable of profoundly impacting the mood and narrative of a scene. Whether you are a student, an online creator, or a seasoned professional Hollywood colorist, you will discover hundreds of artistic tools within an intuitive, node-based interface that makes color experimentation both fast and exciting. The software supports a vast array of formats, including wide color gamut and HDR images, complemented by DaVinci's renowned 32-bit image processing, ensuring high-quality, professional results.
The Foundation: Primary Color Correction
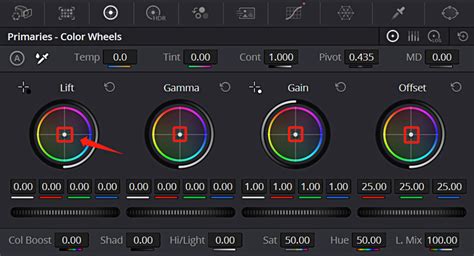
The initial step in any color correction process is balancing the color. This is achieved using the primary correction tools, situated in the lower-left section of the interface. Primary tools exert influence over the entire image, allowing you to adjust brightness and color levels to eliminate unwanted tints and establish a neutral starting point. Each color wheel is mapped to a distinct tonal range within the image. You can directly adjust the color of a specific range by clicking and dragging within its respective wheel, and then modify its overall level using the master dial situated below. This palette also offers adjustment controls, primary bars, and log controls. The primary color wheels enable you to fine-tune balance and brightness across overlapping tonal ranges known as lift, gamma, and gain - also commonly referred to as shadows, midtones, and highlights. The primary palette is equipped with exceptionally potent primary adjustment controls that facilitate rapid adjustments to image contrast, saturation, hue, temperature, tint, midtone detail, color boost for shadows, highlights, and much more. These are indispensable creative tools that will be utilized daily. For instance, the "midtone detail" control allows for contrast adjustments in areas with significant edge detail, thereby enhancing or reducing image definition or sharpness. "Color boost," also known as vibrance, intelligently targets areas of an image with low saturation, resulting in a subtle and more natural-looking enhancement of color. As an alternative to the primary wheels, the primary bars offer a method for making more nuanced adjustments to individual color channels and luminance. The log grading wheels provide more precisely defined tonal ranges for shadows, midtones, and highlights compared to the primary wheels.
Ensuring balanced and matched shots is crucial for achieving visual consistency across content generated by different cameras. DaVinci Resolve provides auto-balance tools to quickly achieve this for a group of similar shots. A simple click on the "auto color" button, located at the left of the color wheels palette, will balance the color and contrast of the selected shot. Furthermore, you can match the color between different shots. Select a clip, then right-click on another clip and choose "Shot Match to This Clip" from the context menu. Resolve will then match the color, contrast, and brightness of the clip you are currently working on to the one you have selected.
Sculpting Color with Curves
While the primary wheels offer broad control, curves provide a means to sculpt the color and contrast of an image with significantly finer detail. Curves can be accessed by clicking on the first icon in the center palette. Each curve allows for the adjustment of a customizable region of the image based on hue, luminance, or saturation. The default "custom" curves enable independent adjustment of red, green, blue, and luminance curves, while simultaneously displaying a live histogram to guide your adjustments. Additionally, there are five specialized curves that allow you to select one attribute, such as hue, and modify another aspect of it, such as luminance or saturation. Curves enable adjustments to luminance and color based on user-defined tonal areas. The "Hue Vs Hue" curve is excellent for subtly altering elements that require minor adjustments; it allows you to change any hue to any other hue. The "Hue Vs Sat" curve enables you to modify the saturation of any specific hue within the image. The "Hue Vs Lum" curve permits you to adjust the lightness of elements belonging to a particular color. The "Lum Vs Sat" curve is used to increase or decrease saturation in different tonal areas of the image with a smooth falloff. Finally, the "Sat Vs Sat" curve is employed to adjust a specific range of saturation without affecting the rest of the image.
Precision Targeting: Secondary Grading and Power Windows
The process of selecting a specific area for color correction is referred to as "secondary grading." For instance, you might wish to alter the color of a shirt without impacting the rest of the image. The qualifier palette allows you to select and adjust a portion of an image based on its hue, saturation, or luminance. To initiate this, click the eyedropper tool in the toolbar and then click and drag within the viewer to select the desired area. The selection will be highlighted in the hue, saturation, and luminance strips. Clicking the magic wand icon in the viewer will display the selection, or "key." While qualifiers target an image area based on color, luminance, or saturation, Power Windows enable you to define a selection by drawing shapes around specific objects within a scene. Upon clicking the Power Window icon, the palette presents various geometric shapes, along with a pen tool and a gradient tool. Select the icon for your desired shape, and it will appear in the viewer. You can then use the on-screen controls to adjust its size, soften its edges, and position it precisely. Options for manually adjusting size, pan, rotation, softness, and more are also available.
The tracker feature allows for the automatic animation of Power Windows to follow moving objects within a scene. To access the tracker palette, click the crosshair icon in the toolbar. You will observe a playhead, along with options for analyzing the pan, tilt, zoom, rotation, and 3D perspective of the shot. With your Power Window still selected, choose the options that best correspond to the camera's movement, move the playhead to the beginning of the clip, and click the "track forward" button. The clip will be analyzed, and the Power Window will be automatically animated to follow the object in your shot.
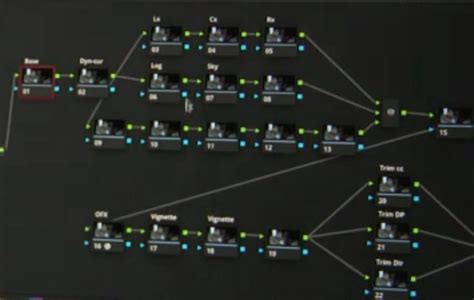
The Power of Nodes: Building Your Grade
Nodes are the fundamental building blocks of color correction within DaVinci Resolve. The initial node is typically allocated for image balancing, while subsequent nodes are reserved for more creative manipulations. For example, your first node might handle primary corrections, the second could isolate and enhance the sky, and a third node might be used to smooth out skin tones. Nodes offer the ability to create unique looks without compromising image quality, a significant advantage over layer-based grading workflows. The node editor, located in the upper right, functions like a flowchart. The image originates on the left and is processed through each color correction or effect node until it reaches the output on the right.
The Color page is equipped with a library of over 90 GPU and CPU accelerated Resolve FX plug-ins that can be utilized to enhance images and apply effects. These are organized by category within the Open FX library, found in the upper right section of the screen. The library includes a diverse range of blurs, color effects, glows, lens flares, vignettes, refinement and beauty tools, image restoration filters, sharpening tools, stylize options, texture effects, transformation tools, and warpers, all of which can be applied to any shot. To add an effect, simply drag it onto any node. The library will then switch to an inspector window, displaying the settings for that particular plug-in. You have the ability to adjust and keyframe various values in a manner similar to the Edit page.
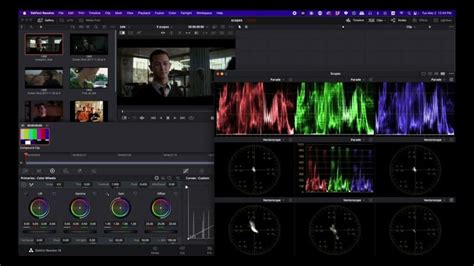
Objective Analysis: Professional Scopes
The inconsistent display of color across different screens, and even the varying interpretation by our eyes under different lighting conditions, necessitates objective tools for evaluating image data. Professional scopes provide a consistent method for this analysis. The scopes palette, located in the lower right of the screen, features five distinct scopes that offer objective tools for measuring and evaluating color within an image. These can be employed to check tonal ranges, adjust skin tones, balance footage, and match clips. The "parade" scope quickly reveals if one color channel is stronger than the others. Similar to the parade scope, the "waveform" displays luminance and color values overlaid on top of each other at the current frame. The "vectorscope" monitor presents a circular graph of your image data, representing its hue and saturation levels. The "histogram" provides a graphical representation of each channel's tonal distribution. The "chromaticity" scope assists in determining whether colors fall within the defined boundaries of your project's delivery format, as specified in the project preferences. For instance, when working in HD, colors that fall outside the Rec. 709 color space might require adjustment.
Streamlining Workflow: Gallery and Comparison Tools
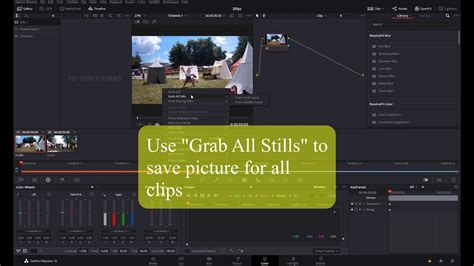
The "gallery" feature within the Color page allows for the organization, sharing, and reuse of grades, significantly accelerating your workflow. The most rapid method for copying a grade involves simply middle-clicking a clip in the film strip to copy its grade to the current shot displayed in the viewer. You can also save grades by right-clicking anywhere in the viewer and creating a "still." Stills can be organized into albums and are stored within the gallery, located in the upper left of the screen. The "Apply Grade" command provides the functionality to copy a saved grade to another shot. If you have a series of shots originating from the same camera, you can select them, right-click, and create a group.
Utilizing "wipe" and "split screen" modes within the viewer is an excellent approach for comparing shots. You can compare a sequence of clips within a scene against each other, against variations of grades in the gallery, or against different versions of grades within a single clip. Clicking on "image wipe" in the upper left of the viewer enables you to view frames from two different clips. Options at the top right allow for displaying wipes horizontally, vertically, mixed, as an alpha channel, as a difference matte, and even as a picture-in-picture. The "lightbox," which can be activated by clicking its icon in the upper right of the screen, displays every clip in your timeline as a thumbnail with its applied grades. This is an invaluable tool for observing how your shots appear side-by-side and for assessing the impact of the grade on the overall narrative. It also serves as an excellent method for spotting differences between shots or simply for identifying any clips that may have been overlooked. The zoom slider allows you to view a range of clips or the entire timeline. As the story progresses, you should observe the color palette and the mood of the grade being reflected in each scene. Any clip that "pops" out visually likely requires further attention.
Advanced Techniques for Specific Adjustments
The Color page boasts an extremely versatile and deep set of features designed to assist you in creating visually stunning images. Regardless of whether you are a video editor new to color grading, an aspiring colorist, or an experienced Hollywood colorist, you will find creative tools to express your artistic vision, alongside technical tools that help you work more efficiently and deliver the highest possible quality images. You gain access to a comprehensive color management system and support for the latest HDR formats, complete with tools specifically engineered for high dynamic range work. DaVinci Resolve Studio features the world's most advanced tools for grading wide color gamut and high dynamic range (HDR) images. HDR grading is made possible through 32-bit image processing, industry-standard HDR output, and Resolve Color Management. You benefit from Dolby Vision, HDR10+, and new HDR Vivid metadata palettes, HDR mode node adjustments, HDR colorspace transforms supporting ST.2084 and HLG tone mapping, and HDR monitoring utilizing built-in scopes.
Modern digital cinema cameras are capable of capturing 13 to 19 stops of dynamic range, presenting an incredible potential for producing imagery that closely mimics human vision. However, extremely bright highlights or very dark shadows can pose challenges when attempting to balance them with traditional tools. The HDR palette allows for the precise addressing of different tonal ranges within an image, from shadows and highlights to super blacks and specular whites. You can also create new color wheels and define your own custom tonal ranges within each image, enabling you to adjust tonality and colors based on the media's unique requirements.
The standard curve tools allow for the creative sculpting of color and contrast in a variety of ways. The new "color warper" extends this capability further, enabling you to set a Hue vs. Hue color grade for specific saturations, thereby imparting a completely new feel to images. It also allows for warping color based on luminance, or brightness. When you access the color warper palette, you will see a web or grid display of all the hues and saturations present in an image. Simply select any hue or range of hues on either the web or directly within the image viewer, and then drag that range to another hue and saturation point on the web within the palette.
Working with RAW Footage and Specialized Tools
DaVinci Resolve is compatible with virtually all native camera RAW formats. This means you can work directly with files from the camera's sensor, rather than compressed pixel data. Simply select a RAW file and click the RAW icon located on the left side of the toolbar. The RAW palette provides complete control over highlight recovery, white balance, gamma, exposure, color temperature, tint, sharpness, and more. RAW image processing is entirely non-destructive and processes the clips before they enter the node editor. You are effectively re-interpreting the camera's original sensor data.
The "face refinement" tool within DaVinci Resolve Studio is capable of automatically detecting faces, creating masks for different facial features, and tracking them for you. This eliminates the need for manual isolation and tracking of individual facial parts, saving countless hours of work and allowing you to focus on the creative aspects of refining and retouching faces. Simply drag the face refinement plug-in from the library onto a node and click "analyze." Once the analysis is complete, use the sliders in the inspector window to sharpen and brighten the eyes, reduce under-eye bags, lighten the brow, smooth out the cheeks or forehead, add blush, color the lips, and more.
The "ResolveFX Beauty" plug-in features an "ultra beauty" mode that offers advanced control for corrective beauty work. Developed with input from professional colorists, this tool utilizes stronger filtering algorithms to produce more natural-looking results. Simply drag and drop the beauty effect onto a corrector node, and "ultra beauty" will activate as the default mode. You can easily address general imperfections with the smoothing parameter without affecting facial features, and then recover texture to achieve a result that truly complements the face.
Removing unwanted objects from a shot can be accomplished using a combination of Power Windows, tracking, and the "object removal" plug-in found in DaVinci Resolve Studio. The process begins by drawing a window around the object you wish to remove and tracking it. Next, add a new node and connect the alpha channel output from the tracked window to this new node. Finally, add the object removal plug-in and click the "scene analysis" button. The DaVinci Neural Engine then analyzes the shot, employing machine learning and AI to determine the most effective way to remove the object from the scene.
The "patch replacer" tool allows for the quick painting of image areas to clean them up. It functions similarly to an image clone or rubber stamp tool, copying pixels from one location to another. This is ideal for removing blemishes, painting out a piece of trash, or concealing a small mark in an otherwise clean shot. Simply drag the patch replacer from the plug-in library onto a node. Two on-screen controls will appear, indicating the area being cloned and the part of the image to which it is being applied. Adjust the position and size by dragging these on-screen controls. Other settings, such as shape, softness, and replacement detail, can be modified within the settings inspector. The RGB mixer allows for the adjustment of the presence of red, green, and blue within the…
To maintain consistency throughout a project, especially in music videos where a cohesive look is paramount, professionals employ several key strategies. One fundamental approach involves grading a single clip until the desired look is achieved. Then, by right-clicking on the video monitoring screen and selecting "grab a still," all nodes and adjustments are saved as a reference image that appears to the left of the monitor window. This "still" can then be applied to other clips by clicking and dragging it onto the master node of an untouched clip, effectively copying all the adjustments. It is common to generate several such stills throughout a project, as not all shots may benefit from the exact same adjustments.
Achieving professional-level consistency also requires careful consideration of the viewing environment. A controlled environment is essential, as the human brain is adept at adapting to visual stimuli. After approximately 20-30 seconds, your eyes will naturally adjust to the image on screen, subconsciously correcting for color casts. For example, if an image is too warm, your brain might adapt to perceive a white sheet as white, even though it has a yellow tint.
Furthermore, becoming overly granular with adjustments, such as employing numerous masks, power windows, and secondaries, can make consistency challenging and consume excessive time. When first starting, many colorists might use a primary grade and 3-4 secondaries per shot, particularly for news magazine-style content. Over time, this often reduces to a primary grade and perhaps only one secondary per shot.
Regularly checking your work in real-time is crucial. After performing a few grades, play back the footage at full speed. Continue grading and playing back periodically to catch any deviations before they become significant. It's important to remember that what appears technically correct may not always look right. Every element within an image is relative to its surroundings. For instance, a dark gray shirt against a white background might appear black due to the stark contrast, but if that same shirt is placed against a black background in the next shot, it will look dark gray. Even if you ensure the shirt has the identical shade of gray in both shots, the viewer might perceive a transformation from a black shirt to a gray shirt due to the surrounding context.
A recommended workflow for consistency involves identifying the most challenging shot within a scene - perhaps one with high dynamic range or mixed color lighting. Once this shot is graded, right-click and select all shots on the timeline, then load the saved grade. Individual shots may still require some minor touch-ups. To avoid altering foundational grades, it is advisable to add another correction node before making further adjustments.