In an era where digital clarity reigns supreme, there's a distinct allure in the imperfections of analog media. The VHS tape, a ubiquitous format of the late 20th century, possessed a unique visual signature characterized by its distortions, color shifts, and subtle degradation. This article delves into the art of replicating this nostalgic aesthetic within Adobe Photoshop, offering a step-by-step guide to achieve a realistic VCR effect that can imbue your digital images with a captivating retro vibe. Whether for a specific project requiring an authentic vintage feel or simply for the joy of creative exploration, understanding the mechanics behind the VHS look can unlock a powerful storytelling tool.
Understanding the VHS Aesthetic: From Magnetic Tape to Digital Emulation
The distinctive look of VHS tapes stemmed from the inherent limitations and characteristics of magnetic tape recording technology. As data was stored magnetically, the charge could degrade over time, leading to a variety of visual artifacts. These imperfections, once considered flaws, are now sought after for their nostalgic and artistic value. Common VHS traits include:
- Distortion and Warping: The physical movement of the tape through the VCR could cause the image to stretch, bend, or ripple, especially during playback functions like pause or rewind.
- Color Aberration and Shifting: Analog signals were susceptible to interference, resulting in color bleeding, banding, or distinct shifts in hue, particularly along the edges of objects.
- Noise and Grain: The magnetic recording process introduced a subtle, often visible, grain or "fuzz" to the image.
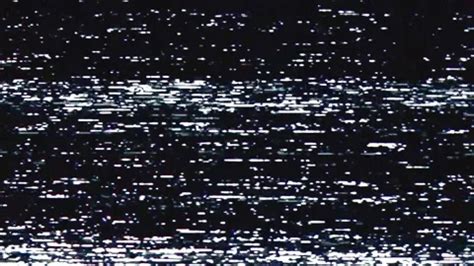
- Scan Lines and Interference: Older CRT television sets, commonly used with VCRs, displayed images in lines. This, combined with signal interference, could create the appearance of horizontal scan lines or static.
- Dropouts and Flickering: Occasional loss of magnetic charge on the tape could lead to brief moments of visual static, black frames, or flickering.
- Light Leaks and Rainbow Effects: Imperfect tape sealing or magnetic interference could sometimes manifest as colored light leaks or prismatic, rainbow-like distortions.
By understanding these elements, we can strategically apply Photoshop's tools to digitally reconstruct the analog charm of VHS.
Method 1: Building the VHS Effect with Photoshop's Built-in Tools
This method focuses on layering various Photoshop filters and adjustments to progressively build the VHS aesthetic. It offers a granular approach, allowing for fine-tuning of each artifact.
Step 1: Initial Setup and Smart Object Conversion
Begin by opening your chosen image in Adobe Photoshop. For optimal flexibility, it's crucial to convert your image layer into a Smart Object. Right-click on your image layer in the Layers panel and select "Convert to Smart Object." This allows you to apply filters non-destructively, meaning you can edit or remove them later without permanently altering the original image data.
Step 2: Softening the Image for a Lower-Quality Feel
VHS tapes were inherently lower quality than modern digital images. To mimic this, we'll introduce a subtle blur. Navigate to Filter > Blur > Gaussian Blur. Adjust the 'Radius' slider to introduce just enough blur to soften the image, removing excessive sharpness without making it appear completely out of focus. The goal is to reduce the pristine digital quality.
Step 3: Deconstructing and Distorting Color Channels
A key characteristic of VHS distortion is the misregistration of color channels. We will replicate this by duplicating the Smart Object layer multiple times and isolating specific color channels.
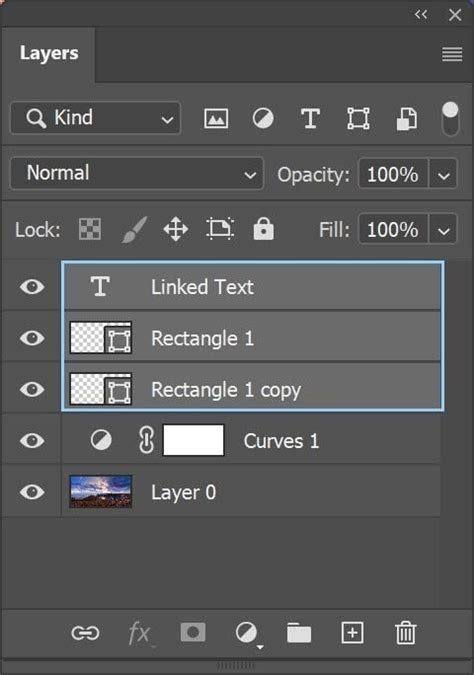
- Duplicate Layers: Duplicate your Smart Object layer four times.
- Naming Convention: Rename these layers for clarity: 'Original' (the bottom layer), 'Red', 'Green', and 'Blue'.
- Hiding the Top Layer: For now, make the topmost layer invisible. You'll use this for final composite effects later.
Now, let's isolate the color channels:
- Red Layer: Double-click the 'Red' layer to open the Layer Style window. Under 'Advanced Blending,' uncheck the 'G' (Green) and 'B' (Blue) boxes. This leaves only the Red channel visible for this layer. Click 'OK'.
- Green Layer: Repeat the process for the 'Green' layer, unchecking the 'R' (Red) and 'B' (Blue) boxes.
- Blue Layer: Similarly, for the 'Blue' layer, uncheck the 'R' (Red) and 'G' (Green) boxes.

Step 4: Applying Shear Distortion to Color Channels
With the color channels isolated, we can now introduce subtle distortions that mimic VHS tape movement.
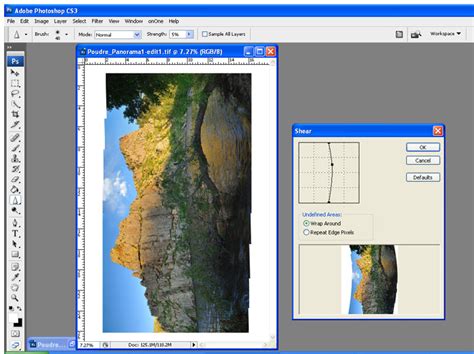
- Blue Layer Distortion: Select the 'Blue' layer. Go to
Filter > Distort > Shear. This filter allows you to warp the image along a curve. Add a few points to the graph and drag them to create a slight, wave-like distortion. Keep this distortion subtle, as you'll be applying similar effects to other layers. Click 'OK'. - Green Layer Distortion: Repeat the
Filter > Distort > Shearprocess on the 'Green' layer. Use different adjustments for the Shear distortion compared to the Blue layer. This variation is crucial for creating a more "glitchy" and less uniform look, which is typical of VHS. You should start to see color fringing or a slight misalignment at the edges of the image.
Step 5: Creating the "Glitch" Effect with Extreme Distortion
To simulate more pronounced VCR artifacts, we'll apply a more aggressive distortion to a dedicated layer.
- Visibility: Make the previously hidden top layer visible. This layer will serve as our primary glitch layer.
- Extreme Shear: Apply
Filter > Distort > Shearto this layer. This time, create a more extreme distortion. Experiment with the 'Undefined Areas' option (often set to 'Repeat Edge Pixels' or similar) to see which best suits your image. Click 'OK'.
Step 6: Masking for Targeted Distortion
The extreme distortion might not be desirable across the entire image. Layer masks allow us to selectively reveal or hide parts of a layer.
- Add Layer Mask: With the extreme distortion layer selected, click the 'Add Layer Mask' icon at the bottom of the Layers panel.
- Rectangular Marquee Tool: Select the Rectangular Marquee Tool. Draw a selection across a portion of the image where you want the glitch effect to be prominent.
- Fill with Black: Hold
Ctrl(Windows) orOption(Mac) and click on the layer mask thumbnail in the Layers panel. This allows you to directly edit the mask. With the selection active, set your foreground color to black and pressDelete(orCmd + Deleteon Mac) to fill the selected area with black on the mask. This will hide the distortion in that area. - Refine Selections: You can create multiple such selections to define specific blocks of distortion, mimicking the way VHS tapes would break up during rewinding or pausing. Hold
Ctrl(Windows) orOption(Mac) and click the layer mask again to return to the layer image view. You can further adjust the Shear filter on this layer to fine-tune the glitch intensity.
Step 7: Adding Noise for Analog Grain
A characteristic of analog media is its inherent noise. We'll add a layer of digital noise to simulate this.
- New Layer: Create a new layer above your distorted layers.
- Fill with Black: Fill this new layer with black using
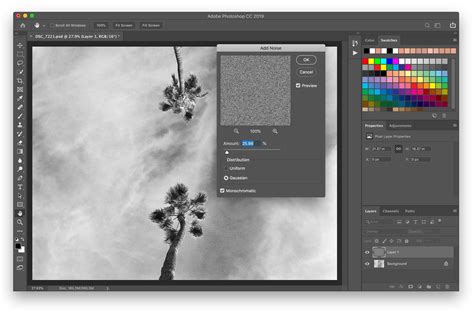
Edit > Fill(or by pressingShift + F5and selecting black). - Add Noise: Go to
Filter > Noise > Add Noise. In the dialog box, adjust the 'Amount' to a high value (e.g., 100%). Crucially, uncheck 'Monochromatic' to create color noise, which is more typical of VHS. Click 'OK'. - Blending Mode and Opacity: Change the blending mode of this noise layer to 'Screen' or 'Overlay'. Then, significantly reduce its opacity (e.g., to 20-30%) to create a subtle grain effect rather than an overwhelming layer of static. Experiment with other blending modes like 'Soft Light' for different textures.
Step 8: Simulating Scan Lines
The horizontal lines of CRT displays are a hallmark of the VCR look.
- New Document for Pattern: Create a new document with a small size, such as 1x10 pixels.
- Draw Scan Line: On a new layer, use the Rectangular Marquee Tool to select half of the canvas. Fill this selection with black. Deselect (
Ctrl + DorCmd + D). - Define Pattern: Go to
Edit > Define Pattern. Give this pattern a recognizable name, like "ScanLine." - Apply Pattern: Back in your main working document, create a new layer. Select the Fill Bucket Tool. In the top options bar, change the fill type to 'Pattern' and select the "ScanLine" pattern you just created. Click anywhere on the canvas to fill the layer with scan lines.
- Distort Scan Lines: Go to
Filter > Distort > Wave. Adjust the settings to create a slightly wavy or irregular pattern for the scan lines, making them appear less uniform. - Blending Mode and Opacity: Change the blending mode of the scan line layer to 'Screen' and reduce its opacity to achieve a subtle effect.
Step 9: Optional Enhancements: Text and Color Grading
To further enhance the VHS authenticity:
- Add Text: Use the Horizontal Type Tool (
T) to add text elements that mimic VHS recordings, such as dates, times, or channel information. Consider using a pixelated or digital-style font. If the text appears too sharp, apply a subtle blur or place the text layer below the noise layer for a dusty effect. - Color Grading: Add adjustment layers to fine-tune the colors. A Hue/Saturation adjustment layer can be used to increase saturation, a common characteristic of '90s VHS tapes. Levels or Curves adjustment layers can be used to crush shadows, giving a faded or matte appearance, and to warm up the overall tones. Experiment with emulating the color palettes of vintage film stocks from the era.
Step 10: Final Touches and Refinements
- Vignette: Add a subtle vignette to darken the corners of the image, simulating the light falloff of older lenses or CRT screens. This can be achieved using a Curves adjustment layer with a radial gradient mask or using a dedicated vignette filter.
- Copy Merged: For a final composite, you can select all layers, go to
Edit > Copy Merged, and thenEdit > Paste Special > Paste in Placeto create a flattened version of your effect. However, keeping layers separate allows for easier adjustments.
Method 2: Leveraging Boris FX Optics for Advanced VHS Emulation
For those seeking a more streamlined yet powerful approach, third-party plugins like Boris FX Optics offer dedicated tools for creating sophisticated visual effects, including the VHS look.
Step 1: Install and Access Boris FX Optics
Download and install the Boris FX Hub, then install the Optics plugin. Once installed, Optics will appear under the Filter menu in Photoshop.
Step 2: Prepare Your Document
Create a new Photoshop document and import your image. Convert the image layer to a Smart Object by right-clicking the layer and selecting 'Convert to Smart Object'. Duplicate this layer and rename the duplicate 'Optics'.
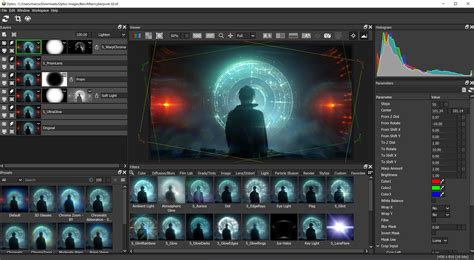
Step 3: Apply the Optics Filter
Select the 'Optics' layer and navigate to Filter > Boris FX > Optics. This will launch the Optics interface, with your image loaded into the layer panel.
Step 4: Utilizing the S_TVDamage Filter
The S_TVDamage filter within Optics is specifically designed to replicate VCR and TV artifacts.
- Add Filter: In the Optics interface, select the 'S_TVDamage' filter from the 'Stylize' category or by using the search function.
- Explore Presets: Optics offers a range of presets that can provide a good starting point. Look for presets labeled "VHS," "70s TV," "Fast Forward," or similar retro styles. You can then modify these presets to your liking.

Step 5: Fine-Tuning S_TVDamage Settings
The real power of S_TVDamage lies in its extensive parameter controls:
- TV Damage Mode: Choose between color or black-and-white VHS emulation.
- Distortion and Artifacts: Increase 'Reception Master' and 'Interference Amp' to add visual noise and glitches. 'Horizontal' and 'Vertical Hold' can simulate signal instability.
- Tape Dropouts: Adjust 'Tape Dropout Brightness' to introduce random visual interruptions.
- Vignette: Use 'Vignette Darkness' to darken the image edges.
- Detailed Controls: Dive into specific parameter groups to fine-tune scanline density, static noise, ghosting effects, color stripes, fast-forward distortions, and more.
- Color Correction: Under 'Color Correct,' increasing 'Saturation' can help achieve that distinct '90s VHS look.
- Lens Effects: Experiment with 'Fish Eye' to simulate the curvature of old TV screens or 'TV Pixel' to mimic lower resolutions.
- Time Parameter: Some filters in Optics have a 'Time' parameter. Adjusting this allows you to preview how the effect evolves over time, helping you find the optimal placement for artifacts.
Step 6: Applying the Effect
Once you are satisfied with the adjustments within Optics, click 'Apply' to save the changes and return to Photoshop.
Alternative Approaches and Considerations
Using Pre-made Templates
For a quick and effective solution, pre-made VHS effect templates are available on marketplaces like Creative Market. These PSD files often include placeholder layers where you can easily drop your own image. The heavy lifting of creating the complex layer stack is already done for you, essentially acting as an advanced filter.
Understanding the Underlying Principles
Regardless of the method used, understanding the core elements of the VHS look is key:
- Distortion Stacking: The VHS effect is often a combination of multiple, subtle distortions layered together.
- Noise and Grain: Adding film grain or digital noise is crucial for an authentic analog feel.
- Color Manipulation: Emulating the color shifts and saturation levels of vintage tapes is essential.
- Glitching and Pixelation: Intentionally introducing digital errors or pixelation can enhance the retro aesthetic.
Visualizing the Transformation
To fully appreciate the impact of these techniques, consider the before and after:
Before VHS Effect: A crisp, high-resolution digital photograph.

After VHS Effect (Method 1): The same photograph, now exhibiting subtle color fringing, a soft grain, slight image warping, and a hint of scan lines, evoking a nostalgic VHS playback.
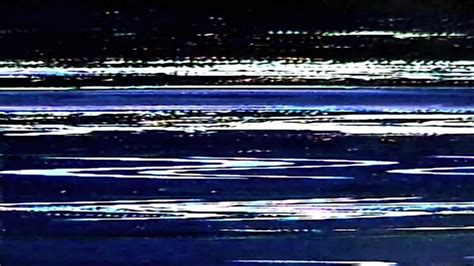
After VHS Effect (Method 2 with Optics): A more pronounced emulation of a heavily degraded VHS tape, potentially with stronger static, more extreme color banding, and simulated tape dropouts, as if pulled from a well-worn cassette.
Conclusion: Embracing Imperfection for Artistic Expression
Recreating the VHS effect in Photoshop is more than just applying filters; it's about understanding and appreciating the visual language of analog media. Whether you choose the meticulous layering of built-in tools or the efficiency of a dedicated plugin, the ability to imbue your digital images with the charming imperfections of old-school video opens up a world of creative possibilities. This technique allows for a powerful evocation of nostalgia, a unique storytelling device, and a testament to how even perceived flaws can be transformed into compelling artistic elements.