Procreate, a powerhouse application for digital art creation, offers unparalleled flexibility through its robust layer system. Layers are the fundamental building blocks of digital artwork, allowing artists to stack, manipulate, and refine individual elements of their creations without affecting others. This inherent modularity provides immense freedom for experimentation, enabling users to work in front of or behind existing elements of their painting. While Procreate offers a vast array of features for enhancing creativity, the ability to efficiently manage and delete layers is a crucial skill for maintaining an organized workflow, optimizing performance, and freeing up valuable digital real estate. This guide delves into the intricacies of deleting layers in Procreate, covering single layer deletion, bulk removal, and related layer management techniques, ensuring users can navigate their creative process with confidence.
The Foundation of Digital Art: Understanding Procreate Layers
Before diving into the specifics of deletion, it's essential to grasp the fundamental concept of layers in Procreate. Layers allow you to stack image elements on top of each other. They let you paint objects that overlap without altering work you've already done. By default, content on a layer is opaque and covers up the contents of layers underneath it. However, Procreate offers various ways the objects and colors on two layers can interact and blend, providing a rich spectrum of visual possibilities.
Procreate documents have a maximum number of layers that varies depending on your document size. This limit is a practical consideration, especially for complex projects or when working on devices with limited storage. Understanding this limitation underscores the importance of efficient layer management, including the judicious deletion of unnecessary elements.
Deleting a Single Layer: A Straightforward Process
The most common layer management task is deleting a single, unwanted layer. This process is designed to be intuitive and quick, allowing artists to streamline their workflow without interruption.
Step-by-Step Guide to Deleting a Single Layer
Access the Layers Panel: Begin by tapping the Layers icon, typically located in the top right corner of the Procreate interface. This action opens the Layers panel, which displays all the layers present in your current artwork.
Select the Layer: Within the Layers panel, locate the specific layer you wish to delete. Tap on this layer to highlight it. Your Primary layer will appear in the Layer's panel as bright blue.
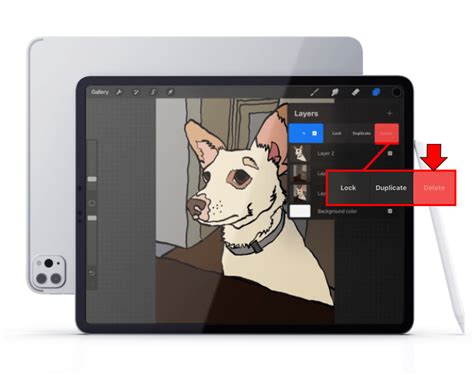
Initiate the Deletion: With the layer selected and highlighted, use your finger or Apple Pencil to swipe the layer to the left. As you perform this swipe, a red "Delete" option will appear to the right of the layer.
Confirm Deletion: Tap on the red "Delete" option. The selected layer will be immediately removed from your canvas.
It's important to note that you can Undo this action. If you accidentally delete a layer, you can quickly reverse the operation by tapping with two fingers on the canvas. This "Undo" gesture is a safety net, providing peace of mind during the editing process. However, you should generally think of deletion as permanent, so it's always wise to ensure you no longer need the layer before proceeding with the deletion.
Deleting Multiple Layers: Efficiency for Bulk Operations
For projects with numerous layers, deleting them one by one can be time-consuming. Procreate offers a streamlined method for deleting multiple layers simultaneously, significantly enhancing efficiency. This feature is particularly useful when clearing out placeholder layers, discarding experimental iterations, or cleaning up a project before export.
Selecting and Deleting Multiple Layers
Open the Layers Panel: As with single layer deletion, begin by opening the Layers panel.
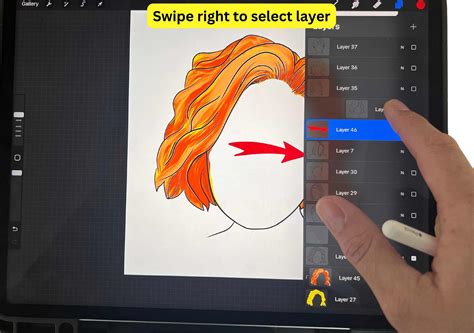
Multi-Selection Technique: To select multiple layers, you need to swipe right on each layer you wish to include in the bulk deletion. As you swipe right on a layer, it will be highlighted in a darker shade of blue, indicating it has been selected as a Secondary layer. You can tap on other layers to select them as well. Your Secondary layers will appear in the Layer's panel as dark blue.
Accessing Bulk Delete: Once you have selected all the desired layers, observe the top right-hand corner of the Layers panel. The "Delete" option will become active, indicating that you can now perform a bulk deletion.
Execute Bulk Deletion: Tap on the active "Delete" option. All the layers you have selected will be removed from your artwork simultaneously.
This method allows for rapid removal of unwanted elements, saving valuable time and effort, especially in complex workflows. Remember that this action, like single layer deletion, can also be undone with a two-finger tap.
HOW TO USE LAYERS IN PROCREATE FOR BEGINNERS: Procreate Tutorial for Artists✨
Managing Layer Groups: Deleting and Ungrouping
Procreate's layer grouping feature is instrumental in organizing complex artworks. Groups allow you to bundle related layers together, making the Layers panel more manageable. Consequently, managing these groups, including their deletion, is an integral part of the layer management process.
Deleting Layer Groups
Deleting an entire group of layers is a straightforward extension of the single and multiple layer deletion processes.
Locate the Group: In the Layers panel, identify the Layer Group you wish to delete.
Swipe to Delete: Swipe the Layer Group to the left. Similar to individual layers, a "Delete" option will appear.
Confirm Deletion: Tap the "Delete" option to remove the entire group and all its contained layers.
Ungrouping Layers
Before deleting a group, or if you simply need to reorganize its contents, you can ungroup layers.
Access Layer Options: Tap on the name of the Layer Group in the Layers panel.
Select Ungroup: A pop-up menu will appear. Tap on the "Ungroup" option to separate the layers within the group back into individual layers. These will then appear as separate entities in your Layers panel, no longer contained within the group.
This ability to ungroup allows for granular control over your layer structure, enabling you to modify or delete specific layers within a previously formed group without affecting other elements of your artwork. If you use Combine Down on a layer that sits directly above a Layer Group, it will merge the active layer with the entire group, applying any blending modes to the pixels below.
Advanced Layer Selection and Management Techniques
Beyond simple deletion, Procreate offers sophisticated tools for selecting and manipulating layers, which can indirectly aid in the deletion process by allowing for more precise targeting of content.
Layer Select
Layer Select is a powerful gesture-based feature that allows you to select layers directly from the canvas without needing to navigate the Layers panel extensively.
Enable Layer Select: To turn on Layer Select, navigate to Actions > Prefs > Gesture Controls > Layer Select. Here you can set up touch and Apple Pencil shortcuts to integrate Layer Select into your workflow.
Canvas Interaction: With Layer Select turned on, layer-specific content will be highlighted as you move your finger or Pencil around the canvas. Lift your finger or Pencil to select a highlighted layer.
Handling Overlapping Layers: If there is more than one layer on top of other layers in that area, a pop-up panel will appear indicating all the available layers for you to select. This pop-up panel allows you to choose the specific layer you intend to interact with.
Apple Pencil Pro Integration: Apple Pencil Pro users can assign Layer Select to the squeeze function in Gesture controls. This is a handy way to select layers of an artwork without touching the screen. Note that Squeeze can only be assigned to one gesture at a time.
Once a layer is selected using Layer Select, you can then proceed to delete it or perform other actions. Swipe right to select a Secondary Group, or tap to select a Primary Group. This allows you to use all Selection and Transform actions on the selected content. If you Paint, Smudge, or Erase with a group selected in the Layers Panel, Layer Select will appear, further enhancing context-aware operations.
Primary and Secondary Layer Selection
Understanding the distinction between Primary and Secondary layers is crucial for advanced manipulation.
Primary Layer: Your Primary layer will appear in the Layer's panel as bright blue. This is typically the layer you are actively working on or have most recently selected.
Secondary Layers: Your Secondary layers will appear in the Layer's panel as dark blue. These are layers you have selected in conjunction with a Primary layer for multi-selection or bulk operations.
As soon as youâve selected a Secondary layer, two new options appear on the top right of the Layers panel: "Delete" and "Group." This immediate availability of these options highlights how Procreate anticipates common workflows involving multiple selected layers.
Beyond Deletion: Other Essential Layer Operations
While deletion is a key aspect of layer management, Procreate offers a suite of complementary tools that work in tandem with it. Understanding these operations provides a holistic view of how to control and edit your artwork's structure.
Locking Layers
Protect a completed layer from accidental edits with "Lock." When you lock a layer, a small padlock symbol appears next to the layer name in the Layers panel. This prevents you from making any unintended changes to that specific layer, ensuring that finished elements remain untouched.
Duplicating Layers
Reproduce an existing layer with "Duplicate." This is invaluable for creating variations of an element, backing up a layer before making significant changes, or building complex textures by stacking duplicates.
Moving and Rearranging Layers
Tap-and-hold a layer or Layer Group to pick it up. Now you can drag it up or down in the layer order. This allows you to change the stacking order of your elements, bringing certain parts of your artwork to the foreground or sending others to the background. You can also touch-and-hold to pick up a layer, then tap other layers to pick them up as well, enabling you to move multiple layers as a unit.
Merging Layers
"Merge Down" combines the active layer with the layer directly below it. You can merge multiple groups with a simple Pinch gesture. Pinch together the top and bottom layers you want to merge. Merging layers will apply any blending mode to the pixels below. If you reach your layer limit, look through your layers for any you can merge together to free up space. This action can be undone immediately with a two-finger tap.
Renaming Layers
Layers added to your project have sequentially numbered titles by default. To keep your project organized, rename layers by tapping a layer to bring up Layer Options, then tap "Rename." Assigning descriptive names makes it easier to identify and manage individual layers, especially in complex projects.
Filling and Clearing Layers
- Fill Layer: This action will fill your entire layer with the currently selected color. If you have Alpha Lock on, you can use "Fill Layer" to color only the existing artwork on that layer.
- Clear: This action will clear the contents of the entire layer. Any further drawing or painting will only affect the existing artwork on that layer.
Layer Masks and Clipping Masks
Procreate offers non-destructive editing through Layer Masks and Clipping Masks.
Layer Mask: In Layers, tap your active layer to bring up Layer Options, then tap "Mask." The greyscale values of a Layer Mask hide and reveal the content of the layer beneath. Use brighter values to reveal more of the layer, and darker values to hide more. Use different grey values to modify the opacity of the content beneath in a non-destructive way.
Clipping Mask: A Clipping Mask functions like an Alpha Locked layer but isn't attached to a single specific layer. A Clipping Mask acts as a separate and distinct layer of its own. You can link Clipping Masks to any other layer. Because of this, you can move a Clipping Mask from one layer to another, or stack multiple Clipping Masks above a single base layer. Clipping Masks are a great way to modify your content non-destructively. If you don't like the result, remove it.
Conclusion: Empowering Your Creative Workflow
The ability to delete layers in Procreate is more than just a simple command; it's a fundamental aspect of efficient and effective digital art creation. Whether you are deleting a single layer to refine a detail or performing a bulk deletion to declutter a complex project, Procreate's intuitive interface ensures the process is seamless. By mastering these deletion techniques, alongside other essential layer management tools like locking, duplicating, moving, and grouping, artists can unlock greater creative freedom, maintain organized projects, and optimize their workflow for a more productive and enjoyable artistic journey. Deleting layers in Procreate is a useful option to have in your toolbox, allowing you to easily remove unwanted elements from your artwork, rearrange layers for easier access, and free up memory for larger projects. With a few simple taps and swipes, you can quickly and easily delete layers in Procreate and get back to creating your masterpieces.