Affinity Designer stands out as a potent vector design tool, and a significant part of its power lies in its versatile brush capabilities. While brushes are often associated with raster environments like Photoshop or GIMP, they hold a vital place within vector applications as well. This tutorial will guide you through the process of creating your own custom brushes in Affinity Designer, transforming your unique designs and shapes into dynamic tools for your workflow.
Understanding Vector Brushes in Affinity Designer
At its core, a vector brush in Affinity Designer is essentially a PNG image that is stretched or repeated along a defined path. This fundamental concept unlocks a world of creative possibilities, allowing you to imbue your vector artwork with intricate textures, custom patterns, and personalized stylistic elements. The process involves creating a design, exporting it as a PNG, and then re-importing it into Affinity Designer to be utilized as a brush.
Creating Your Own Custom Brushes
The journey to creating your own Affinity Designer brushes begins with a design. This can be anything from a simple sketch to a complex vector illustration, a piece of text, a raster image, or even a group of objects. For demonstration purposes, we will use a basic vector shape.
Step 1: Design Your Brush Element
Begin by selecting a shape tool, such as the star shape tool, and create your desired shape. You can fill this shape with any color you prefer; this color will be integral to the brush's appearance if you choose to create a "Textured Image Brush."
Step 2: Export Your Design as a PNG
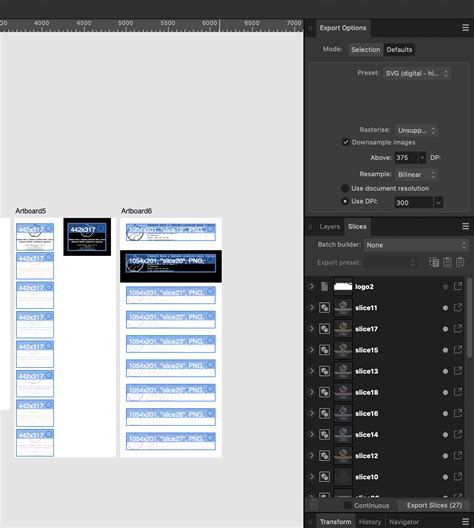
Once your design is ready, it's time to prepare it for brush creation. You will need to export it as a PNG image. To do this, navigate to the Export Persona. This can be accessed via the icon at the top of the screen that resembles a share button. Within the Export Persona, select the layer containing your object. Click the "create slice" button, typically found at the bottom of the slices panel. A light blue box will appear around your object, indicating that a slice has been created for export.
In the slices tab, expand the menu associated with your newly created slice by clicking the small arrow to its left. Ensure that PNG is selected as the file type and set the size to 1x. Then, click the small white icon located to the right of the slice name. This action will prompt you to choose a location and name for saving your exported PNG file.
Step 3: Import and Create Your New Brush
With your PNG file exported, return to the Designer Persona. Locate the Brushes tab, usually found in the top-right corner of your screen. Within the Brushes panel, click the menu icon on the right side and select "New Textured Image Brush."
It's important to understand the nuances between the different brush creation options:
- New Solid Brush: This creates a basic stroke brush without any inherent textures or colors applied.
- New Textured Intensity Brush: This option generates a brush stroke based on the opacity values of a raster image. It's ideal for creating brushes where transparency variations are key.
- New Textured Image Brush: This type of brush creates a stroke based on the color values of the original PNG file. This is the option to choose when you want your brush to retain the colors of your exported design.
After selecting "New Textured Image Brush," you will be prompted to choose your newly created PNG file. Once selected, your custom brush will appear in the Brushes panel, ready for use.
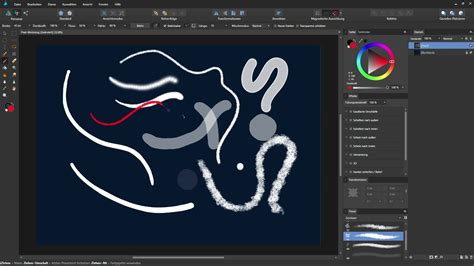
Step 4: Test Your New Brush
To test your creation, grab the Vector Brush Tool (keyboard shortcut: B). Select your newly made brush from the Brushes tab. As you draw on the canvas, a vector path will be created, precisely following your hand motion. This path can be further refined using the Node Tool (keyboard shortcut: A).
Step 5: Adjusting Brush and Stroke Properties
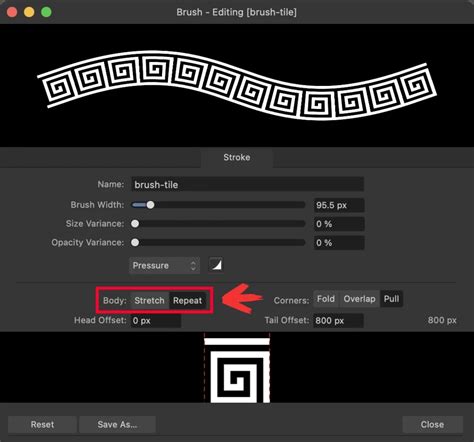
The true power of custom brushes lies in their adjustability. You can edit the properties of your brush by double-clicking or right-clicking it to open the Brush Editor. Here, you can significantly alter the brush's behavior.
- Brush Width: Controls the overall size or thickness of the brush stroke.
- Size Variance: Introduces variation in the brush's thickness, often thinning it out towards the end of a stroke.
- Opacity Variance: Creates a fade from opaque to transparent at the end of a stroke, adding a subtle depth.
Within the "Body" settings, you have two primary options for how your PNG image is applied to the stroke:
- Stretch (default): This setting causes your PNG image to stretch along the entire length of your brush stroke.
- Repeat: This setting will repeat the PNG image multiple times along the stroke, creating a patterned effect.
The preview box at the bottom of the Brush Editor is crucial. The red lines on each side indicate the start and end points of the brush. By moving these lines inward, you can define which portion of the brush image is actually used for the stroke, allowing for more precise control over the brush's appearance.
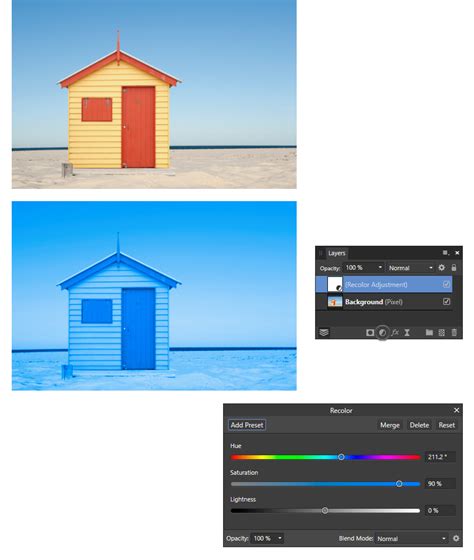
Step 6: Recolor Your Brush (Workaround)
A notable characteristic of "Textured Image Brushes" is that their color is determined by the original PNG. You cannot directly change the color of the brush stroke itself after creation. However, there's a clever workaround. After drawing a stroke with your brush, select the resulting path. Then, add an adjustment layer by navigating to Layer > New Adjustment > Recolor. Within the Recolor panel, you can adjust the settings to achieve your desired color for the brush stroke.
Step 7: Alternative Brush Applications
Beyond direct painting, your custom brushes can be applied in other creative ways. You can use the Pen Tool (keyboard shortcut: P) to meticulously draw a path, and then select your desired brush to apply it as a stroke along that path. This offers a high degree of control for intricate linework.
For those seeking a simpler approach, you can create a basic, solid vector brush by selecting "New Solid Brush" from the Brushes panel preferences menu. This new brush will then appear in your panel, ready for customization in the brush editing panel.
Modifying Existing Brushes
Affinity Designer comes with a rich library of preset brushes, and you're not limited to just creating new ones from scratch. You can also customize these existing presets to better suit your needs. However, it's important to be aware that some preset brushes might be third-party assets. If you plan on selling brushes you've modified, always check the provided license or terms of use for any copyright restrictions.
To modify a preset brush, select it in the Brushes panel and click the "Edit Brush" button, usually located in the top right. After adjusting the settings in the stroke section, you have a few options:
- Duplicate: Click "Duplicate" to save your modified preset as a new custom preset, leaving the original intact.
- Close: Clicking "Close" will save your custom settings to the current preset, overwriting its original configuration.
- Reset: This option will revert the settings back to those of the original preset.
Working with Raster Brushes
Affinity Designer also offers a robust set of raster brushes, providing a different set of creative possibilities. To access these, you'll need to switch to the Pixel Persona. Look for a button, often in the top-left corner of the interface, that allows you to toggle between personas. Once in Pixel Persona, you'll see a distinct set of raster brushes available.
A particularly exciting feature of raster brushes is the Symmetry option. In the top settings panel of the brushes, you can enable "Symmetry" and set a "Symmetry Number." For instance, setting the number to 4 means that every stroke you draw will be mirrored and duplicated four times, creating intricate symmetrical patterns automatically. This is incredibly useful for designs requiring radial symmetry or complex geometric arrangements.
Affinity Designer Tutorial: Create Custom Brushes
Importing Photoshop and Illustrator Brushes
A significant advantage of Affinity Designer is its compatibility with brushes from other popular design software. You can seamlessly import and use Adobe Photoshop (.abr) brushes within Affinity Designer. The same technique can be applied to brushes originating from Adobe Illustrator.
When importing .abr brushes into Affinity Designer, it's crucial to remember that these are pixel-based. Therefore, you will need to be in the Pixel Persona for them to function correctly. By default, Affinity Designer opens in the Designer Persona, which is vector-based.
The process of installing an .abr brush is generally straightforward:
- Create a new pixel layer. Any brushes you import or use will typically reside on this layer.
- Navigate to the Brushes panel.
- Click the menu icon and select "Import Brushes."
- Locate and select your .abr brush file.
Once imported into the Pixel Persona, these brushes will behave much like native Affinity Designer raster brushes. You can change their color using the color selector and adjust their settings for size, hardness, flow, and opacity. Advanced settings are also available for more granular control.
The Lilypad Store, for example, offers many brush and stamp sets in either .abr or .png format, or both. While .abr files can be imported into both Affinity Photo and Affinity Designer, Affinity Publisher does not have a brush tool. Therefore, only brushes provided as .png files can be used in Publisher unless you also have Photo or Designer installed.
Understanding Brush Settings: Pixel vs. Vector
While both pixel and vector brushes offer creative avenues, their settings and behaviors differ:
Settings for Pixel Brushes (Pixel Persona)
In the Pixel Persona, you have extensive control over your brushes:
- Size: Adjusts the overall diameter of the brush tip.
- Hardness: Determines the softness or sharpness of the brush edges.
- Flow: Controls how quickly the paint builds up with each stroke.
- Opacity: Dictates the transparency of the brush stroke.
- Advanced Settings: Access a comprehensive array of options for deep customization, allowing you to experiment and create unique brush effects.
Settings for Vector Brushes (Designer Persona)
Vector brushes offer a more streamlined set of settings, focusing on the vector path:
- Stroke Size: This is a key difference. With vector brushes, you can adjust the size of the stroke after you have drawn it. This is done via the Stroke panel, typically found in the top right of the interface.
- Nodes: Vector strokes are composed of nodes. You can use the Node Tool (A) to manipulate these nodes, precisely reshaping the vector path of your brush stroke even after it has been applied. This offers unparalleled control over the line's form.
Locating and Changing Brushes
The Brush Tool itself is located in the left toolbar. In Pixel Persona, it's represented by a paint brush icon. In Designer Persona, the Vector Brush Tool is indicated by a brush icon with a wavy line underneath it.
Changing between brush categories is intuitive on both desktop and iPad versions:
- On iPad: Tap the arrow next to the category name to toggle between them. Alternatively, tap the category name itself to bring up a dropdown panel listing all installed brush categories. Clicking on a category name instantly jumps you to that set of brushes.
- On PC/Mac: Click the arrow icon next to the current category name. A dropdown panel will appear, displaying all your installed categories. Select the desired category to switch.
Finding Specific Brush Types: Halftone Brushes
As you explore Affinity Designer's brush capabilities, you might notice the absence of readily available standard halftone brushes or textures within the default installation. This is a common point of inquiry for users. Fortunately, there are numerous online resources and marketplaces where you can find and download these specialized brushes. Many third-party creators offer high-quality halftone brush packs designed specifically for Affinity Designer, which can then be imported and used following the general brush installation methods.
Conclusion
Affinity Designer's brush system is a powerful and flexible feature that significantly enhances the creative potential of the software. Whether you're crafting intricate custom vector brushes from your own designs, leveraging the expressive nature of raster brushes with symmetry options, or importing established brush sets from Photoshop, the ability to tailor your tools to your specific artistic vision is paramount. By understanding the distinctions between vector and raster brushes, mastering the export and import processes, and exploring the vast array of adjustable settings, you can unlock a new level of efficiency and creativity in your design workflow.