When your video looks great but the audio is less than stellar, the immediate thought might be to discard the entire clip. However, in DaVinci Resolve, a few strategic edits can salvage a project with problematic sound. The ability to separate audio from video grants you complete control over each element, allowing for precise adjustments and replacements. This guide will walk you through the essential techniques for detaching, editing, and enhancing audio in DaVinci Resolve, transforming less-than-ideal sound into polished, professional output.
DaVinci Resolve is a powerful and versatile video editing software renowned for its advanced audio editing capabilities. One of the most frequently encountered tasks in post-production is the separation of audio from video. This process is crucial for various reasons, including the independent editing of sound, the removal of unwanted noise, or the complete replacement of audio tracks with new recordings or music. Understanding how to effectively detach audio is a foundational skill for anyone looking to elevate the sound quality of their video projects.
The Fundamental Process: Unlinking Audio and Video Clips
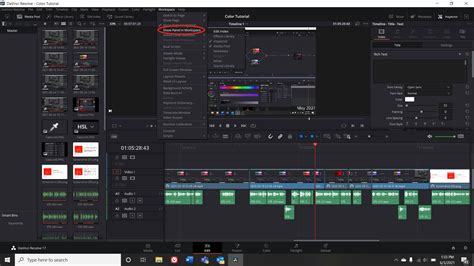
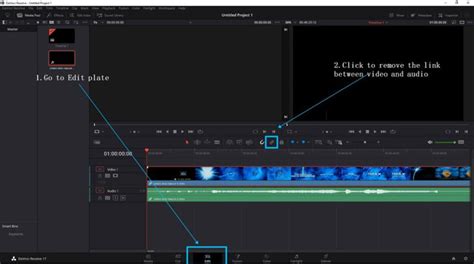
The most straightforward method to detach audio from video in DaVinci Resolve involves unlinking the two components directly within the Edit tab. This process ensures that the audio and video can be manipulated independently without affecting each other.
The initial step is to import your video clip into DaVinci Resolve. Once the clip resides in the Media Pool, simply drag it onto your timeline. With the video segment now visible on the timeline, locate either the audio or video portion of the clip and right-click on it. In the contextual menu that appears, you will find an option labeled “Link Clips.” Unchecking this option is the key to detaching the audio from the video. After unlinking, you will observe that the audio and video elements are now distinct entities on your screen, allowing for individual selection and modification.
For those who find the right-click method a bit cumbersome, DaVinci Resolve offers a keyboard shortcut. By selecting the clip on the timeline, you can then press Command-L (on macOS) or Control-Shift-L (on Windows) to unlink the audio and video. This command directly performs the same function as unlinking through the contextual menu.
When Complete Separation Isn't Necessary: The Power of the ALT/Option Key
There are instances where you might not need to fully detach the audio from the video. Perhaps all you require is a quick way to adjust the sound without altering the visual aspect of the clip. DaVinci Resolve facilitates this through a simple yet effective shortcut using the ALT key (on Windows) or the Option key (on macOS).
To utilize this feature, identify the video clip whose audio you wish to adjust. While holding down the ALT or Option key, click directly on the audio portion of the clip. Upon releasing the key, the audio and video will automatically relink, ensuring that any subsequent edits to the audio are contained without affecting the video. This is an invaluable tool for making minor sound tweaks, such as adjusting volume levels or applying subtle effects, while maintaining the integrity of the visual timeline.
Preserving Audio for Future Use: The Mute Option
Often, when experimenting with background music or adding a voiceover, creators may be unsure if they will need the original audio later. Instead of outright deleting it, which could lead to regret, DaVinci Resolve provides a simple solution: muting the clip.
To mute an audio clip, right-click on the audio track within the timeline. From the resulting menu, select the “Mute Clip” option. The audio track will remain present in the timeline, but it will remain silent during playback and in the final exported video. This is a non-destructive way to temporarily disable audio, ensuring it's readily available should you decide to re-enable it later. This method is particularly useful when you're layering new audio and want to ensure it sits correctly before committing to deleting the original sound.
Understanding the Nuances: Detach vs. Extract Audio
It's important to distinguish between "Detach Audio" and "Extract Audio" within DaVinci Resolve, as they serve slightly different purposes.
- Detach Audio: This action, as described above, separates the audio and video components within the same project timeline. The audio remains linked to the video clip in terms of its position on the timeline, but it can now be edited, moved, or deleted independently.
- Extract Audio: This process creates a new, separate audio file from the video clip, which is then placed in the Media Pool. This is useful if you want to take the audio from a video and use it as a standalone audio asset in other projects or for further advanced audio processing outside of the immediate timeline context. To extract audio, you would typically unlink the clip first, then select the audio portion and use the export function on the Deliver page, choosing an audio-only format like WAV or AAC.
Advanced Audio Editing in the Fairlight Page
Once audio has been successfully detached from its video counterpart, DaVinci Resolve’s dedicated audio post-production environment, the Fairlight page, becomes your primary workspace for detailed audio manipulation. This is where you can truly refine and enhance your sound.
Accessing the Fairlight Page
To enter the Fairlight page, simply click on the Fairlight tab, typically located at the bottom of the DaVinci Resolve interface alongside the Edit, Cut, Fusion, Color, and Deliver pages. This will present you with a comprehensive audio mixing console and waveform display.
Adjusting Audio Levels and Applying Effects
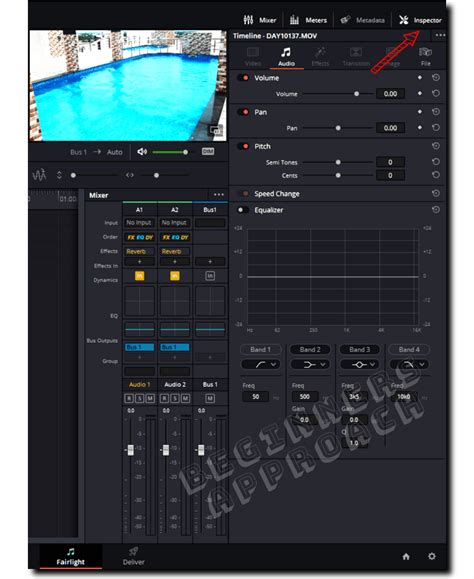
Within the Fairlight page, the Inspector panel (usually found in the top-right corner) is your hub for detailed adjustments. Here, you can precisely control volume, balance, and panning for your detached audio track. For more nuanced sound shaping, the Equalizer (EQ) tool is invaluable. It allows you to target and adjust specific frequency ranges, enabling you to remove unwanted resonant tones, boost clarity, or sculpt the overall tonal character of the audio.
Furthermore, Fairlight offers powerful tools for noise reduction. If your original audio suffered from background hiss, hum, or ambient noise, the Noise Reduction tool can significantly clean up the track, making dialogue or music clearer and more prominent. Experimenting with these tools is key to achieving professional-sounding audio.
Replacing Audio with New Soundtracks
A common scenario for detaching audio is when you need to replace it entirely. This could be for adding a professional voiceover, incorporating licensed music, or using better-quality audio recorded separately.
The process begins by importing your desired new audio file into the Media Pool. Once it's available in Resolve, drag it onto the timeline, positioning it to align with the corresponding video segment. Careful attention must be paid to syncing the new audio with the visuals. The waveform display in the timeline is crucial here, allowing you to visually match the peaks and troughs of the new audio to the action on screen. If the new audio is out of sync, you can manually adjust its position on the timeline until it aligns perfectly.
Best Practices for Audio Detachment and Editing
To ensure the highest quality results and a smooth workflow when working with detached audio in DaVinci Resolve, consider these best practices:
- Maintain Backups: Always keep a backup of your original audio track, even if you intend to replace it. This provides a safety net in case you need to revert to the original sound or use it for syncing purposes.
- Normalize Audio: Utilize the “Normalize Audio” function to ensure consistent sound levels across different clips or even within a single track. This prevents jarring volume fluctuations.
- Employ Fade In/Out: For smooth transitions between audio clips or at the beginning and end of a track, apply Fade In and Fade Out effects. This avoids abrupt beginnings or endings and creates a more polished listening experience.
- Check Sync Alignment: When replacing dialogue or adding external audio, meticulous sync alignment is paramount. Even a few frames of misalignment can be noticeable and detract from the professional feel of your video.
- Leverage Keyframes: For dynamic volume control, especially in scenes with varying sound needs, use keyframes. Keyframes allow you to precisely control volume changes over time, fading audio up or down at specific points to emphasize dialogue or create atmosphere.
- Master Fairlight Tools: The more familiar you become with the advanced tools available in the Fairlight page - such as EQ, compression, reverb, and noise reduction - the more significantly you can improve the overall sound quality of your videos.
Why Detaching Audio is Essential
The ability to separate audio from video in DaVinci Resolve unlocks a multitude of creative and technical possibilities, making it an indispensable technique for video editors.
- Noise Removal: Detaching audio allows you to isolate problematic sound from the video, enabling you to apply noise reduction techniques without affecting the visual quality of your footage. This is particularly useful for footage shot in noisy environments.
- Audio Replacement: If the original audio is of poor quality, distorted, or simply not suitable for your project, you can detach it and replace it with higher-quality recordings, stock music, or a new voiceover.
- Independent Level Adjustment: Different elements within a video might require varying audio levels. Detaching audio allows you to adjust the volume of dialogue, sound effects, and music independently, leading to a well-balanced mix.
- Synchronization of External Sources: When using multiple camera angles or external audio recorders, detaching the original camera audio allows you to precisely sync externally recorded sound, which often offers superior quality.
- Creative Sound Design: Detached audio can be manipulated, layered with other sound effects, or processed in unique ways to create a specific mood or enhance the storytelling of your video.
Alternative Software Considerations: iMyFone Filme
While DaVinci Resolve is a professional-grade powerhouse, other editing software options exist for simpler tasks. iMyFone Filme, for instance, is presented as an alternative for editing photos, videos, and audio. Its interface allows for merging files or editing individual components. To remove audio from a video in Filme, one would typically right-click the video file, select edit options, and then adjust the volume slider to its minimum. While Filme offers a more streamlined approach for basic audio removal, DaVinci Resolve provides a far more comprehensive and professional suite of tools for advanced audio manipulation.
Zooming and Fading Audio in DaVinci Resolve
Beyond detachment, DaVinci Resolve offers intuitive ways to visually manage and adjust audio on the timeline.
Zooming into Audio Waveforms
To get a closer look at your audio waveforms for precise editing, you can use a combination of keyboard shortcuts and mouse actions. Pressing and holding the ALT key and using the mouse's scroll wheel allows you to zoom in and out on the audio tracks horizontally. While this adjusts the width of the clip display, it doesn't affect the vertical height of the waveform. To adjust the height of the audio track display, you need to move your mouse cursor to the left of the track name on the track line and then drag up or down. This visual magnification is crucial for tasks like identifying specific sound events or making very fine adjustments to audio edit points.
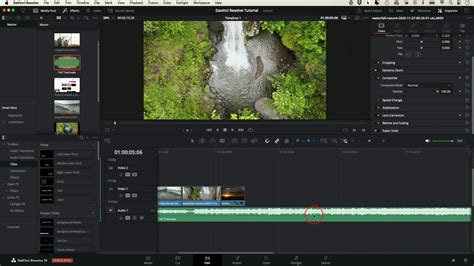
Creating Audio Fades
Audio fades are essential for smooth transitions. To create a fade in or fade out effect on an audio clip, position the playhead at the beginning of where you want the fade effect to start. Then, select the audio clip and navigate to the "Trim" option in the top menu. From there, you can apply fade effects. A more direct method within the timeline is to hold Control (Windows) or Command (Mac) and click on the edge of an audio clip. This will create a small dot or handle, which you can then drag to create a fade. Dragging it inwards from the beginning of the clip creates a fade-in, and dragging it inwards from the end creates a fade-out.
Advanced Techniques: Pitch Shifting and Reverb
DaVinci Resolve's Fairlight page also provides tools for more creative audio manipulation, such as pitch-shifting and adding reverb.
Pitch Shifting Audio
If you need to alter the pitch of an audio clip - perhaps to create a specific vocal effect or correct a slightly off-key recording - DaVinci Resolve offers a straightforward method. First, select the clip you wish to pitch-shift within the Fairlight page and open the Inspector. Navigate to the "Pitch" section and begin adjusting the settings. It's advisable to make subtle adjustments initially, as drastic changes can lead to unnatural-sounding artifacts.
Adding Reverb Effects
To give your audio a sense of space and depth, you can add reverb. This is achieved by going to the Effects Library within the Fairlight page and locating the "Reverb" effect. Drag and drop this effect onto your desired audio track. You can then customize the reverb parameters within the Inspector panel to achieve the desired acoustic environment, from a subtle room ambiance to a grand hall echo.
DaVinci Resolve Fairlight Overview for Beginners
Conclusion: Empowering Your Audio Workflow
The ability to detach, edit, and manipulate audio independently from video in DaVinci Resolve is a fundamental skill that significantly enhances the quality and professionalism of your video projects. Whether you're dealing with noisy recordings, needing to replace dialogue, or simply aiming for a more balanced sound mix, DaVinci Resolve provides the robust tools necessary to achieve polished results. By mastering these techniques, you can transform even challenging audio situations into opportunities for creative expression and technical excellence.
Frequently Asked Questions about Detaching Audio in DaVinci Resolve
How do I separate audio from video in DaVinci Resolve?To separate audio from video, go to the Edit tab, right-click the video clip on the timeline, and select "Unlink" from the contextual menu. You can also use the keyboard shortcut Command-L (Mac) or Control-Shift-L (Windows).
How do I delete audio from a video clip in DaVinci Resolve?After unlinking the audio from the video, select the detached audio track (identified by its green waveform) on the timeline and press the Delete key. This will remove the sound while keeping the video intact.
Can I mute audio instead of deleting it in DaVinci Resolve?Yes. Right-click the audio track in the timeline and select "Mute Clip." The audio file remains in the timeline but will not be heard during playback or in the final export.
How do I replace the audio in a video using DaVinci Resolve?First, unlink and delete the original audio. Then, import your new audio file into the Media Pool, drag it onto the timeline, and meticulously align it with the video. Use the waveform display to ensure accurate synchronization.
Can I edit the separated audio in DaVinci Resolve?Absolutely. Once the audio is detached, switch to the Fairlight page. Here, you can adjust volume, apply noise reduction, use the equalizer (EQ), and employ various other effects to enhance sound quality.
Why might my audio be out of sync after separating it in DaVinci Resolve?This can happen if the audio and video were not perfectly aligned initially, or if they were accidentally nudged on the timeline after unlinking. Use the Waveform Display to manually re-sync the audio to the video by adjusting its position.
How do I increase or decrease audio levels after separating sound from a video?With the audio track selected, go to the Inspector panel (usually top-right). Find the "Volume" slider and adjust it to increase or decrease the sound level of the separated audio track.
Can I extract only the audio from a video file in DaVinci Resolve?Yes. After unlinking the audio, you can export the audio track separately from the Deliver page. Choose an audio-only format, such as WAV or AAC, in the export settings.
How do I add effects to audio after separating it from video?Navigate to the Fairlight page and open the Effects Library. You can then drag and drop various effects like EQ, compression, reverb, and noise reduction onto your separated audio track and customize their parameters in the Inspector.
Can I separate multiple audio tracks from a video file in DaVinci Resolve?Yes. If your video clip contains multiple audio channels, you can unlink them individually. In the Fairlight page, you can then edit and apply effects to each audio track separately.
How do I export a video without audio after separating the sound?On the Deliver page, go to the "Audio Settings" section and uncheck the "Export Audio" option before rendering your video. This will produce a video file with no accompanying sound.
What’s the best way to clean up background noise in separated audio?The Noise Reduction tool within the Fairlight page is the most effective method. Apply it to your separated audio track to identify and remove unwanted background sounds.
Can I automatically sync external audio with my video in DaVinci Resolve?Yes, DaVinci Resolve offers an "Auto Sync Audio" function, typically found in the Media Pool. This feature automatically matches external audio clips to video clips based on their waveforms or timecodes.
How do I separate audio from video without losing quality?The process of unlinking audio from video in DaVinci Resolve does not inherently reduce quality. Ensure that your project settings and export settings are configured to match the original file format to maintain the highest fidelity.