Photoshop, a powerhouse in the realm of digital image editing, offers a surprisingly diverse array of methods for creating and manipulating circles. Whether you're a seasoned graphic designer or a blogger looking to add a touch of visual flair to your posts, understanding how to draw a perfect circle is a fundamental skill. This guide aims to demystify the process, taking you from the simplest techniques to more advanced applications, ensuring you can achieve any circular effect you desire with confidence and ease.
The Foundation: Setting Up Your Canvas
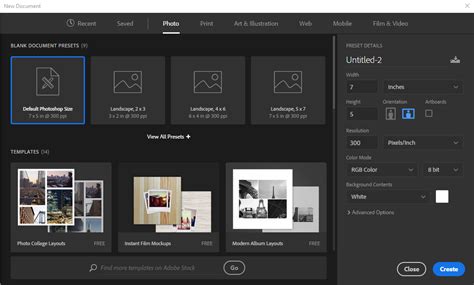
Before diving into drawing, it's essential to have a workspace ready. To start a new project in Photoshop, we need to create a new document. This can be done by clicking "File" > "New" or by utilizing the keyboard shortcut Ctrl+N (Cmd+N on Mac). In the dialog box that appears, you can set the width, height, and resolution of your canvas. Photoshop also offers preset sizes for common project types, which can be a convenient starting point. Once your parameters are set, click "Create" to open your new document. Photoshop's workspace is highly customizable, allowing you to arrange panels and tools to suit your workflow. To begin working with distinct elements, it's best practice to create a new layer. This can be achieved by clicking the "New Layer" button in the Layers panel or by using the keyboard shortcut Ctrl+Shift+N (Cmd+Shift+N on Mac). Double-clicking on the layer name in the Layers panel allows you to rename it for better organization.
Method 1: The Ellipse Tool - Your Direct Path to Perfect Circles
Photoshop offers two primary tools for creating perfect circles quickly and easily, and the Ellipse Tool is arguably the most straightforward. This tool creates vector shapes by default, meaning they are editable and can be resized without any loss of quality.
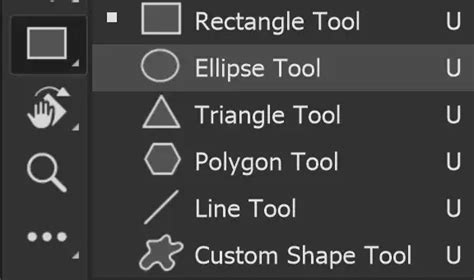
To begin, locate the Ellipse Tool within the toolbar. It's often nested under the Rectangle tab, identifiable by a rectangle-shaped symbol. If you see a square when you first look at the toolbar, click and hold down on it to reveal a fly-out menu, from which you can select the Ellipse Tool. Alternatively, you can press the 'U' key on your keyboard, which cycles through the shape tools.
Once the Ellipse Tool is selected, you have a couple of ways to create your circle. For a perfect, symmetrical circle, hold down the Shift key while dragging your mouse across the canvas. This constraint ensures that the width and height remain equal, resulting in a flawless circle.
For more precise control over the size, you can click once with the Ellipse Tool to open the "Create Ellipse" dialog box. Here, you can enter specific dimensions for the Width and Height. Remember, these values represent the diameter of the circle.
When using the Ellipse Tool, you'll notice options in the options bar at the top of the screen to customize your circle's appearance. You can choose to create a shape layer, a path, or pixels. For editable vector circles, the shape layer option is ideal.
Fill and Stroke Customization:
- Fill: The "Fill" option allows you to determine whether your circle will have a solid color, a gradient, or no fill at all. You can select a fill color by clicking the Fill Color box in the options bar and using the Color Picker. If you wish to have no fill, select "None" (represented by a red diagonal line) from the fill color options.
- Stroke: The "Stroke" option controls the outline of your circle. You can choose a stroke color, stroke width (how thick or thin the outline appears), and even the style of the stroke (solid, dashed, or dotted). Similar to the fill, click the Stroke Color box to select your desired color. The Stroke Width field allows you to enter a specific value in pixels.
To change the color of the circle's fill or stroke after it has been created, you can select the circle layer in the Layers panel and then adjust the Fill or Stroke options in the options bar or the Properties panel. For more complex stroke styles, you can access additional options by clicking the Stroke settings in the Properties panel.
Drawing from the Center:
To draw a circle from its center point, select the Ellipse Tool, then hold down Alt (Option on Mac) and Shift simultaneously while clicking and dragging on the canvas. This will create a circle that expands outwards from where you initially clicked.
Method 2: The Elliptical Marquee Tool - Creating Selections for Cropping and Filling
The Elliptical Marquee Tool offers another effective method for creating circular shapes, particularly useful when you need to make a circular selection for further editing, such as cropping an image into a circle or filling a specific circular area.
This tool is also found within the Marquee Tool group in the toolbar. If you see a square marquee symbol, click and hold to reveal the Elliptical Marquee Tool.
Similar to the Ellipse Tool, holding down the Shift key while dragging with the Elliptical Marquee Tool will create a perfect circular selection. Photoshop provides numeric guidelines as you drag, allowing you to see the dimensions of your selection. The Elliptical Marquee Tool creates a moving outlined selection of the created shape, which can then be customized.
Once you have your circular selection, you can then:
- Fill it with color: Select your desired foreground color, then go to Edit > Fill, or use the Paint Bucket Tool.
- Add a stroke: Go to Edit > Stroke, and specify the color, width, and location of the outline.
- Create a new layer from the selection: Go to Layer > New > Layer via Copy or Layer via Cut.
- Crop an image: This is where the Elliptical Marquee Tool truly shines for specific tasks.
Cropping to a Perfect Circle
To crop an image to a perfect circle, follow these steps:
- Open your image in Photoshop.
- Select the Elliptical Marquee Tool.
- Hold down the Shift key and drag to create a perfect circular selection over the area you wish to keep.
- To remove everything outside this circle, you need to invert your selection. Go to Select > Inverse.
- Now, with the area outside your circle selected, press the Delete key. Poof! The unwanted parts of your image will disappear.
- Deselect by going to Select > Deselect (or Ctrl+D / Cmd+D).
- For a clean canvas, you might want to crop any remaining extraneous white space. Go to Image > Crop.
- Save your image. For transparent backgrounds, save as a .png format using the "File > Export > Export As" option and selecting PNG from the dropdown.
How to Circle Crop Images in Photoshop | Quick Tips
Method 3: The Brush Tool - For Textured and Freehand Circles
While the Ellipse and Elliptical Marquee tools are excellent for precise geometric circles, the Brush Tool offers a more organic and creative approach, allowing for textured, painterly, or even fuzzy circles.
- Select the Brush Tool: Find it in the toolbar or press 'B'.
- Choose a Brush: In the options bar or the Brush Settings panel (Window > Brush Settings), select a round brush. You can experiment with different brush presets to achieve various textures. For a fuzzy circle, you might choose a brush with softer edges.
- Set Brush Size and Hardness: Adjust the brush size to your desired diameter. For softer edges, reduce the brush hardness.
- Draw Your Circle: To draw a perfect circle with the Brush Tool, hold down the Shift key while dragging. You can drag from the center outwards or from edge to edge.
- Fuzzy Circles: For a more artistic, fuzzy circle, you can select a brush with a low hardness setting or a textured brush. You can also apply a Gaussian Blur filter (Filter > Blur > Gaussian Blur) to a solid circle created with the brush to soften its edges.
- Dashed or Dotted Lines: You can also create dashed or dotted circles using the Brush Tool by adjusting brush spacing in the Brush Settings panel and then drawing with the Shift key held down. Higher spacing values result in more pronounced dashes.
The Brush Tool allows for immense customization. You can choose from a vast array of brush tips, adjust opacity for semi-transparent effects, and even use textured brushes for unique artistic outcomes.
Advanced Techniques and Refinements
Beyond the basic drawing methods, Photoshop provides several ways to refine and enhance your circles.
Using Paths for Precision and Flexibility
The Pen Tool, while seemingly more complex, offers a high degree of precision for creating paths that can then be "stroked" to create a circle. This method can be particularly useful for creating outlines that can be easily modified or reused.
- Select the Pen Tool: Find it in the toolbar or press 'P'.
- Create a Circular Path: This involves a series of clicks and drags to create anchor points that form a circle. While it requires practice, it offers ultimate control.
- Stroke the Path: Once your circular path is created, right-click anywhere on the canvas and select "Stroke Path." You can choose to stroke it with a brush, pencil, or other tools. You can select the thickness you want (this can also be done before drawing the circle).
- Delete the Path: After stroking, you'll see a dotted line representing the path. To delete it, right-click again and select "Delete Path."
This method, though it may sound complicated, is efficient once mastered. It allows for a "fuzzy circle" by picking the brush tool instead of the pencil tool before stroking the path.
Positioning and Alignment
After creating your circle, you'll often need to position it precisely.
- Select the Move Tool: Press 'V' on your keyboard.
- Manual Adjustment: Click and drag the circle to reposition it on the canvas.
- Alignment Features: With the Move Tool active and your circle layer selected, look for alignment options in the top toolbar. These features allow you to center the circle horizontally or vertically on the canvas or align it with other objects.
Layer Management for Multiple Circles
When working with multiple circles, effective layer management is crucial.
- New Layer for Each Circle: Create a new layer for each circle you draw. This keeps your elements separate and easy to edit independently.
- Stacking Order: In the Layers panel, you can adjust the stacking order of your circles by dragging their layers up or down. This determines which circle appears in front of or behind another.
- Grouping Layers: For complex designs, group related circle layers together by selecting them and pressing Ctrl+G (Cmd+G on Mac).
Final Touches and Saving
Once your circle is drawn and styled to your satisfaction, a few final steps will polish and preserve your design.
- Deselecting: To remove the "marching ants" outline of a selection, go to Select > Deselect (Ctrl+D / Cmd+D).
- Cleaning Up: If there are any rough edges or stray pixels, use the Eraser tool to clean them up.
- Applying Blur (Optional): For softer edges, you can apply a subtle Gaussian Blur: Filter > Blur > Gaussian Blur with a small radius (e.g., 0.5-1 pixel).
- Saving Your Work:
- For editable projects: Save your work in Photoshop's native format (File > Save As, choose Photoshop .psd). This preserves all your layers and editing capabilities.
- For web or transparent backgrounds: Save as a .png file (File > Export > Export As). PNG is ideal for graphics with transparency.
- For general use: JPEG is a common format, but it does not support transparency.
By mastering these techniques, you'll find that creating perfect circles, whether for simple illustrations, blog post graphics, or complex designs, becomes an intuitive and efficient part of your Photoshop workflow.