Procreate offers a powerful suite of tools that can fundamentally alter your digital art workflow, transforming how you approach everything from initial sketching to final detailing. Among these, the Alpha Lock function stands out as a particularly elegant solution for controlling where your brushstrokes land, allowing for greater precision and creative freedom. This tutorial delves deep into the Alpha Lock feature, explaining its mechanics, demonstrating its practical applications, and comparing it with related masking techniques. Whether you're a beginner looking to refine your coloring and shading, or an experienced artist seeking to streamline your process, understanding Alpha Lock will undoubtedly elevate your Procreate experience.
Understanding the Fundamentals of Layer Management in Procreate
Before diving into Alpha Lock, it's essential to grasp the basic layer operations within Procreate. When you select a layer in the Layers panel, a basic set of options becomes available. These include functions such as renaming, duplicating, copying, and deleting the layer. However, Procreate also conceals more advanced functionalities within this menu, "hidden gems" that can significantly enhance your drawing and painting capabilities. Alpha Lock is one such gem, alongside the Mask option, which we will explore later.
What is Alpha Lock and How Does It Work?
At its core, Alpha Lock is a function that allows you to lock the transparent or unpainted area of a layer. Once this feature is activated on a layer, any brushstrokes you make will be confined strictly to the pixels that already exist on that layer. In essence, it prevents you from painting outside the existing artwork.
Imagine you have a shape or a character drawn on a layer. With Alpha Lock enabled, you can freely add color, texture, or shading to that shape, and your brush will automatically stay within its boundaries. The unpainted areas of the layer remain completely untouched, preserving the original transparency. This is incredibly useful for adding detailed texture and shading to your artwork without the tediousness of constantly trying to stay within the lines. It’s a simple yet effective way to add a new level of polish and interest to your art.
The Alpha Lock function is similar to a clipping mask in that it restricts drawing to existing content, but it offers a significant advantage: you do not have to create a separate layer to achieve this effect. This means you can perform all your shading and detailing directly on the same layer as your base artwork, simplifying your Layers panel and streamlining your workflow.
A Step-by-Step Guide to Using Alpha Lock with Text
While Alpha Lock works with any shape on a layer, using it with text is a common and illustrative application. This tutorial will guide you through the process, demonstrating how to apply Alpha Lock to a text element.
Step 1: Create a New Artboard
Begin by initiating a new canvas. Tap the "+" sign located in the top right corner of the Procreate interface.
Step 2: Select Custom Dimensions
To create an artboard with specific dimensions, select the small box with a plus sign to the right of "New canvas." This option allows you to define your own width and height. For this tutorial, an artboard of 3000 x 4000 pixels was chosen, providing ample space for detail.
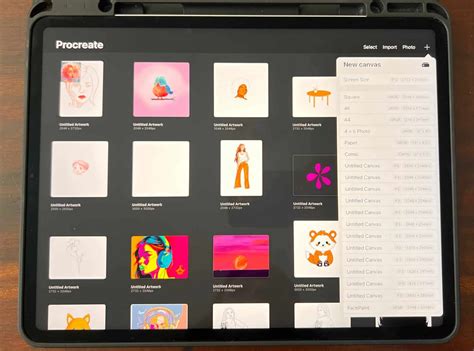
Step 3: Confirm Canvas Creation
Once your dimensions are set, tap the yellow "Create" button to generate your new artboard.
Step 4: Access the Actions Menu
Locate and tap the "Wrench" icon in the upper left corner of the screen. This opens the Actions menu, which houses various utility functions.
Step 5: Add Text to Your Canvas
Within the Actions menu, navigate to the "Add" tab and select "Add Text." This will insert a text box onto your canvas.
Step 6: Choose Your Font
A text editing interface will appear. To select your font, highlight the existing text and then tap the "Aa" icon in the right corner of the new tab. A font selection panel will open, allowing you to browse and choose your desired typeface. For this tutorial, the font "Sunkissed Script" is used, but you are free to select any font that appeals to you.
Step 7: Access the Keyboard
After selecting your font, tap the keyboard icon located in the top left corner of the text editing interface to bring up the keyboard.
Step 8: Type Your Text
With the keyboard displayed, you can now type your desired text into the text box.
Step 9: Deselect Text Editing
Once you have finished typing your text, tap anywhere on the canvas outside the text box. This action will dismiss the text editing interface and the keyboard.
Step 10: Resize and Position Your Text
Ensure the cursor icon (the arrow tool) at the top of the screen is highlighted in blue, indicating it's active. You can then tap and drag the corner handles of your text bounding box to resize it. After resizing, tap the cursor icon again to deselect it and finalize the transformation.
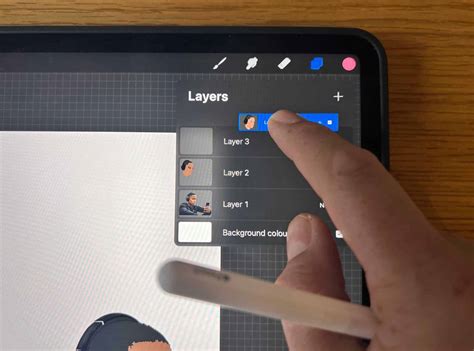
Step 11: Rasterize the Text Layer
To utilize Alpha Lock with text, the text layer must be rasterized. This process converts the editable text into a pixel-based image. Tap on your text layer in the Layers panel, and then select "Rasterize" from the options that appear.
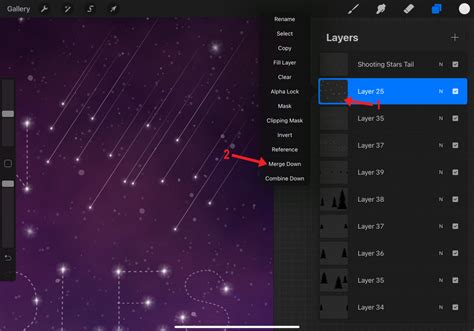
Step 12: Activate Alpha Lock
With the text layer rasterized, you can now apply Alpha Lock. There are two primary methods:
- Method 1: Tap on the rasterized text layer to open the Layer Options menu, and then select "Alpha Lock."
- Method 2: A quicker shortcut is to swipe the layer with two fingers to the right. This will instantly toggle Alpha Lock on or off for that layer.
When Alpha Lock is active, a small checkered pattern will appear in the thumbnail of the layer in the Layers panel, indicating that only existing pixels can be modified.
Step 13: Select Your Brush and Color
Now that Alpha Lock is enabled, select the brush you wish to use for coloring or detailing. For this example, the "Low Key Procreate Brush" is recommended, but any brush will work. Choose your desired color from the Color panel.
Step 14: Draw Within the Locked Layer
Proceed to draw on your canvas. You will immediately notice that your brush strokes are confined to the area of the rasterized text. It is impossible to paint outside of the existing pixels. Remember, you are working directly on the same layer as your text, without the need for additional layers or clipping masks. Add as much detail, color, or texture as you desire within the boundaries of your text.
Once you are satisfied with the changes made while Alpha Lock was active, you can turn it off by repeating Step 12 (either through the Layer Options menu or by swiping the layer with two fingers to the right). Turning off Alpha Lock will allow you to draw on the same layer but outside the original text boundary, if needed.
Quickly Master Alpha Lock in Procreate
Exploring Related Masking Techniques in Procreate
While Alpha Lock is a powerful tool for restricting edits to existing pixels on a single layer, Procreate offers other masking functionalities that serve different purposes and offer distinct advantages. Understanding these can help you choose the most appropriate method for any given task.
Layer Lock: Preventing Accidental Edits
A Layer Lock is a simpler form of protection. When a layer is locked, it prevents any accidental changes, edits, or transformations from being made to it. This is useful for preserving elements that you are happy with and do not want to alter further. A small padlock icon will appear next to the layer's name in the Layers panel when it is locked. You cannot edit, move, cut, paste, transform, or delete a locked layer. Locking a group will lock all layers within that group.
Layer Masks: Non-Destructive Concealment
Layer Masks provide a non-destructive way to conceal or reveal parts of a layer without actually erasing any content. Think of it like using masking tape on a physical painting. You can hide areas of a layer, and if you change your mind, you can easily reveal them again.
To create a Layer Mask, tap on a layer to invoke the Layer Options menu and then select "Mask." Layer Masks are edited using grayscale values:
- Black: Painting or erasing in black on the mask hides the corresponding part of the parent layer.
- White: Painting or erasing in white reveals the parent layer.
- Grays: Shades of gray create semi-transparency.
When a Layer Mask is selected as your primary layer for editing, your color selections in the Color Panel will ignore hue, focusing instead on luminosity. This allows you to use "Erase" or "Paint" tools to precisely edit the mask. Layer Masks can be moved independently or together with their parent layer by tapping and holding on either the mask or the parent layer and dragging them. Layer Masks do not have their own "Duplicate" button; you would typically duplicate the parent layer to also duplicate its mask.
Clipping Masks: Constraining Edits to a Layer Below
A Clipping Mask is another method of constraining edits, but it works differently than Alpha Lock. When you activate a Clipping Mask, it clips your active layer to the layer directly underneath it. This means that any drawing or painting done on the clipped layer will only be visible within the boundaries of the layer below it.
To create a Clipping Mask, tap on the layer you want to clip (this will be the layer above the base layer) to invoke the Layer Options menu, and then select "Clipping Mask." You can then use the Transform tool to move, scale, or distort the content on your clipped layer, and it will remain confined to the shape of the layer beneath.
Clipping Masks are independent of the layer they affect in terms of their position in the Layers Panel. If you move the clipped layer's order, it will automatically clip to the new layer below it. However, if you move a clipped layer to the very bottom of your Layers Panel, the Clipping Mask function will deactivate.
Comparing Alpha Lock, Layer Masks, and Clipping Masks
While all these masking techniques serve to control where edits are applied, they differ in their implementation and use cases:
- Alpha Lock: Operates directly on a single layer, restricting edits to existing pixels on that layer. It's ideal for adding detail, texture, or color within an established shape without needing extra layers. It's a direct, in-place editing tool.
- Clipping Mask: Uses a separate layer positioned above a base layer. Edits on the clipped layer are confined to the visible areas of the layer below. This is excellent for applying details, textures, or effects to a specific base shape or color block without altering the base layer itself.
- Layer Mask: Also uses a separate layer, but this mask layer controls the visibility of its parent layer. It's a powerful non-destructive tool for selectively hiding or revealing parts of an image, allowing for complex compositing and editing without permanent changes.
The choice between these methods depends entirely on your artistic goals. For simply adding shading or texture to an existing shape on the same layer, Alpha Lock is the most straightforward. For applying detailed elements or effects to a distinct base, a Clipping Mask is often preferred. For complex image manipulation, compositing, or selective hiding of elements, Layer Masks offer the most flexibility and non-destructive workflow.
Advanced Workflow: Combining Techniques
Experienced Procreate artists often combine these tools to achieve sophisticated results. For instance, you might use a base layer for the main colors, then create new layers set as Clipping Masks for different color elements. Within those clipped layers, you could then use Alpha Lock to add intricate details or textures to specific parts of those colored elements.
Consider a scenario where you've blocked out a character. You could:
- Create a base layer for the character's form.
- Create new layers for different colors (skin, clothing, hair) and set them as Clipping Masks to the base layer.
- On a specific color layer (e.g., skin), you might then use Alpha Lock to add subtle shading and highlights directly onto the skin tone without straying outside the skin area.
This layered approach, utilizing the strengths of each masking technique, allows for a highly organized and flexible workflow.
The "Multiply" Blending Mode: A Complementary Tool
While not a masking technique in itself, understanding blending modes can significantly enhance your use of Alpha Lock and other masking features. The Multiply blending mode is particularly useful. When applied to a layer, it darkens the underlying layers based on the colors of the top layer, similar to how colors would interact if you were to superimpose different colored transparent acetates. If you have a blue base layer and a red layer set to Multiply above it, the resulting color will be a dark, almost black, hue. This mode is excellent for quickly adding shadows and depth to your artwork, especially when used in conjunction with a Clipping Mask or Alpha Lock to ensure the shadows fall within your desired areas.
For example, you could create a new layer for shadows, set its blending mode to Multiply, and then use Alpha Lock on this shadow layer. This way, you can paint your shadows freely, and they will only appear within the areas you've previously defined on the Alpha Locked layer, while the Multiply mode ensures they blend realistically with the colors beneath.
Beyond the Basics: Refine Your Artistry
Mastering Alpha Lock and Procreate's other masking tools is not just about following steps; it's about understanding the underlying principles of digital art and how these tools can be leveraged to achieve specific artistic outcomes. Procreate offers a vast canvas for creativity, and features like Alpha Lock are designed to empower artists by providing precise control and efficient workflows. Experiment with these tools on various projects, from simple shapes to complex illustrations, and discover how they can transform your creative process. Don't be afraid to try applying Alpha Lock to different types of elements, such as textures, backgrounds, or even abstract art, to see its full potential. The key is practice and a willingness to explore the expansive capabilities of Procreate.