Procreate offers a suite of powerful tools designed to make drawing precise lines and shapes accessible to artists of all skill levels. Whether you're a seasoned professional seeking perfect architectural renderings or a beginner struggling to create a clean horizon, Procreate provides intuitive methods to achieve straight lines with ease. This guide will delve into the various techniques available, from the simplicity of QuickShape to the precision of Drawing Guides and the subtle control offered by Stroke Stabilization, ensuring you can render the cleanest lines possible.
The Magic of QuickShape: Effortless Straight Lines and Perfect Forms
One of the most celebrated features for creating clean lines and shapes in Procreate is QuickShape. This ingenious tool transforms your freehand strokes into geometrically perfect forms with minimal effort. The fundamental principle behind QuickShape is to draw a rough version of your desired line or shape and then hold your Apple Pencil or finger steady at the end of the stroke. Procreate intelligently analyzes your input and refines it into a more consistent line or curve.
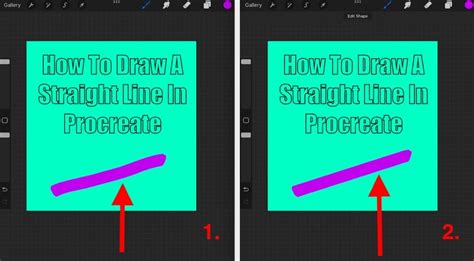
To initiate QuickShape, simply draw a line as you normally would and, upon completion, keep your Apple Pencil or finger pressed down on the screen. Watch as your imperfect stroke transforms into a crisp, straight line. This feature is particularly advantageous for those who find freehand drawing of straight lines a challenge, as it effectively "snaps" your drawing into alignment.
For absolute precision in horizontal or vertical lines, a secondary technique can be employed. After your initial line has snapped straight, press another finger to the screen. This action locks the line's orientation. While this second finger remains on the screen, you can then manipulate the angle of the line in precise 15-degree increments by moving your Apple Pencil. This is an invaluable method for establishing perfect perpendicular or parallel lines within your artwork.
Even after the line has snapped and you've lifted your Apple Pencil, there's still a window for adjustments, provided you haven't performed any other actions. At the top of your Procreate interface, a contextual menu will appear, offering the option to "Edit Shape." Tapping this button reveals further customization possibilities. For straight lines, selecting "Line" from this menu will introduce two adjustable dots, or nodes, at each end of your line. These nodes provide granular control, allowing you to precisely alter the line's angle, length, and position. This is incredibly handy for connecting elements in a drawing or ensuring perfect alignment.
QuickShape isn't limited to just lines; it excels at creating perfect geometric shapes too. Draw a rough circle, and hold your pencil down, and it will snap into a perfect circle or an ellipse. Similarly, a rough square or triangle will be refined into its ideal form. The "Edit Shape" menu remains accessible, allowing you to switch between different shape types if needed. For instance, you could draw a circle and then, via the "Edit Shape" menu, convert it into a square.
Harnessing the Power of Drawing Guides for Unparalleled Precision
Procreate's Drawing Guide feature offers a more structured approach to achieving perfectly straight lines and maintaining consistent perspectives. This tool provides a variety of grid overlays and assisted drawing functionalities that can dramatically enhance precision.
To access the Drawing Guide, navigate to the Actions menu (the wrench icon) and select the "Canvas" tab. Here, you'll find the "Drawing Guide" option. Toggling this on will overlay a default 2D grid onto your canvas. Beneath this toggle, you can select "Edit Drawing Guide" to customize the guide's appearance and type.
Procreate offers several types of drawing guides:
2D Grid: This provides a standard grid of horizontal and vertical lines, ideal for creating perfectly aligned elements. When "Assisted Drawing" is toggled on within the 2D grid settings, any line you draw will automatically snap to the grid's orientation. A small green node on the grid allows you to control the direction of this assisted drawing, enabling you to draw perfectly horizontal, vertical, or even precisely angled lines by aligning with the grid's orientation.
Isometric Grid: This guide is designed for creating 3D objects with an isometric perspective, featuring diagonal lines at 45-degree angles. When Assisted Drawing is active, your strokes will adhere to these diagonal lines, facilitating the creation of consistent 3D forms.
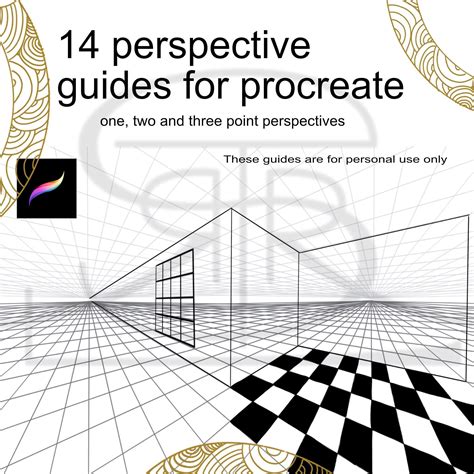
Perspective Guide: This powerful tool allows for drawing in one-point, two-point, or three-point perspective. You can tap on the canvas to set vanishing points, and Procreate will generate radial lines and a horizon line to guide your drawing. With Assisted Drawing enabled, your lines will naturally align with these perspective guides, ensuring accurate depth and spatial representation.
Symmetry: While not exclusively for straight lines, the symmetry guide is invaluable for creating mirrored elements. You can choose to mirror your strokes across a vertical, horizontal, quadrant, or radial axis. When drawing a straight line with symmetry enabled, the line will be mirrored across the chosen axes, resulting in perfect symmetry in your artwork.
To activate Assisted Drawing for any of these guides, ensure that the "Assisted Drawing" toggle is switched on within the "Edit Drawing Guide" menu. You can also toggle Assisted Drawing on or off directly from your Layers panel by tapping on a layer's name and selecting "Drawing Assist." This ensures that your lines will adhere to the chosen guide's parameters, making it exceptionally easy to draw perfectly straight lines at any angle.
It's important to note that when Drawing Assist is active, your lines will be constrained to follow the grid or perspective lines. You can adjust the direction of these assisted lines by manipulating the green node on the guide interface.
Refining Your Strokes: Stroke Stabilization for Smoother Lines
Even with the assistance of QuickShape and Drawing Guides, sometimes freehand strokes can appear slightly wobbly. Procreate's Stroke Stabilization feature, also known as Streamline, is designed to counteract this by smoothing out your brush strokes.
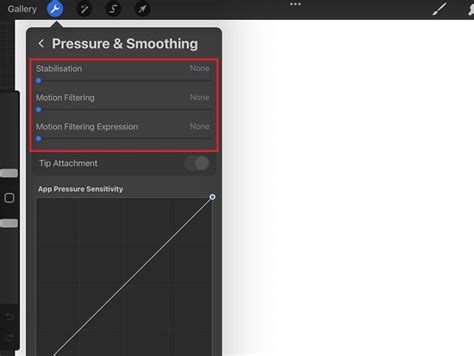
You can adjust the global stabilization settings for all your brushes by going to the Actions menu (wrench icon) > Prefs > Pressure and Smoothing. Here, you'll find a "Stabilization" slider. Increasing this value will apply a smoothing effect to all your brush strokes. However, it's crucial to find a balance, as excessively high stabilization can make natural, varied pencil strokes feel less organic and more rigid.
For more granular control, you can adjust the stabilization settings for individual brushes. Open your Brush Library, select the brush you wish to modify, and tap it again to open the Brush Studio. On the left-hand menu, find and select "Stabilization." You can then adjust the "Stabilization" and "Streamline" sliders to your preference. It's highly recommended to duplicate a brush before making these adjustments, allowing you to revert to the original settings if needed. Swiping left on a brush in the library and selecting "Duplicate" will create a copy, often with a "1" appended to its name, preserving your original brush.
Varying Line Weights for Dynamic Drawings
Procreate's ability to adapt line weight based on pressure is a fundamental aspect of creating dynamic and realistic artwork. When drawing a straight lineâwhether using QuickShape, Drawing Guides, or freehandâapplying varying pressure with your Apple Pencil can result in lines that are thicker where you press harder and thinner where you apply less pressure. This technique is particularly effective for adding depth and a more organic feel to your drawings, even when using the precision tools. It's important to remember that this pressure sensitivity will not apply to monoline brushes, which are designed to maintain a consistent line weight regardless of pressure.
Erasing with Precision: Straight Lines with the Eraser Tool
The principles of drawing straight lines in Procreate extend to erasing as well. You can utilize the same QuickShape and Drawing Guide functionalities with the Eraser tool to create perfectly straight erasures. Select your desired eraser from the eraser icon menuânote that you can even choose any brush to act as your eraser. Once your eraser is selected, you can employ the QuickShape technique: draw a line, hold, and let it snap straight. This allows for precise removal of sections of your artwork, ensuring clean edges and defined shapes.
Navigating QuickShape and QuickLine Behavior
Occasionally, Procreate's automatic snapping features, QuickShape and QuickLine, might seem overly eager, snapping lines when you intend to draw freely. If you find yourself consistently drawing straight lines unintentionally, you can adjust the responsiveness of QuickShape. Navigate to the Actions menu (wrench icon) > Prefs > Gesture Controls. Within the QuickShape settings, you'll find a "Delay" slider. Increasing this delay will give you more time to complete your stroke before the snapping feature activates. You can set this delay up to 1.5 seconds, or decrease it for a more immediate snap. Finding a balance between avoiding accidental snaps and maintaining efficient workflow is key.
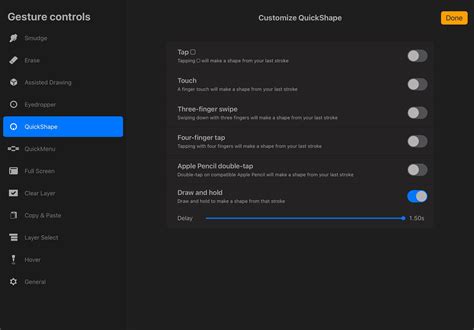
If QuickLine or QuickShape becomes a persistent nuisance, you have the option to disable them entirely. This can be done within the same Gesture Controls menu. By locating the specific gesture control for "Draw and Hold" and toggling it off, you can prevent Procreate from automatically straightening your lines or forming shapes.
Advanced Control: The Transform Tool
After a line or shape has been drawn and "locked" (i.e., no longer active in the Edit Shape menu), you can still modify it using the Transform Tool. Located in the toolbar, this tool, often represented by a diagonal arrow, allows you to move, resize, and rotate your artwork. The "Uniform" setting within the Transform tool ensures that your line or shape is scaled proportionally without distortion. Experimenting with the other transform modes can offer further creative manipulation options.
Embracing Imperfection: When Perfect Lines Aren't Necessary
While Procreate offers exceptional tools for creating perfect straight lines, it's also important to recognize that not all artwork requires geometric precision. Sometimes, the charm and character of a drawing come from its slightly imperfect, hand-drawn quality. For those seeking to embrace a more "sketchy" style, resources like Skillshare classes on sketchy doodling can provide valuable insights into developing a looser, more expressive artistic approach, even while understanding the underlying tools for precision.
By mastering these techniquesâQuickShape, Drawing Guides, Stroke Stabilization, and understanding the nuances of eraser and transform toolsâyou can confidently create straight lines of any kind in Procreate, tailored to the specific demands of your artistic vision.