Adjusting the color of individual layers in Adobe Photoshop is a fundamental skill for any digital artist or photo editor. Whether you aim to correct color imperfections, create dramatic artistic effects, or simply tweak the hue of a specific color range, Photoshop offers a versatile toolkit. This article will guide you through various methods, from basic techniques to more advanced strategies, ensuring you can precisely control color on a per-layer basis.
The Challenge of Isolated Color Adjustments
A common point of confusion for Photoshop users arises when attempting to modify the color of a single layer without affecting others. Many beginners find that standard adjustment layers, when applied directly, influence all layers beneath them. This can be frustrating, especially when working with complex compositions or multi-layered designs. For instance, if you have a project composed of several sketches on independent layers, as might be the case for a screen print design with multiple colors, adjusting each layer's color until the right combination is achieved can prove challenging if the methods are not applied correctly. You might select the whole layer, or a specific color, or mask off a part of the layer, but the adjustment still bleeds into other areas.
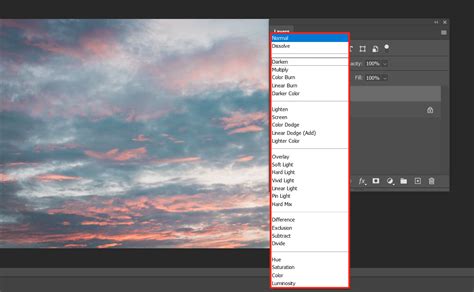
The core of this issue often lies in understanding how adjustment layers interact with the layers below them. While adjustment layers are powerful for making non-destructive changes, their default behavior is to affect everything within their reach. The key to isolating these adjustments lies in a technique that has been a staple for experienced users and can be applied in numerous scenarios.
The Power of Clipping Masks for Layer-Specific Adjustments
One of the most effective and widely used methods to ensure an adjustment layer only affects the single layer directly beneath it is by using a clipping mask. This technique is straightforward once understood and offers precise control.
To create a clipping mask, you first add an adjustment layer above the specific layer you wish to modify. Then, holding down the Alt (Option on Mac) key, you click on the line that separates the adjustment layer from the layer below it in the Layers panel. You will notice the adjustment layer icon changes slightly, and the layer it affects will be indented, indicating it is now "clipped" to the layer below. This ensures that any color adjustments made within that adjustment layer will only be visible and applied to the single layer directly beneath it.
This method is incredibly useful. For example, if you've created a composite image, perhaps with a musician like Taylor Davis, and you want to add a glow to a violin bow, turning it into a magical wand, you would create a Curves adjustment layer to brighten the image. If this adjustment layer, by default, affects all layers below, you would then invert its mask (Cmd/Ctrl + I to fill with black) to hide the effect. Then, you could paint white on the mask where you want the glow to appear. If you want to add a colored layer and paint on the same areas, without reproducing the mask, clipping the adjustment layer to the specific layer containing the bow is the most direct approach. While you can alt/Option drag the mask to replicate it, use a clipping group, or apply the mask to a group, the clipping mask method is often the most elegant for single-layer adjustments.
Exploring Adjustment Layers for Color Modification
Beyond the clipping mask technique, Photoshop offers a variety of adjustment layers specifically designed for color manipulation. Understanding their nuances is crucial for achieving desired results.
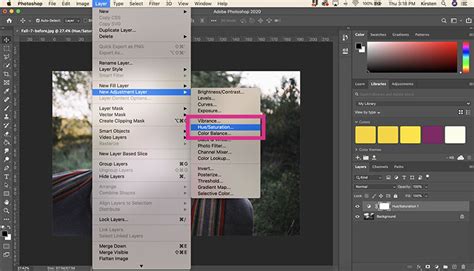
Hue/Saturation Adjustment Layer
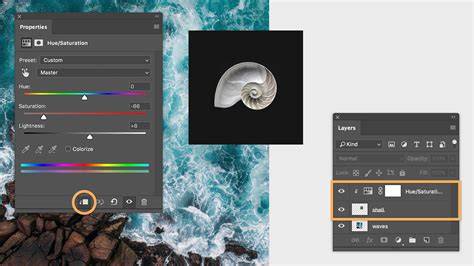
The Hue/Saturation adjustment layer is a versatile tool for altering the color of an image or a specific object. It allows you to change the hue (the pure color itself), saturation (the intensity of the color), and lightness (brightness) of your image.
To change the color of a specific object, you can begin by using selection tools like the Object Selection tool or the Quick Selection tool to isolate the area you want to modify. Once the object is selected, adding a Hue/Saturation adjustment layer will automatically create a layer mask based on your selection, confining the adjustments to that area. Within the Hue/Saturation properties panel, you can then use the Hue slider to shift the color to a new hue. If no selection was made, the adjustment will apply to the entire image.
A key feature of the Hue/Saturation adjustment layer is its ability to target specific color ranges. By using the eyedropper tool next to the "Master" dropdown, you can select a color within your image and then adjust its hue and saturation independently. This allows for fine-tuning and prevents unintended color shifts in other parts of the image.
Color Balance Adjustment Layer
The Color Balance adjustment layer provides a more targeted approach to correcting color casts or creating dramatic color effects. It works by allowing you to adjust the balance of cyan/red, magenta/green, and yellow/blue within your image.
To use Color Balance, you can create a new adjustment layer and select "Color Balance" from the dropdown menu. You can then move the sliders to add or subtract specific colors. For instance, moving the Cyan/Red slider towards Red will add red tones to the image. The values displayed above the sliders indicate the changes across the red, green, and blue channels, ranging from -100 to +100. Optionally, you can select "Preserve Luminosity" to ensure that the brightness of the image is not altered while you're adjusting the colors.
Photo Filter Adjustment Layer
The Photo Filter adjustment layer simulates the effect of placing a colored filter in front of the camera lens. It's an excellent way to apply a consistent color tint across an image or a specific layer.
To apply a Photo Filter, navigate to Layer > New Adjustment Layer > Photo Filter. You can choose from a range of preset filters (like Warming Filter or Cooling Filter) or select a custom color. The "Density" slider controls the strength of the filter's effect. Similar to Color Balance, the "Preserve Luminosity" option is available to maintain the original brightness values.

Destructive vs. Non-Destructive Color Changes
While adjustment layers are inherently non-destructive, some tools in Photoshop offer direct, destructive color changes. It's important to be aware of this distinction to preserve your original image data.
Color Replacement Tool
The Color Replacement tool is designed to replace existing colors in an image with a new color. It's a straightforward tool, but it modifies the pixels directly on the active layer. Therefore, it's highly recommended to duplicate your layer (Cmd/Ctrl + J) before using this tool to maintain a backup of your original image.
The Color Replacement Brush - Photoshop CC
When using the Color Replacement tool, you can select the color you want to replace using the eyedropper. You can add or subtract colors from the selection using the eyedropper with the plus or minus signs. The "Localized Color Clusters" option can help refine the selection to similar colors, and the "Fuzziness" slider controls the range of colors that will be affected. After setting your preferences, you can paint over the areas you wish to change.
Color Replacement Brush
The Color Replacement Brush is a less commonly known but effective tool for changing colors. It's often found hidden within the brush settings. Similar to the Color Replacement tool, it allows you to paint over areas and replace their color. You can select the color you want to paint with and choose different sampling methods to control how Photoshop picks up the existing colors.
Advanced Color Manipulation Techniques
Beyond the standard adjustment layers, Photoshop offers more advanced methods for intricate color control.
Color Fill Layer and Blending Modes
A powerful technique for applying color is by using a Color Fill layer. You can create a new fill layer (New Fill Layer from the bottom of the Layers Panel) and select your desired color. Then, change the blending mode of this new layer to "Color." This will apply the hue and saturation of the fill layer to the underlying layers while preserving their luminosity.
To make this adjustment layer-specific, you can create a black layer mask by holding down Option/Alt and clicking the "Add Layer Mask" button. This will hide the color fill initially. You can then paint with white on this mask to reveal the color fill only in the desired areas, effectively creating a selective color overlay.
Another approach involves changing the blending mode of a new layer to "Hue." This will apply the hue of the new layer to the layers below, while retaining their original saturation and luminosity. This is a subtle but effective way to shift the overall color tone of an element.
Match Color Adjustment
The Match Color adjustment, while powerful, can be perplexing due to its complex algorithm. It attempts to match the colors of a source image to a target image. However, it can struggle with low-saturation target colors, often due to subtle differences in hue and saturation in these areas that hide compression artifacts.
When using Match Color, it's important to consider the color space (e.g., sRGB for Hex numbers). If you're matching specific RGB or HSB numbers, understand that these represent a single, solid color. The tool tries to apply these to the target image, which can sometimes result in a flat, lifeless appearance, especially if the goal is to match hue and saturation while preserving the originating image's luminosity. The tool can sometimes be too aggressive in its attempt to match all color aspects, leading to undesirable results.
A more nuanced approach to color matching involves separating Hue and Saturation from Luminosity. This can be achieved by carefully adjusting color settings and, for instance, bringing down the white point until a desired color sampler point is met, thereby controlling color independently of brightness.
Alternative Approaches to Color Adjustment
Photoshop's flexibility means there are always multiple ways to achieve a similar outcome.
Gradient Map
The Gradient Map adjustment layer maps the luminosity values of your image to the colors in a gradient. This can be used for creative color grading or to create surreal color effects. By selecting different gradients, you can dramatically alter the color palette of your image.
Color Channels and Color Balance
As mentioned earlier, Color Balance is a direct way to adjust color. Additionally, manipulating individual Color Channels (Red, Green, Blue) can offer precise control over how colors are rendered. For instance, adjusting the Red channel can significantly impact the overall red tones in your image.
While many methods exist, the Hue/Saturation adjustment layer and techniques involving blending modes are often favored for their simplicity and the high degree of control they offer over the photo editing process.
Ultimately, the best method for changing layer colors in Photoshop depends on the specific project, the desired outcome, and your personal workflow. Experimenting with these tools will help you achieve professional results and unlock new creative possibilities.