Embarking on a digital art journey with Krita can be both exhilarating and, at times, a little daunting. This tutorial aims to demystify the process of creating a captivating seaside sunset painting, guiding you through each step with clarity and detail. Whether you're a seasoned digital artist or just beginning to explore Krita's vast capabilities, this guide will equip you with the knowledge and techniques to bring your vision to life. For those seeking a foundational understanding of Krita's interface, supplementary video resources are available, offering a quick tour of its essential features.
Krita Tutorial for Beginners - User Interface (PC)
Setting Up Your Digital Canvas
The first crucial step in any digital art project is establishing the correct document parameters. To begin, open Krita and navigate to the "New File" button, or utilize the convenient shortcut, Ctrl + N. Within the "New File" dialog, it's advisable to orient your canvas in landscape mode, which often lends itself well to scenic depictions. For this tutorial, we will select the "Film 16:9 4k" document preset. This choice will set your canvas dimensions to a generous 3840 pixels by 2160 pixels, providing ample space for detail and refinement. Once these settings are confirmed, click the "Create" button to generate your digital canvas.
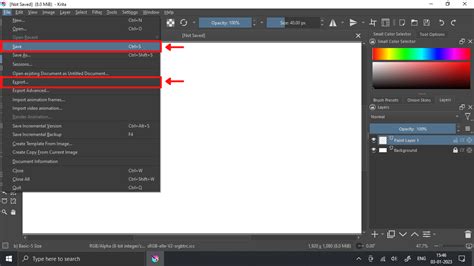
Before diving into the creative process, it's a best practice to save your work. Press Ctrl + S to initiate the save process, assign a descriptive name to your document, and choose a suitable location on your computer to store it. This simple act can prevent the loss of valuable progress.
Curating Your Color Palette
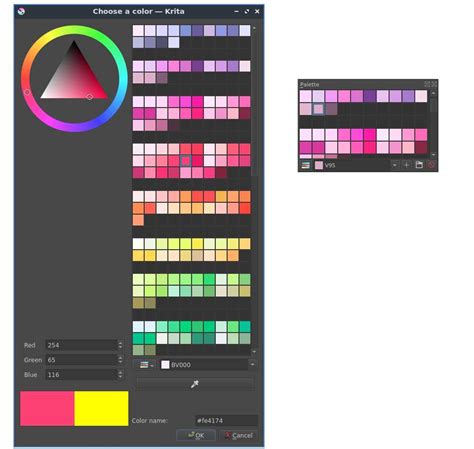
A well-chosen color palette is fundamental to achieving the desired mood and realism in your artwork. For this seaside sunset, a specific palette has been prepared as a guide. However, it's important to remember that these are merely suggestions; feel free to deviate and explore colors that resonate with your artistic intuition. The beauty of digital art lies in its flexibility, allowing for continuous tweaking and refinement of hues as the painting evolves.
To effectively utilize the provided palette, Krita's "Reference Image" tool is invaluable. Simply copy the palette image and access Krita's "Edit" menu, then select "Paste as Reference image" (Ctrl + Shift + R). This action will embed the color patch image as a reference layer, which you can then position adjacent to your canvas. This allows for easy color sampling throughout the painting process. Furthermore, incorporating additional reference images of sunsets can offer further inspiration and aid in capturing the nuanced atmospheric effects.
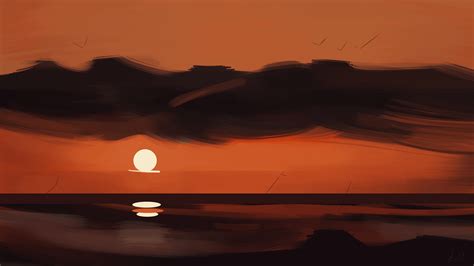
Crafting the Gradient Sky: The Foundation of Your Sunset
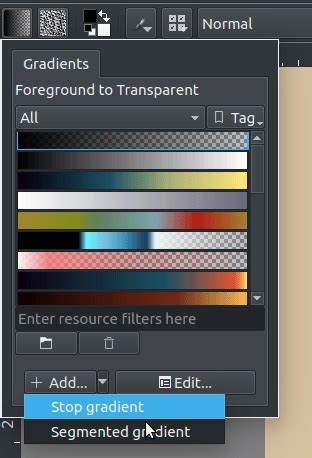
The sky forms the dramatic backdrop of our seaside sunset, and establishing a compelling gradient is key to its success. Activate the "Gradient Tool" by pressing G. In the toolbar, locate and click the "Fill gradients" button. Subsequently, click "Add" to open the dialog for creating a custom stop-based gradient. We will implement five stops: two at the edges and three distributed in the middle.
For the first stop, select a light yellow hue. You can precisely pick this color by clicking on the color box, which opens the "Color Chooser" dialog. Within this dialog, utilize the eyedropper tool to sample the desired color directly from your reference palette. Reduce the opacity of this initial stop to 50%.
Proceed to the second stop, changing its color to a light orange with 100% opacity and positioning it at 10%. For the third stop, choose an orange color, again maintaining 100% opacity, and set its position to 25%. Continue this process for the fourth stop, selecting an orange color with 100% opacity and placing it at 75%. Finally, for the last stop at the end of the gradient, select the purple color, which corresponds to the third patch in the second row from the top of the reference palette.
Give your custom gradient a descriptive name, such as "Seaside-01," and confirm by clicking the "OK" button.
With the gradient preset established, navigate to the "Tool Options" docker and select "Bi-Linear" from the "Shape" dropdown menu. Now, to define the horizon line and establish the base color of your sky, click and hold slightly below the center of the canvas. Pressing the Shift key will constrain the gradient line to a perfectly straight horizontal orientation as you drag it downwards. This action will create a foundational horizon line.
Painting the Clouds: Adding Depth and Atmosphere
Clouds are essential elements for conveying the dynamic beauty of a sunset. To begin painting them, activate the "Brush Tool" by pressing B. In the "Brush Presets" docker, search for and select the "f) Bristles-4 Glaze" brush. You can efficiently locate this brush using the search bar at the bottom of the docker.
Adjust the brush size to 180 pixels using the control in the top bar. Crucially, enable the "vertical mirror tool" by clicking the second mirror triangle icon situated next to the size slider. This tool is instrumental in creating symmetrical reflections, which will be vital for depicting the shimmering effects on a wet beach. A horizontal line will appear on your canvas with a grab handle. Drag this line, holding the handle, to position it roughly above your horizon line.
To prevent accidental movement of this symmetry line while painting, you have two options: either drag the grab handle completely off the canvas or lock the line by checking the "Lock Y Line" option, accessible via a small arrow icon in the toolbar.
Next, add a new layer for your clouds by clicking the plus icon in the "Layer" docker or by pressing the Insert key. On this designated layer, begin by sampling a dark purplish color from the second-to-last row of your palette. With slight pressure on your stylus, start painting the clouds. Create broad, horizontal swathes of clouds in the upper portion of the sky, and as you approach the horizon, draw thinner, sleeker cloud formations. Should you need to refine any areas, press the E key to transform your brush into an eraser.
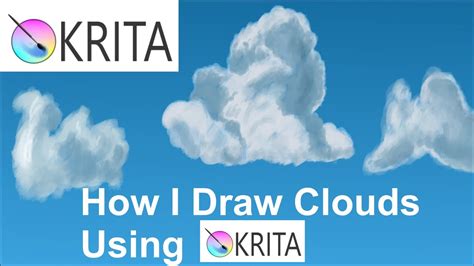
Once the base colors for the clouds are laid down, pick a darker purple from the last row of the palette and apply it to the upper sections of the clouds. This technique enhances the illusion of light originating from below, casting subtle shadows on the upper surfaces. Following this, select a dark red from the same row and paint with gentle pressure along the bottom edges of the clouds. This adds the warm glow of the setting sun, a light source that appears to emanate from beneath the cloud formations. Finally, introduce highlights by dabbing on the light yellow color, particularly along the lower edges where the sun's rays are most direct. For clouds closer to the horizon, also apply some light yellow highlights to the top, as light can also filter through from behind them.
Blending and Refining Cloud Textures
Achieving a smooth and natural transition between colors in the clouds is essential for a believable sky. After applying the initial colors, employ the "k) Blender Blur" brush. Draw horizontal strokes with light pressure across the cloud areas to seamlessly blend the various hues.
An alternative, highly effective method for blending and mixing colors involves utilizing the "Color Sampler Tool" (P). Activate this tool and navigate to the "Tool Options" docker. Increase the "Radius" to 20 pixels and reduce the "Blend" value to 80%. The radius determines the area from which Krita samples and averages colors, while the blend value dictates how much the current foreground color mixes with the sampled color. This setting will yield a pleasing intermediate color for your brush strokes, and by applying successive strokes, you can achieve remarkably smooth gradations.
Krita Tutorial for Beginners - User Interface (PC)
Apply this color-mixing technique within the clouds, complementing the effects of the blender blur brush. If you desire to select a pure, unblended color, simply increase the blend value back to 100%. Incorporate some of the purple color between the cloud formations, blending most of the colors to create depth. Then, strategically add highlights to the mid-sections of the clouds to further enhance their form and volume.
Depicting the Horizon: Landmass and Lighthouse
The horizon line is where the sky meets the earth, and it's time to populate it with terrestrial elements and a focal point â a lighthouse. Add a new layer by pressing Insert. Continue using the "f) Bristles-4 Glaze" brush, but adjust its size to 125 pixels. Sample a dark red color from the palette and begin applying vertical strokes along the central symmetry line.
Continue this process until you have covered approximately one-third of the canvas vertically. To add visual interest and a sense of a natural landscape, paint some coconut trees interspersed within this landmass. Position a lighthouse at the very end of the land formation. During this stage, you might observe that the clouds appear too close to the lighthouse. If this occurs, switch back to the cloud layer and refine the cloud formations by erasing and repainting thinner ones. Remember to switch back to your topmost layer to continue working on the landmass.
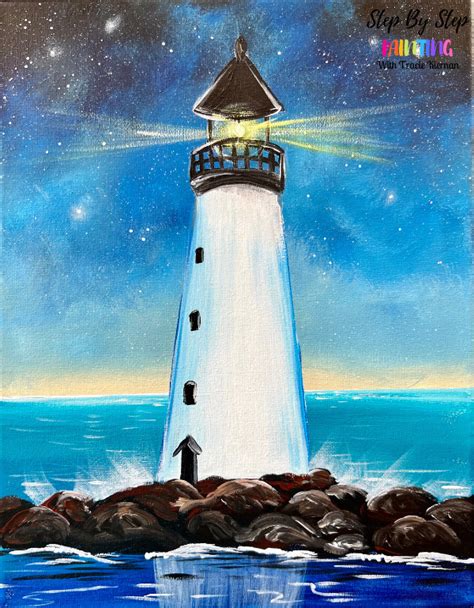
On the topmost layer, select a color that is slightly darker than the red you initially used and roughly cover the entire patch again. Repeat this process with the darkest available color. This layering of dark tones will create a subtle yet effective reddish gradation along the edge of the landmass.
To introduce the lushness of vegetation, sample some dark green colors from the palette and paint within the landmass area. Then, use a lighter green from the second row of the palette to add highlights, suggesting foliage catching the ambient light.
Bringing the Sea to Life: Waves and Reflections
The sea is a dynamic and ever-changing element, and capturing its essence requires attention to detail. Continue using the same "glaze" brush, but adjust its size to be between 25 and 100 pixels. You can fine-tune the brush size using the slider on the top bar or by utilizing the [ and ] shortcut keys.
Begin by color-picking a dark blue from the topmost row of the palette. At this point, the symmetry tool is no longer needed, so deactivate it by clicking its icon in the top bar again.
Add another new layer using the Insert key. With the brush tool active, press and hold the V key. This action will allow you to draw a straight line across the horizon, starting from the edge of the landmass. Subsequently, draw the shoreline with gentle, wavy lines. Ensure these lines are slightly skewed to create a convincing sense of perspective. Observing a video demonstration can be particularly helpful at this stage to grasp the nuances of drawing the shoreline.
Krita Tutorial for Beginners - User Interface (PC)
Fill the designated sea area with the dark blue color. To represent highlights on the water's surface, add horizontal lines using colors from the sky, specifically purple and orange. Blend these colors using the techniques previously discussed.
It may also be necessary to reduce the intensity of the light yellow band along the horizon, as this area will be dominated by the sun itself and its direct reflection. Select an orange color and paint a straight line along the light yellow band, then blend the color to soften its appearance.
Final Touches and Enhancements
As we approach the culmination of this painting, it's time to unify the various elements and introduce final refinements. Merge all existing layers by selecting the topmost layer in the "Layer" docker, then holding down the Shift key and clicking on the initial "Background" layer. Press Ctrl + E to combine all selected layers into a single layer.
Now, focus on enhancing the reflections on the water. Select the "k) Blender Rake" brush. With a brush size ranging from 40 to 80 pixels, draw horizontal strokes over the reflections of the landmass. The "Rake" brush will intentionally distort these reflections, adding a natural, watery effect. Avoid overdoing these strokes. For the reflections of the lighthouse, use a larger brush size and gently push the strokes outwards towards the sides. Introduce some randomness into these strokes to enhance realism. Extend some of these rake brush strokes across the sea's surface as well.

Add a new layer and select the "f) Bristles-1 Details" brush. Sample the lightest yellow color from your palette and begin painting the edges of the waves. Waves will appear more pronounced as they approach the shore. For certain sections, paint thicker waves to convey the visual of waves breaking upon the sand.
Using the same light yellow color, paint the sun just above the horizon. Subsequently, depict the sun's reflection on the seawater. Sample an ochre color from the canvas and paint over the reflection on the shore. This will introduce an organic quality, as a beach rarely exhibits perfectly mirror-like reflections. Add shadowy areas beneath the thicker waves to accentuate their form and provide a sense of depth.
Create another new layer and switch to the "Gradient Tool." Ensure the "Shape" in the "Tool Options" docker is set to "Radial." Using a medium yellow color from the palette, draw a gradient originating from the sun. Change this layer's blending mode to "Overlay." Sample some sky color and draw gradients originating from the top-left and bottom edges of the canvas.
Switch back to the "Brush Tool" (B) and paint some highlights on the seawater. Then, on the layer directly below, add some shadows beneath the waves.
Add yet another new layer and select the light yellow color. Switch to the "Gradient Tool" and draw a gradient originating from the sun. Change this layer's blending mode to "Screen." On this layer, paint additional clouds with the light yellow color and also apply highlights to the lighthouse and vegetation.
Return to the layer below, which is set to "Overlay" mode, and introduce more details. Add some pinkish hues to the sand and clouds to enrich the color palette.
Final Adjustments and Exporting
This final stage is crucial for breathing life into your painting and elevating its overall impact. Add a new layer on top of all existing layers and switch to the "Brush Tool." Choose the "f) Bristles-2 Flat Rough" brush. Apply mid-tones and shadows to the sand and clouds. Incorporate some of the bluish color from the sky into the seawater. Critically analyze your painting and make any necessary color adjustments.
Merge all layers by pressing Ctrl + E. Navigate to the "Filter" menu, then select "Adjust," and choose "HSV Adjustment." Increase the saturation and lightness slightly. Next, go to "Filter" -> "Adjust" -> "Color Adjustment Curves" (Ctrl + M). From the dropdown menu, select the "Red" channel. Click on the center of the graph and drag the line to create a curve. Repeat this process for the "Blue" channel and then press "OK." These adjustments will subtly enhance the red and blue tones within your image.
Once you are completely satisfied with the results, export your painting. You can choose to export it for web display, print it for framing, or even present it as a thoughtful gift.
This tutorial has aimed to provide a comprehensive walkthrough of creating a seaside sunset in Krita. We hope you have found it informative and inspiring. Seeing your creations is always a joy, so feel free to share your artwork. For those who wish to support the creator's efforts, options for buying a coffee or donating through PayPal are available. Additionally, prints of the sunset painting can be purchased.
For an in-depth, visual learning experience, a detailed 1-hour and 22-minute Krita video tutorial is available, offering a complete breakdown of the painting process. This resource is suitable for both beginners and advanced digital painters, starting from the basics with default settings and progressing through each stage. Accelerated sections of repetitive painting actions are included, with a timer overlay to facilitate easy skipping. The creator acknowledges potential challenges with understanding due to a French accent and limited vocabulary, and the lack of subtitles. The recording process, conducted in extremely hot weather and with sound-dampening measures, presented significant challenges. Appreciation is extended to the developers of OBS Studio, Kdenlive, and Krita for their invaluable software.
The video tutorial's Table of Contents (TOC) is provided below, which may assist search engines in indexing specific segments:
- 00:35:47 Chapter 5, Drawing.
Additional Krita-related video content includes:
- New Video: How to Draw Dynamic Figures in KritaReleased: Thursday, 9 March 2023
- New Video! Making Brushes Part 4Released: Thursday, 24 November 2022
- Multiple PerspectiveReleased: Tuesday, 8 February 2022
- First Krita Book in French!Released: Wednesday, 16 March 2016
- Introducing Dirty Presets, Locked Brush Settings and Cumulative Undo in Krita 2.9.Released: Saturday, 31 January 2015