When working with images, understanding image resolution in Photoshop is essential for achieving professional-quality results. Whether you're a graphic designer, photographer, or simply someone looking to enhance their photos, mastering resolution can make a significant difference in the clarity and detail of your images. In this guide, we’ll explore how to effectively manage and optimise image resolution to ensure your projects shine.
Photoshop offers powerful tools to adjust and enhance image resolution, allowing you to enlarge or reduce images without sacrificing quality. By learning the intricacies of resolution settings, you can transform ordinary photos into stunning visuals that stand out. With just a few simple steps, you can elevate your designs and presentations, ensuring they capture attention and convey your message effectively.
Join us as we dive into the world of image resolution in Photoshop, providing you with practical tips and insights. You'll gain the confidence to manipulate images like a pro, making your editing process smoother and more rewarding. Get ready to unlock the full potential of your images!
What is Image Resolution?
Image resolution refers to the amount of detail an image holds, typically measured in pixels. It indicates the number of pixels contained within a given area, such as inches or centimetres. Higher resolution means more pixels, resulting in sharper, clearer images. Common resolutions include 72 DPI (dots per inch) for web images and 300 DPI for print, ensuring high-quality output.
Resolution plays a crucial role in determining how images appear on different devices and mediums. For instance, a low-resolution image may look pixelated when enlarged, while a high-resolution image retains its clarity.
Understanding image resolution is essential for photographers, graphic designers, and anyone working with visual media, as it directly affects the quality and professionalism of their work. In applications like Photoshop, adjusting image resolution is key to achieving the desired visual impact for both digital and printed images.

Pixels Per Inch (PPI) vs. Dots Per Inch (DPI)
While often used interchangeably, PPI and DPI have distinct meanings. PPI refers to the number of pixels in an image file, particularly relevant for digital displays. DPI, on the other hand, refers to the number of ink dots a printer can place on a physical surface per inch. For print, achieving a high DPI often requires a corresponding high PPI in the digital image file.
How to Enlarge an Image in Photoshop
Enlarging an image in Photoshop can transform your visuals while maintaining quality, making it essential for designers, photographers, and anyone needing high-resolution graphics. Whether you're preparing images for print or simply need a larger version for a project, Photoshop offers powerful tools to help you upscale your images effectively.
This guide will walk you through the steps to enlarge your images while preserving details, using features like "Image Size" and advanced resampling techniques. With just a few clicks, you can achieve stunning results that elevate your work. Let’s explore how to enlarge your images in Photoshop without compromising on quality.
Step-by-Step Image Enlargement
Step 1 - First, open the Image you want to upgrade in Photoshop. Then, go to the "Image" menu and select "Image Size."
Step 2 - In the "Image Size" dialog box that appears, make sure to check the "Resample Image" option. Then, select an interpolation method from the drop-down menu. We recommend using either "Bicubic Sharper" for reducing blur or "Bicubic Smoother" for creating smoother results when enlarging.
Step 3 - Once you've selected an interpolation method, enter your desired width and height for your Image in the appropriate fields. Finally, click "OK" to confirm your changes.
And that's all there is to it! After following these steps, your Image should be enlarged with significantly higher quality.
Using Super Resolution on JPEG in Photoshop
Using Super Resolution on JPEG images in Adobe Photoshop is a straightforward process that can dramatically enhance your image quality. This feature leverages artificial intelligence to intelligently add pixels, creating a higher-resolution version while preserving detail and clarity.
Leveraging AI for Enhanced Resolution
Step 1 - Start by launching Photoshop and opening the JPEG file you want to upscale.
Step 2 - Right-click on the image layer in the Layers panel, then select Convert to Smart Object. This step is crucial as it allows for non-destructive editing, meaning you can always go back and make further adjustments without degrading the original image data.
Step 3 - Go to Filter > Camera Raw Filter. In the Camera Raw interface, right-click the image and select Enhance. Check the Super Resolution box and click Enhance. Photoshop will analyse the image and create a higher-resolution version.
Step 4 - Once the process is complete, save your newly enhanced JPEG by choosing File > Save As, ensuring you select the appropriate format.
This feature is perfect for enlarging JPEGs without losing quality, making it an essential tool for photographers and designers looking to elevate their visuals effortlessly. Enjoy stunning results with just a few clicks!
How to use the Super Resolution feature in Photoshop
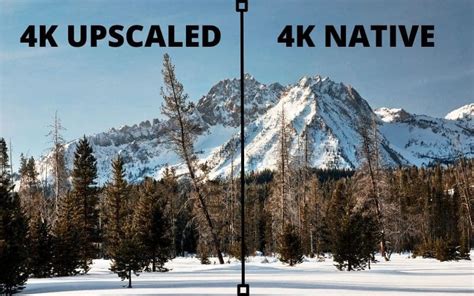
Importance of Upscaling Image Resolution
Upscaling image resolution is essential for maintaining visual quality, especially in larger formats. When you enlarge an image without proper upscaling, it often becomes pixelated and lacks clarity. Upscaling helps retain the sharpness and detail of the original photo, ensuring it looks professional and crisp, even when enlarged.
This process is particularly important for printing high-quality posters, banners, and other large-scale visuals. Additionally, improved resolution enhances the overall viewing experience, making images more appealing and engaging. Whether for personal projects or professional work, upscaling image resolution ensures your visuals stand out with impeccable clarity and detail.
The Analogy of Seeds in a Field
Imagine you and a friend each having a bucket full of 5000 seeds to plant in a field. You must use all 5000 of your seeds by planting them in 1-inch squares in a field. Now imagine that you are allowed to plant only 150 of your seeds per inch and your friend is allowed to plant 300 seeds per inch. Your friend's field will appear much denser and more detailed than yours, even though you both started with the same number of seeds. This is analogous to how resolution works: more pixels (seeds) per inch (field area) create a more detailed image.
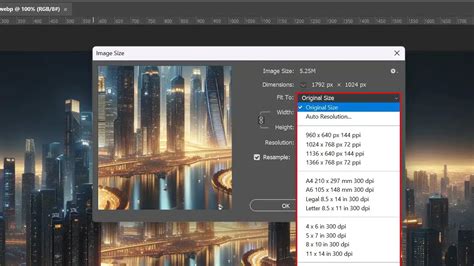
How to Check Image Resolution in Photoshop
Checking the image resolution in Photoshop is a straightforward process that ensures you start with the best quality for your projects. This allows you to make informed decisions about whether an image is suitable for its intended use, whether for web display or print.
Navigating the Image Size Dialogue
Step 1 - Launch Photoshop and open the image you want to check by selecting File > Open.
Step 2 - Go to the top menu and click on Image, then select Image Size from the dropdown.
Step 3 - In the Image Size dialogue box, look for the Resolution field, which shows the image's PPI (pixels per inch). This measurement indicates the image's detail and quality.
Step 4 - If necessary, adjust the resolution settings. For print, aim for 300 PPI; for web use, 72 PPI is typically sufficient. Make sure the "Resample Image" option is unchecked if you’re only checking the resolution without altering the image size.
This quick check helps you maintain the desired quality for your specific needs.
The Difference Between Image Enlargement and Resolution Upscaling
When working with images, understanding the difference between image enlargement and resolution upscaling is crucial for achieving the best quality. While both processes aim to make an image appear larger, they utilize different methods and have distinct implications for image quality.
Simple Enlargement vs. Intelligent Upscaling
1. Image Enlargement: Image enlargement refers to simply increasing the dimensions of an image, resulting in a larger physical size. This process does not necessarily enhance the image's quality; instead, it can lead to pixelation or blurriness if the original image lacks sufficient detail. Photoshop achieves this by stretching existing pixels, which can result in a blocky appearance.
2. Resolution Upscaling: Resolution upscaling, on the other hand, involves increasing the pixel count of an image to improve its quality while enlarging it. This method uses advanced algorithms to interpolate pixels, creating a smoother and sharper appearance, often preserving more detail compared to simple enlargement. Photoshop's "Super Resolution" feature and advanced interpolation methods fall under this category.
Benefits of Upscaling Image Resolution
Image resolution plays a crucial role in the quality and clarity of visuals. Higher-resolution images enhance clarity, ensuring details are sharp and vibrant, making them perfect for both digital and print media. With improved resolution, you gain greater flexibility in editing, allowing for precise adjustments without sacrificing quality.
Additionally, high-resolution images present a more professional appearance, boosting the overall impact of your work. Various online tools can help you upscale image resolutions efficiently, ensuring that your visuals remain crisp and clear even when enlarged.
These tools often utilise advanced technologies, such as AI, to enhance the details and quality of your images. Whether you need to upscale image Photoshop files or leverage Photoshop AI upscale capabilities, these tools can make the process seamless and effective.
Exploring Online Upscaling Tools
While Photoshop offers robust built-in features, several online tools can assist in upscaling image resolutions:
- Upscale.media: This tool uses advanced AI technology to improve image quality without losing sharpness, offering a quick, user-friendly solution.
- Let’s Enhance: Utilising advanced AI algorithms, this tool enhances image resolution while preserving fine details and reducing noise.
- Deep Image: Specialises in enhancing and upscaling images using advanced AI technology, providing impressive results with minimal manual intervention.
- Waifu2x: Popular for upscaling images and reducing noise, it works well with various image types, providing clear and enhanced resolution.
- Bigjpg: An effective online tool for upscaling images while preserving detail and clarity using AI technology.
- AI Image Enlarger: Enhances image resolution by analysing and refining details, ensuring enlarged images remain sharp and clear.
- VanceAI Image Enlarger: Utilises advanced artificial intelligence to upscale images while preserving their quality, effectively adding detail and clarity.
- PixBim Enlarge AI: Harnesses the power of artificial intelligence to upscale images with remarkable precision, intelligently adding details and reducing noise.
- Fotor: A versatile online photo editing tool offering a range of options for upscaling and improving image resolution with ease.
- PhotoZoom Pro: A specialised tool designed to enlarge images while maintaining high-quality resolution with advanced algorithms.
While these tools offer convenience, Photoshop's comprehensive features provide more in-depth control and customisation for professional-grade results.
Tips For Increasing Image Resolution
To achieve the best results when increasing image resolution, consider these essential tips:
Starting with Quality and Understanding the Process
- Use High-Quality Sources: Start with the highest-quality image available. The better the original, the better the results when upscaling. Low-quality source images will inherently limit the potential quality of the upscaled version.
- Understand Resolution vs. Size: Image editing programs like Adobe Photoshop can give you resolution information and allow you to change the resolution of an image. It's crucial to understand that changing resolution without resampling often affects the document size (width and height) without altering the number of pixels. This lets Photoshop know that we do not want to add or subtract any pixels to the photo. Adding and subtracting pixels is what happens when we resize images (to enlarge or shrink them). To change resolution, we are NOT changing the number of pixels in the photo, but changing only how many of those pixels will be displayed per inch.
The "Resample Image" Option Explained
When you navigate to Image > Image Size in Photoshop, you'll encounter the "Resample Image" option.
- With "Resample Image" checked: This allows Photoshop to add or remove pixels to change the image's dimensions (width, height, and resolution) independently. This is what you use for true upscaling or downscaling, where the total pixel count changes. Interpolation methods (like Bicubic Smoother or Bicubic Sharper) are critical here to determine how new pixels are created or existing ones are discarded.
- With "Resample Image" unchecked: This option allows you to change the resolution (PPI) without altering the total number of pixels. If you increase the resolution (e.g., from 72 PPI to 300 PPI), the physical dimensions (width and height) of the image will decrease proportionally to accommodate the higher pixel density. Conversely, decreasing the resolution will increase the physical dimensions. The pixel dimensions (total number of pixels) remain the same.
Interpolation Methods for Upsampling
When resampling and increasing the number of pixels, the choice of interpolation method significantly impacts the outcome:
- Nearest Neighbor: The fastest but least sophisticated method, it simply duplicates existing pixels. This can lead to jagged edges and stair-step artifacts.
- Bilinear: Averages the colors of four nearby pixels. It's smoother than Nearest Neighbor but can still result in some blurriness.
- Bicubic: Averages the colors of 16 nearby pixels. It provides better sharpness and detail than Bilinear but can sometimes introduce artifacts.
- Bicubic Smoother: Specifically designed for upscaling, it tends to produce smoother gradients and fewer jagged edges.
- Bicubic Sharper: Optimized for downscaling, it aims to retain sharpness when reducing image size. When used for upscaling, it can sometimes introduce unwanted over-sharpening.
For increasing picture resolution in Photoshop, "Bicubic Smoother" is often a good choice for achieving a more natural enlargement.
Understanding Screen Frequency and Output Devices
Photoshop can suggest picture resolution based on the screen frequency of the output device. In the "Image Size" dialog, under "Resample Image," you can find an "Auto" option that uses the screen frequency to suggest a resolution. The "Screen" field allows you to input the screen frequency for the output device.
- Draft: Produces a resolution identical to the screen frequency (at least 72 pixels per inch).
- Good: Gives a resolution 1.5 times higher than the screen frequency.
- Best: Gives a resolution 2 times higher than the screen frequency.
If the picture’s resolution is more than 2.5 times higher than the screen resolution and you attempt to print the picture, a warning message appears. In this case, you may need to save a copy of the file and then lower the resolution or crop the image in Photoshop.
Viewing Print Size and Adapting to Templates
To view the print size on the screen, try one of the following methods: In the View menu, click "Print Size," or select the Hand tool or Zoom tool and check the options bar. You also have the opportunity to adapt the file size to a particular print template. The picture is then redisplayed in its estimated printing size, as indicated in the Document Size area of the Image Size dialog box.
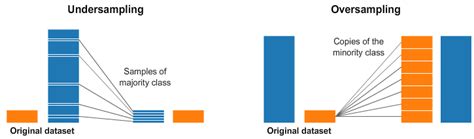
Oversampling and Pixel Resampling
Oversampling is a modification in the amount of image data when you are altering the pixels’ size or the resolution of the picture. When the resolution is lowered (the number of pixels is reduced), the information is eliminated from the picture. This is called downsampling. When you raise the number of pixels or boost the sampling, new pixels are added. This is called upsampling.
When to Consider Professional Retouching or Repair Tools
If you are after professional shots in high resolution and find yourself struggling to achieve the desired quality, consider seeking help from expert retouchers. If your images are significantly low-quality, warped, or damaged, dedicated image repair tools like EaseUS Fixo Photo Repair can be effective in unblurring pictures and enhancing their resolution. These tools often employ advanced algorithms to reconstruct missing or corrupted image data.
The Role of AI and Machine Learning
Artificial intelligence (AI) and machine learning (ML) are increasingly playing a vital role in image upscaling. Features like Photoshop's "Super Resolution" and similar technologies in Adobe Lightroom leverage AI to intelligently add pixels and reconstruct details, offering quality that was once only achievable through manual, time-consuming processes or by starting with a higher-resolution original. These AI-powered tools can often predict and generate plausible details, making upscaled images look more natural and less artifacted.
Experiment with Super Resolution, resampling, and even AI image upscalers to see how far you can push your image quality. You may be surprised at the resolution details you can recover and improve using modern image editing software like Adobe Photoshop.
tags: #what #is #resolution #photoshop