If you’re new to video editing, you might have heard of DaVinci Resolve. What you may not know is that it’s quickly becoming the go-to recommendation for beginners. While it has a steeper learning curve than other editors like Premiere Pro, DaVinci Resolve offers more control and flexibility once you learn the ropes. On top of that, it also has a free version you can download instantly. If you’re just getting started with video editing and looking for a beginner tutorial, you’re in luck. In this post, we’ll cover the basics of how to use DaVinci Resolve and explore the main tools you can use to start editing a project.
DaVinci Resolve has gained interest from professional editors and hobbyists in recent years. Backed by a super-capable free version and the constant addition of new features, the software is versatile and surprisingly sweeping. Whether you’re new to video editing or looking to switch from another piece of software, this DaVinci Resolve tutorial will show you how to use this excellent program to get you up and running fast. With this simple DaVinci Resolve tutorial, you’ll go from opening the software for the first time to sharing your finished video project. In this DaVinci Resolve tutorial, you’ll focus on solo editing tips and tricks to get you started.
Note: The screenshots used in this article are from DaVinci Resolve 18.6. If you’re using a different version, some settings and tools may be in other locations.
Creating Your First Project in DaVinci Resolve
To create a simple video with DaVinci Resolve, there are a few steps you need to understand. In a basic editing workflow, you need to create a project, add your media, cut and edit your clips, and export the final product. Let’s find out how each of these steps works in DaVinci Resolve.
Setting Up a New Project
DaVinci Resolve’s project management uses a disk database. Rather than saving individual project files onto your hard drive and keeping tabs on their locations, your projects are stored centrally. For this DaVinci Resolve tutorial, we’ve kept project creation very simple. This is how you’ll set up a project to use just for yourself.
- Select "Untitled Project" or New Project: To create a new project, open the DaVinci Resolve app and select "Untitled Project" or use the "New Project" button to create a new project file. The first time you open a project, you’ll land on the Project Manager page. From the Project Manager, select "New Project."
- Name Your Project: Next, name your project, then hit "Create."
- Adjust Project Settings: Before you move to the next step, it’s wise to set your project settings. Go to "File" > "Project Settings" or click the gear icon at the bottom-right of the screen. You can ignore most of these settings for now. All you need to do for now is make sure your "Timeline frame rate" and "Timeline resolution" match the video files that you’re going to import. These can be found under the "Master Settings" section. You’ll need to set your Timeline Frame Rate. This defaults to 24 fps, but ideally, you’ll change this to match the majority of your footage (such as 23.976 or 25 fps). If you adjust the timeline frame rate, change the "Playback Frame Rate" and "Video Format" tabs to match. If you don’t know what these settings should be, don’t worry. You’ll have another chance to alter the frame rate when you import your footage.
Navigating the DaVinci Resolve Interface
Before you import and edit your video files, it’s important to understand how DaVinci Resolve’s interface and layout work. DaVinci Resolve is organized so that each step of the editing workflow has its own workspace. These are found along the bottom of the screen and include Media, Cut, Edit, Fusion, Color, Fairlight, and Deliver. For this basic tutorial, we’ll focus on Media, Cut, and Edit.
The Media Page: Organizing Your Assets
The Media page is where you’ll import and organize your media files. The purpose of this page is to help you get everything ready for the editing process. This is how the Media page is arranged:
The most important parts of the Media page are:
- Media Storage: Found in the top-left pane, you’ll see your computer’s file directory. You can use this to navigate through your drives to quickly locate media you want to import.
- Media Pool: The bottom-central pane is where your imported media is displayed. You can organize your media into bins (folders within DaVinci Resolve) to keep everything tidy.
- Viewer: The Source Viewer is the top-central pane. It helps you preview clips while importing and organizing them.
To begin editing, you’ll need to mark your footage. This way, you’re only moving useful media onto the timeline for editing. Hover your mouse over each clip’s thumbnail and scrub the footage. Press "I" on the keyboard to mark an in-point, the place in the footage you’d like to start with. Press "O" on the keyboard to mark an out-point, the point in the footage you’d like to end with. Click and drag the thumbnail onto the timeline to make an edit. Alternatively, double-click a shot you’d like to load into the viewer to review. The same "I" and "O" keyboard shortcuts apply.
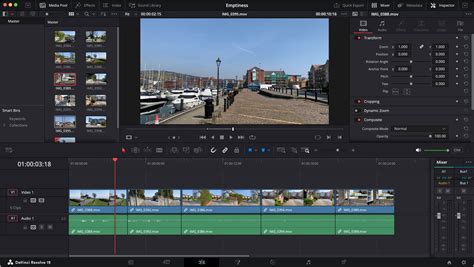
The Cut Page: Quick Edits and Rough Assemblies
The Cut page provides simple tools to help you cut up your video assets. It’s useful for quick edits and shorter projects where advanced features aren’t needed. On this page, you’ll find all of the basic tools you need to create a complete sequence from your raw media files.
Let’s take a look at the Cut page:
The key sections include:
- Timeline: The Timeline is the main section of the Cut page, found along the bottom of the screen. This is where you’ll add, cut, and arrange your media. DaVinci Resolve features a dual timeline where the upper timeline provides an overview of the whole project, while the lower timeline lets you make precise edits.
- Media Pool: Found in the top-left corner, this pane works exactly the same as it does on the media page. You can drag and drop clips from the Media Pool onto your timeline.
- Viewer: This is the video preview screen that takes up most of the Cut page. Here, you’ll be able to see the effects of your edits in real time. You can switch between Source Tape and Timeline modes to see your sequence as you build it.
- Toolbar: Just above the Timeline, you’ll see a toolbar with a stack of icons. Here, you’ll find basic tools that help you select, move, and cut clips in your Timeline.
- Transitions, Titles, and Effects: Along the top of the Media Pool pane, there are buttons for Transitions, Titles, and Effects. These let you apply specific video effects from the Resolve library, helping you to create a more professional-looking video.
The Cut and Edit tabs in DaVinci Resolve are spaces for editing video. The main difference is that the Cut tab is ideal for short projects (such as social media shorts) and rough assemblies, while the Edit tab is the traditional editing workspace that’s ideal for complex projects.
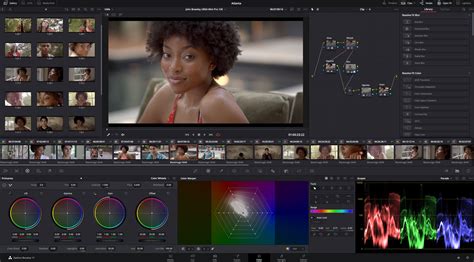
The Edit Page: The Professional Workspace
The Edit page is a fully-featured workspace for professional video editing. It’s here that the majority of editors spend their time, with a comprehensive set of tools for fine-tuning footage, transitions, effects, and more.
Here’s what the Edit page looks like:
You should now be familiar with the Media Pool and Timeline. Here are some new sections to note:
- Source and Timeline Viewers: Unlike the Cut page, the Edit page has two viewers. On the left, the Source Viewer shows the clip you’re preparing to edit. On the right, the Timeline Viewer shows the sequence as you’re constructing it in the Timeline.
- Editing Toolbar: Directly above the Timeline, there’s a toolbar with several tools that help you import, trim, and snap clips together in the sequence.
- Inspector Panel: At the top-right corner, you’ll see the Inspector panel. This panel has a range of editing tools, effects, and transitions you can add to your clips. From here, you can rotate, zoom, flip, and change the position of your clip. And that’s not all-there are also options to crop, stabilize, add lens corrections, and more.
By now, you hopefully have a basic understanding of the Media, Cut, and Edit pages. We recommend taking some time to get familiar with each page as it’ll make editing much faster when you can remember where everything is. As you get better with DaVinci Resolve, you can start to explore the Fusion, Color, and Fairlight pages. These pages will give you everything you need to enhance the colors, sounds, and effects in your videos. And don’t forget, you can use DaVinci Resolve LUTs and intro templates to take these features even further.
Importing and Editing Your Media
Now that you know how the Media, Cut, and Edit pages are laid out, it’s time to import your audio and video files and start editing. As we go through some of these steps, we’ll be including both the actions along with the keyboard shortcut in Resolve. Using keyboard shortcuts is a great way to learn the program and edit faster. Our complete guide to DaVinci Resolve keyboard shortcuts is a great resource to use as you’re learning the program.
DaVinci Resolve supports a wide range of video and audio file types, which makes importing media to your project straightforward. While there are a few ways to import your media, the easiest way is to simply drag and drop your files into the Media Pool.
In the Media page, open Media Storage and navigate to where your files are found. Drag and drop the files from the directory structure into the Media Pool.
You can also import media directly from the Cut and Edit pages. To do so, right-click inside the Media Pool and select "Import Media." Navigate to your desired files, then click "Open."
To make edits, you’ll need to mark your footage. Hover your mouse over each clip’s thumbnail and scrub the footage. Press "I" on the keyboard to mark an in-point, the place in the footage you’d like to start with. Press "O" on the keyboard to mark an out-point, the point in the footage you’d like to end with. Click and drag the thumbnail onto the timeline to make an edit.
Splitting Clips for Precise Editing
Splitting clips creates a break that lets you isolate parts of your footage, remove unwanted segments, and rearrange your videos. To split clips in DaVinci Resolve, open the Edit page and navigate to the part of your sequence that you want to split. Press "B" or click the Blade Edit Mode icon (it looks like a razor blade). Then, click inside your sequence to create a split.
You can also split clips within the Cut page by using the Split Clip tool. Move the playhead to the part of the clip you want to clip, then click the Split Clip icon to create a break.
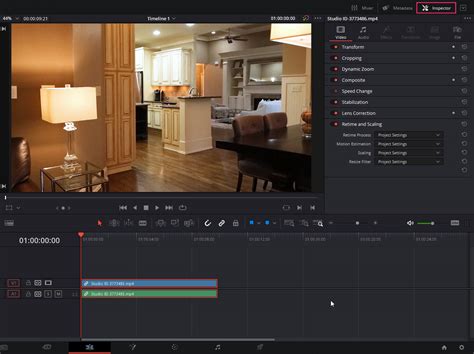
Cropping Your Footage
Cropping a video lets you remove unwanted edges, focus on a specific part of the frame, or resize the aspect ratio. You can crop your footage within the Edit page, where you’re given tools to adjust specific parts of your video. Here’s how to do it:
- Select the Clip: Make sure you’re on the Edit page, then select your clip in the timeline to highlight it.
- Open the Inspector Panel: If the Inspector panel isn’t already open, select the Inspector button at the top-right corner of the interface.
- Adjust Cropping Settings: Select the "Cropping" header to expand the settings, then adjust each slider until you have the crop you’d like. Each directional slider (crop left, right, top, and down) will crop inwards by a specific number of pixels. The further you drag the slider, the more it’ll crop.
- Reposition and Scale Your Footage: If you still want the cropped footage to take up the entire frame, you can reposition and scale the clip. In the "Transform" section, use the "Position" tool to center your clip. Then, use the "Zoom" tool to expand your clip until it fills the frame.
Undoing and Redoing Mistakes
Undoing and redoing actions in DaVinci Resolve is a quick way to correct any mistakes you might make during the editing process. DaVinci Resolve offers simple keyboard shortcuts and an extensive edit history to help you quickly undo or redo your actions.
Here are the keyboard shortcuts:
- Windows/Linux: Press
Ctrl + Zto undo the last action andCtrl + Shift + Zto redo the last previously undone action. - Mac: Press
CMD + Zto undo the last action andCMD + Shift + Zto redo the last previously undone action.
You can also go to the top bar and select "Edit" > "History" to see a list of your recent actions and select which point you want to revert to. This is extremely useful if you’ve made a series of edits that you want to take back, as it effectively acts as a backup.
Adding Text and Enhancing Your Video
Once you have your clips arranged and edited, you'll want to add text and potentially other enhancements to make your video more engaging.
Adding Text Overlays
DaVinci Resolve offers several options for text customization, from simple captions to more complex animations. Here’s how to add text in DaVinci Resolve using the Edit page:
- Import Your Media (if needed): If you’re going to overlay the text onto the video, make sure your clips are already placed in the timeline.
- Access the Effects Library: Select "Effects" in the top-left corner and navigate to "Titles," under the "Toolbox" category.
- Choose a Text Effect: If you just want simple text, drag and drop the "Text" effect from the Titles section onto the timeline above your video track. If you want more customizable and advanced features, drag the "Text+" option onto your timeline instead. You can also choose from the other preset title animations provided by DaVinci Resolve.
- Edit the Text: Select the text in the timeline, then navigate to the Inspector panel. Here you can change the font, size, color, and other basic properties as you see fit. If you use the Text+ effect, you’ll also be able to change tracking, line spacing, color, shading, and animation options.
How to Add Text in DaVinci Resolve
DaVinci Resolve includes two different text tools: "Text" and "Text+". The "Text" option is for quickly generating 2D titles. You can change fonts, introduce a drop shadow, and even add a colorful background shape to help separate the text from the video. "Text+" is a more sophisticated tool based on Blackmagic’s compositing software DaVinci Resolve Fusion. Text+ titles offer more possibilities, but they can take a long time for your computer to render and aren’t the easiest tools to learn. Pro Tip: Double-check that you’ve selected the right title before editing! You have to manually click on the title in the timeline first.
Applying Transitions
While most video production relies on more straightforward transitions, such as fade to black or cross dissolve, you’ll find several useful transitions pre-built and ready to use. Click "Edit" on the ribbon toolbar.
Open the "Effects Library" panel at the top left of the interface. Under "Video Transitions," click and drag the "Cross Dissolve" transition onto the Timeline. Place your mouse between 2 video pieces. You’ll find all the tools to edit and adjust your transitions to match the mood of your project in the Inspector. You can adjust how long or short a fade is and whether it’s gradual or linear.
Using Built-in Effects and Plugins
DaVinci Resolve comes bundled with many high-quality plugins that let you add effects to your videos. Typically, the newest and latest fancy effects are locked to the paid version. For example, DaVinci Resolve 18 introduced new effects like the Surface Tracker for adding effects to moving surfaces, and updated the Resolve FX Depth Map to offer improved control for depth-based effects. As you’d expect, the free version of the software comes with far fewer options than the paid version. Don’t worry, though! There are still plenty of effects to learn and explore here.
Within the Effects Library, navigate to "OpenFX." Scroll down to "Vignette." You can also add an adjustment clip to the whole Timeline. Under "Effects Library" > "Effects" > "Adjustment Clip," drag that effect to a new layer in the Timeline. You can also supercharge the software by adding templates and macros.
Advanced Editing Techniques for Beginners
As you become more comfortable with the fundamental editing process, you can start exploring features that will refine your workflow and the final output of your videos.
Syncing Audio and Video
If you record audio separately from your video, DaVinci Resolve makes it quick and easy to sync the audio with the video. To do this, select (control on a PC or command on a Mac) the audio and video clips you want to sync. Right-click and choose "Auto Sync Audio," then "Waveform." Resolve will listen to each track’s audio and use it to align the waveforms. Once done, the footage automatically plays with the synced audio, simplifying your editing process.
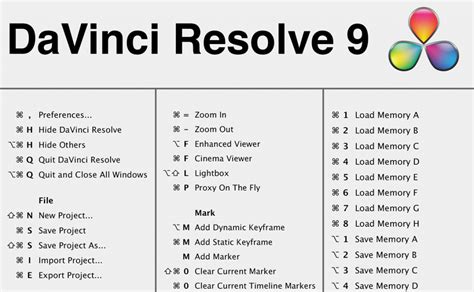
Leveraging Keyboard Shortcuts
One of DaVinci Resolve’s strengths is the ability to use your keyboard almost entirely in the editing process. Like learning the piano notes in a song, it takes some practice to bring them together. But once you do, editing goes much quicker, and you rarely need to use your mouse. Additionally, if you’re switching from another software, like Premiere Pro, you can import your keyboard shortcuts and continue using them. For our tutorial, we’re using the default shortcuts. We also made a reference sheet (below) of all the shortcuts mentioned in the video above.
Basic Editing Keyboard Shortcuts:
Use these to cut through your footage and find the parts you want.
- J: Back; increase play speed with additional taps.
- K: Stop.
- L: Forward; increase play speed with additional taps.
- Space bar: Play and pause.
- I: Create In Point (begin a cut).
- O: Create Out Point (end a cut).
- F9: Insert cut footage into the timeline.
- Q: Toggles between the source and timeline views.
Scrubbing Footage with the Source Tape Viewer
If your project is large, selecting each clip individually can be a pain. In that case, you can choose the source tape viewer. When selected, the source viewer displays all your video files in a single stream. Source Tape Viewer makes it easy to go through and find your in and out points, which can be especially helpful when sorting through b-roll clips repeatedly.
Automating Parameters with Keyframes
Keyframes allow you to change a parameter over time. Want a slow punch in? Keyframe. Dramatic zoom? Keyframe. Motion graphics? You get the idea: there are keyframes for every parameter imaginable. Let’s walk through the basics of using keyframes. Select the clip you want to edit. This opens the Inspector in the upper-right corner. Place your playhead where you want the parameter change to start. In the Inspector, locate the keyframes. They are the column of diamonds. Click on the keyframe diamond next to the parameter change you’re making, such as the zoom effect. This action adds a keyframe at the playhead for that parameter. Next, move your playhead to the place where you want the parameter change to occur. Add another keyframe by clicking the diamond again. Changing the parameters will also automatically create another keyframe.
Applying Changes Across Multiple Clips
Let’s say you change the volume of one clip and want all or multiple other clips to also apply the same change. Here’s how. Select the clip you changed. Copy it with Ctrl + C (PC) or Command + C (Mac). Select all the clips you want to mimic that change and hit Alt + V (PC) or Option + V (Mac). A paste menu will pop up, allowing you to choose which parameters to apply across the clips. Select the parameters you wish to change. Other attributes you can copy and paste include zoom, crop, equalizer, and many more.
Normalizing Audio Levels
DaVinci Resolve makes it easy to normalize audio levels, allowing you to even out clips with varying high and low volumes. To do this, select all clips in the Timeline, right-click, and choose "Normalize Audio Levels." Choose your Normalization Mode. For most people, the differences don’t matter. Choose "Independent," which normalizes each clip individually to create a consistent volume range throughout the video.
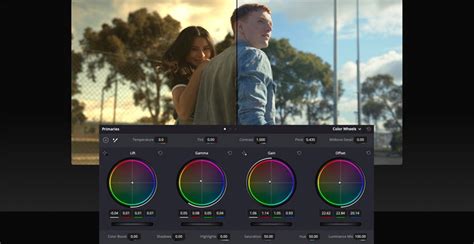
Quick Color Correction
In later episodes of our DaVinci Resolve for Beginners series, we’ll cover color grading in depth. But here’s a quick beginner hack, and you don’t need to know anything about color grading to use it. From the Color tab, select a clip and hit the little “A” to auto color correct. Select all the other clips to apply the same color correction. Then right-click and select "Apply Grade."
Exporting Your Finished Project
Once you’re happy with your edit, titles, transitions, music, and color, you’ll want to share your work with the world. Head back over to the Cut page. Remember, the latest versions of DaVinci Resolve also offer cloud collaboration and sharing tools you can explore. From DaVinci 18 forward, there’s also been an expanded stable of formats open for direct export, which is fantastic for social media creators.
Quick Export from the Edit Tab
Quick Export lets you export your project without going through the delivery tab. Find the option within the upper right corner of the Edit tab. The pop-up window lets you quickly choose your render settings (H.264 Master is a good place to start, but there are many presets as well), add a filename, and export to your computer or hard drive.
Exporting from the Deliver Page
Alternatively, you can use the Deliver page for more control over your export settings. Go to the Deliver tab, and you'll get a bunch of settings to choose from. Then hit "Add to Render Queue." You can queue up multiple videos to render at once if you want.
While it exports, DaVinci Resolve will show a status window. This lets you know the progress of your render. Once that’s done, your movie is ready to share!
How to Add Text in DaVinci Resolve
Next Steps in Your DaVinci Resolve Journey
Whew. That was a lot to cover! But now you’ve walked through the core process of editing in DaVinci Resolve, from organizing media to exporting the final product. As you keep practicing, these steps will become second nature.
If you have questions, tips of your own, or want to see specific topics covered in future tutorials, we’d love to hear from you. See you next time! You now have a solid overview of how to use DaVinci Resolve and even created your first project. Now it’s time to take that knowledge and unleash your creativity. Learn everything about video editing in DaVinci Resolve.
As you get better with DaVinci Resolve, you can start to explore the Fusion, Color, and Fairlight pages. These pages will give you everything you need to enhance the colors, sounds, and effects in your videos. And don’t forget, you can use DaVinci Resolve LUTs and intro templates to take these features even further.
DaVinci Resolve is available for free, making it easy for anyone to edit videos. From footage to finish, grab your clips and follow along. Become A Resolve Pro with Keyboard Shortcuts. DaVinci Resolve is even more powerful with its keyboard shortcuts, making the editing process smooth and fast. Grab our shortcuts cheatsheet and start practicing today.
We’ve previously examined what’s driving that shift and how Resolve compares with Premiere Pro. Now, we’re excited to help you get started. This beginner-friendly tutorial will prepare any DaVinci Resolve newbie, whether you’re new to the software or video editing altogether. In this episode on DaVinci Resolve, LaClair walks through the full video editing process: Get organized in the Media tab. Tell your story in the Edit tab. Make it shine and export from Delivery.
"If you've never touched video-editing software before, go ahead and download DaVinci Resolve right now-it's completely free. Now that you've mastered the basics, why not take your video editing to the next level? There's plenty more to learn about this wonderful editing app. We also have hundreds of free DaVinci Resolve tutorials here on Envato Tuts+.
Avoid the “Media Offline” Problem: A common DaVinci Resolve issue is the “Media Offline” problem. This error occurs when footage imported into Resolve is moved on your computer or external hard drive. In other words, if the source location of your footage changes, the link in Resolve breaks. To prevent this error, determine the folder or drive where you will permanently store your footage before bringing it into DaVinci. To fix this issue, select one or more clips. Right-click the footage and hover over "Clip Operations." Select "Relink Selected Clips" and find the footage’s new location.
Add Sound Effects with Resolve’s Built-in Library: In the upper-left section of the Edit tab are various primary menus: Media Pool, Effects, Index, and Sound Library. When you open the Sound Library for the first time, the software prompts you to download it. Once downloaded, you can search for countless sound effects and easily drag them into your videos. Pro Tip: Search three asterisks-“***”- to see all effects available in the Sound Library.
Enhance Your Edits with Storyblocks Assets: Sign up to Storyblocks for unlimited downloads of thousands of pre-made, customizable templates for DaVinci Resolve.
Video That Works Inside Your Business: SproutVideo powers secure video with the controls and analytics businesses need. Prove impact with rich video analytics and engagement heat maps. Control access to videos using passwords, login credentials, or SSO. Protect content with allowed domains, dynamic watermarks, and more. Trusted by Fortune 500 companies like FedEx and Siemens, try SproutVideo completely free for 30 days. No credit card required.