Adobe Photoshop, a powerhouse in digital image manipulation, offers a robust suite of tools for creating and editing text. Whether you're a seasoned professional or a beginner looking to add flair to your designs, understanding how to effectively edit letters within Photoshop is crucial. This guide delves into the intricacies of text manipulation, from basic character edits to advanced styling and replacement techniques, ensuring you can confidently work with type in your projects.
Understanding Photoshop's Text Layers
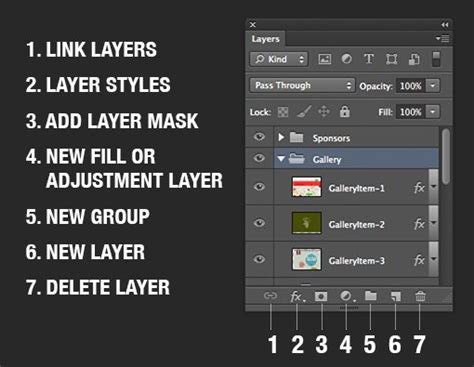
At the core of text editing in Photoshop are Text Layers. These dedicated layers are distinct from pixel-based layers and are identified by a "T" icon instead of a typical image thumbnail in the Layers panel. This distinction is vital because it means text retains its editability and resolution independence until it's rasterized.
When you open an image file in Photoshop, it may appear as "Layer 1" by default. To begin working with text, you'll typically select a type tool from the toolbox. Once text is created, it resides on its own layer, allowing for independent manipulation. For new text, you write and commit the text you want to apply a style to. If you make a mistake at all during the process, the simple way to undo the error would be to use the hot key Ctrl/Cmd+Z.
Committing and Canceling Text Edits
After you've made changes to your text, you need to "commit" those changes. This can be done by clicking a different tool in the toolbox, clicking in the image away from the text layer you are editing, or by pressing the Esc key. Note that the Esc key is set to commit text by default. You can change this behavior to cancel changes by going to Edit > Preferences > Type (Windows) or Photoshop > Preferences > Type (macOS).
Editing Existing Text
Photoshop provides several intuitive ways to modify existing text within a text layer.
Selecting Text for Editing
To edit characters in a layer, you first need to select them. You can achieve this in several ways:
- Click to set the insertion point: Place your cursor where you want to begin editing.
- Drag to select one or more characters: Click and drag your mouse across the text.
- Double-click to select a single word: A quick double-click will highlight an entire word.
- Triple-click to select an entire line of text: Three quick clicks will select a whole line.
- Select a range of characters: You can select a range of characters by clicking and dragging, or by clicking at the start of the range, holding down Shift, and clicking at the end of the range. Alternatively, hold down Shift and press the Right Arrow or Left Arrow key to select characters one by one.
Once text is selected, you can enter text as desired, effectively replacing the selected characters.
Modifying Text Properties
The options bar at the top of the Photoshop interface is your primary control panel for text properties. Here, you can modify various aspects of your type.
- Font Selection: Choose from a wide array of installed fonts. A font is a complete set of characters-letters, numbers, and symbols-that share a common weight, width, and style. You can change the font for individual characters or all type in a layer.
- Font Size: In the Tool Options, enter or select a new value for Size. You can enter a size larger than 72 points. The value you enter is converted into the default unit of measurement. The default unit of measurement for type is points. You can change this in the Units & Rulers section of the Preferences dialog box. Photoshop calculates the default font size based on document resolution and zoom factor. When a new document is created, or an existing document without type layers selected is opened, the font size will be reset to the newly calculated default font size. Also, the leading will be set to Auto. Previously, the default font size was always 12 pt, and sometimes this would be too small depending on resolution and zoom factor.
- Color: You can change the type color before or after you enter text. To do this, select the text you want to modify, then choose a color from the Color menu in the options bar or use the Color panel.
Applying Faux Styles
While it's always best to use actual font variations provided by the typeface designer, Photoshop allows you to apply faux (fake) versions of bold and italic. These are not true typographic features but rather programmatic alterations that can sometimes compromise the integrity of the typeface design. You can apply these styles to the font and its type style independently.
Advanced Text Editing and Styling
Beyond basic edits, Photoshop offers powerful tools for advanced text manipulation and styling.
Warping Text
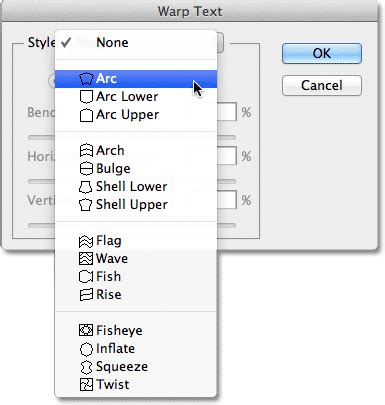
You can warp type into various shapes, such as an arc or a wave, to add dynamic visual interest. To do this:
- Select the type tool and select the text you want to warp.
- In the options bar, click the "Create warped text" icon.
- Choose a warp style from the Style pop-up menu.
- Adjust the Bend slider to specify the amount of warp.
- You can also apply perspective to the warp using the other sliders.
Horizontal and Vertical Type
By default, Photoshop creates horizontal type, where the type lines flow from left to right. However, you can easily switch to vertical type, where the type lines flow from top to bottom. To create vertical type, select the Vertical Type tool from the toolbox or choose Layer > Type > Vertical.
Using the Character and Paragraph Panels
For more granular control over your text, the Character panel and Paragraph panel are indispensable.
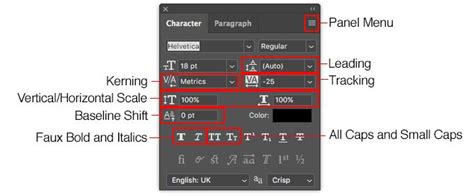
- Character Panel: This panel allows you to fine-tune individual characters. You can adjust leading (the space between lines of type), kerning (the space between specific pairs of characters), tracking (the overall spacing between characters), horizontal and vertical scaling (to change the width and height of characters), and more. You can change the color of individual characters or all type in a layer directly from this panel.
- Paragraph Panel: This panel focuses on the overall layout of your text paragraphs. It offers options for alignment, justification, indentation, and hyphenation.
Language Dictionaries and Spelling Checks
Photoshop integrates with language dictionaries to assist with spelling and hyphenation. You can select a language from the pop-up menu at the bottom of the Character panel to ensure accurate spell-checking and hyphenation for different languages. This is particularly useful when working with multilingual content. The spelling check can continue without changing the text, or it can correct a misspelling. If a word is misspelled, you can enter the correct word in the "Change To" text box and click "Change."
Color Fonts
Color fonts take typography to a new level by allowing you to embed vibrant, multi-colored elements directly into your text. These fonts can include layered colors, gradients, and textures, going beyond basic black or grayscale.
Understanding Resolution and Type Size
The appearance of type is dependent on the resolution of the image. Text that is approximately 1-inch high in an image that is 72 ppi will appear differently than the same text in a higher-resolution image. This is why Photoshop recalculates the default font size based on document resolution and zoom factor.
Replacing Text in Images
There are two primary scenarios for replacing text in Photoshop: when the text is part of a dedicated text layer, and when the text is embedded within a pixel-based image.
Replacing Text in Text Layers (Find and Replace)
If the text is in a text box (meaning it's on an editable text layer), you can leverage the Find and Replace Text tool. This method is for replacing text that’s in a text box object.
- Select the layer containing the text you want to find and replace in the Layers panel. Ensure the type layers you want to search are visible and unlocked.
- Go to Edit > Find and Replace Text.
- In the "Find What" text box, enter the text you want to find.
- In the "Replace With" text box, enter the revised text.
- Choose your search scope (e.g., "All Layers," "Current Layer," or "Selection"). "Searches all layers in a document" is an option. You can also choose to search forward from an insertion point in the text.
- Click "Find Next" to locate the text, and then "Replace" or "Replace All" to make the changes.
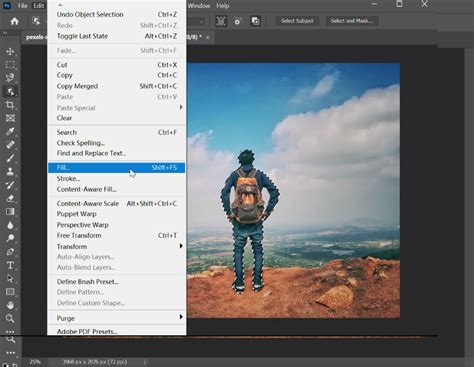
Replacing Text Embedded in Images (Content-Aware Fill)
When text is part of an image, meaning it's not on an editable text layer, you'll need to use pixel-editing tools. This often involves removing the existing text and then adding new text.
- Duplicate the Layer: Before making any destructive edits, duplicate the layer you're working on by clicking it in the Layers panel and pressing Ctrl+J (Windows) or ⌘ Cmd+J (macOS). This preserves your original image.
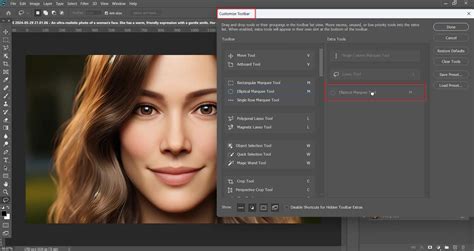
- Select the Text: Use your preferred selection tool (e.g., Quick Selection, Lasso Tool) to carefully select the text you want to remove. For complex backgrounds, you'll want precise control when replacing text on a complex background. Press Z to switch to the zoom tool to get a closer look.
- Remove the Text with Content-Aware Fill:
- Go to Edit > Content-Aware Fill.
- Photoshop analyzes the surrounding pixels and attempts to seamlessly remove the selected text, filling the area with matching background content.
- In the Content-Aware Fill dialog box, you can see a preview of the fill and adjust settings if needed.
- Add New Text:
- Press T to switch to the Type tool.
- Click on the spot where the original text was located.
- Type your new text. You can try to match the original font, or select a completely new one!
- Once you've entered the new text, you may need to commit it.
- Rasterize Type (if necessary): If you plan to apply certain filters or use tools that require rasterized layers, you might need to convert your text layer into pixels. Right-click the new text layer in the Layers panel and select Rasterize Type. Photoshop provides an OK button you can click to rasterize the layer.
Advanced Selection and Removal Techniques
For text on complicated, busy backgrounds, you'll need more advanced techniques. The precision of your selection is paramount. Tools like the Pen Tool can offer the most control for complex shapes. When removing text from a background, consider the texture and pattern of the surrounding area to ensure the fill looks natural. Sometimes, manual cloning or healing with tools like the Clone Stamp Tool or Healing Brush Tool might be necessary to achieve a perfect blend.
Transforming and Manipulating Text Layers
Once you have your text in Photoshop, you can transform it in numerous ways.
Free Transform
The Free Transform command is one of the most customizable tools for manipulating a layer, including text layers.
- Select the text layer you want to transform.
- Go to Edit > Free Transform (or press Ctrl+T / ⌘ Cmd+T).
- A bounding box will appear around your text. You can then:
- Scale: Drag the corner handles to resize the text. Hold Shift while dragging to maintain proportions.
- Rotate: Move your cursor just outside a corner handle until it turns into a curved double-arrow, then click and drag to rotate.
- Skew: Hold Ctrl (Windows) or ⌘ (macOS) and drag a side handle to skew the text.
- Distort/Perspective: Hold Ctrl+Shift (Windows) or ⌘+Shift (macOS) and drag a corner handle to apply distortion or perspective.
- Press Enter or Return to commit the transformation.
Rotating Type
You can rotate type by selecting the type layer and using any rotate command or the Free Transform command. You can also rotate characters by 90° horizontally or vertically. To do this, select the text, then in the options bar, choose the rotate character option.
Vertical Alignment
You can vertically align texts by selecting the text tool and clicking the "Align" button in the options bar or Paragraph panel. Then, you will see alignment icons and options, including those for vertical alignment.
Working with Type Styles and Effects
Photoshop allows you to apply a wide range of styles and effects to your text to enhance its appearance.
Blending Options
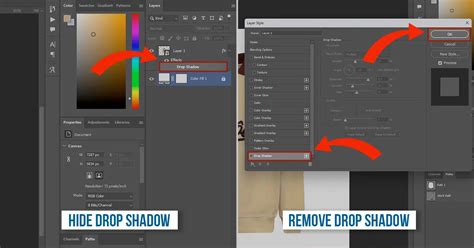
Right-click on the text layer in the Layers panel and choose Blending Options. This opens a dialog box where you can apply various layer effects such as:
- Drop Shadow: Adds a shadow behind the text.
- Outer Glow/Inner Glow: Creates a glowing effect around the text.
- Bevel and Emboss: Adds a 3D-like effect to the text.
- Stroke: Adds an outline to the text.
- Color Overlay/Gradient Overlay/Pattern Overlay: Applies solid colors, gradients, or patterns to the text.
These effects can be customized extensively to achieve unique looks.
Faux Styles and Typeface Design
It's important to distinguish between true typographic features and "faux" styles. A typeface design is the art and technique of arranging type. While Photoshop can apply faux bold or italic, these are not part of the original typeface design and can sometimes lead to undesirable visual artifacts. For optimal results, always try to use the actual bold or italic versions of a font if they are available.
Considerations for Print and Web
The way type appears can be affected by the intended output medium.
Resolution Dependence
Remember that type created as text layers is vector-based and will remain sharp regardless of scaling. However, once rasterized, it becomes pixel-based and its quality will degrade if scaled up significantly. This is why understanding image resolution is important, especially when preparing files for print.
Anti-aliasing and Font Rendering
Photoshop offers anti-aliasing options for text, which smooths out the jagged edges of pixels. Options like "Smooth" help to blend the curves of the font with the background, creating a more professional appearance. The choice of anti-aliasing can also affect how text is rendered on screen and in print.
Expert Insights
Shari Fairclough, a Social Media & Graphic Design Expert, emphasizes the versatility of Photoshop for text manipulation. She notes that "whether you’re working on a marketing class assignment or making a new meme, removing and replacing text on an object is easy in Adobe Photoshop!" Her experience highlights the practical applications of these editing techniques.
Conclusion
Mastering text editing in Photoshop involves understanding the fundamental nature of text layers, utilizing the various tools for selection and modification, and exploring the advanced styling options available. From simple character edits to complex text replacements and stylistic transformations, Photoshop provides a comprehensive environment for bringing your typographic designs to life. By leveraging tools like the Type tools, Character and Paragraph panels, Content-Aware Fill, and Blending Options, you can achieve professional and impactful results for any project.