The Brush Tool in Adobe Photoshop stands as a cornerstone for digital artists, photographers, and designers, offering unparalleled control over painting, drawing, and applying a vast array of effects. Its versatility is such that it's considered indispensable for anyone serious about image manipulation and creation. With a myriad of brush options and intricate settings, the Brush Tool unlocks a universe of creative possibilities, allowing users to move beyond basic fills and strokes to achieve sophisticated artistic outcomes. This tutorial aims to demystify its power, guiding beginners and those looking to deepen their understanding through its core functionalities, advanced customization, and practical applications.
Understanding the Fundamentals of the Brush Tool
At its heart, the Brush Tool functions much like a traditional drawing instrument. It applies color by creating strokes on a digital canvas. When you press and hold the mouse button or apply pressure with a stylus on a drawing tablet, the tool lays down a shaped mark. Continuing to paint creates a continuous stroke, with multiple marks being added until the pressure is released. Each application of the brush adds color based on the Foreground Color selected in the Tools toolbar.
Essential Brush Tool Options
The primary settings that govern how the Brush Tool applies color are found in the Options Panel. These include:
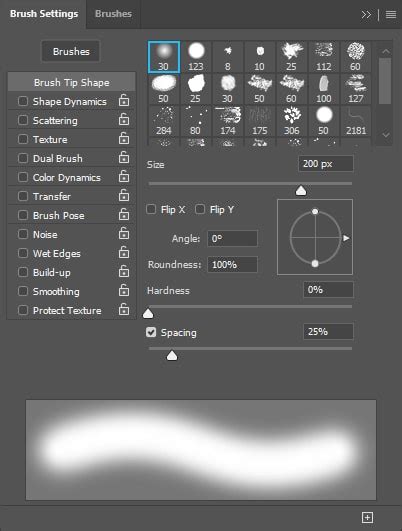
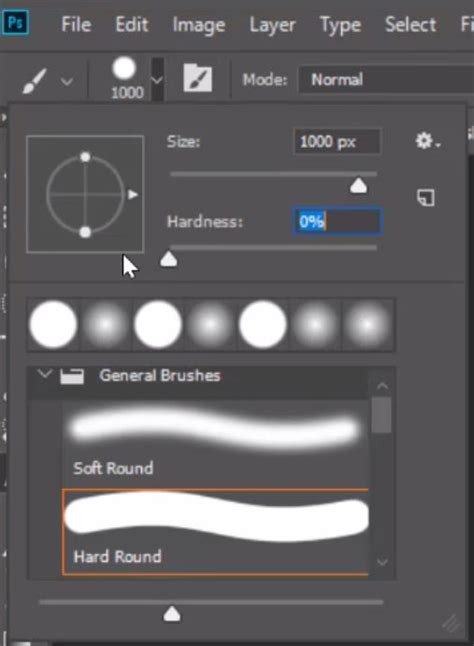
- Brush Tip Shape: This is the most basic setting, allowing you to choose the form of the mark the brush makes. Clicking on the Brush Preset Picker in the Options Panel reveals a collection of built-in presets.
- Size: This option dictates the dimensions of the brush tip. The default keyboard shortcuts for increasing or decreasing the brush size are the
[and]keys, respectively. - Hardness: This setting controls the sharpness of the brush tip's edge. A higher hardness value results in a crisp, defined edge, while a lower value produces a softer, feathered edge.
- Size: This option dictates the dimensions of the brush tip. The default keyboard shortcuts for increasing or decreasing the brush size are the
- Blending Mode: Each time you paint, you can select a Blending Mode for the stroke. These modes function identically to layer blending modes, dictating how the applied color interacts with the existing pixels on the canvas. They offer powerful ways to add color (e.g., Darken, Multiply, Overlay) or introduce light effects (e.g., Lighten, Color Dodge, Linear Dodge). There is a vast scope for experimentation here.
- Opacity: Opacity determines the transparency of the color being applied. A brush with 100% opacity will lay down a solid, opaque color, while a brush set to 1% opacity will be barely visible. When painting with a low opacity brush (e.g., 20%), each pass over the same area will add to the color, building it up incrementally. However, the opacity of any single pass will not exceed the set level. Only when the mouse button is released and a new stroke is initiated does the opacity stack further. This stacking effect allows for gradual color build-up.
- Flow: The Flow setting controls the rate at which paint is applied. With a low flow setting (e.g., 20%), each continuous pass of the brush over the same spot will build up more paint, gradually darkening the area. This is distinct from opacity, where each pass is limited to the set opacity level. Flow allows for a continuous, smooth blending of color as you hold down the mouse button. Reducing flow dramatically can yield smoother blends, especially when working with soft brushes or trying to achieve subtle color transitions.
Mastering Brush Presets and Customization
Photoshop offers a rich library of brush presets, but its true power lies in the ability to create and modify custom brushes. The Brush Panel is the central hub for managing and refining these tools.
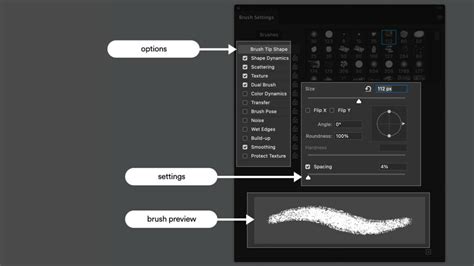
The Brush Settings Panel
To access the comprehensive brush customization options, navigate to Window > Brushes. This panel provides a deep dive into brush behavior.
- Brush Tip Settings: Within the Brush Settings Panel, you can further refine the brush tip.
- Spacing: This percentage determines the distance between individual brush marks when you create a stroke. Increasing spacing will spread out the marks, while decreasing it will create a more solid line.
- Hardness: As mentioned earlier, this can also be adjusted here for fine-tuning the edge quality.
- Shape Dynamics: This section introduces randomness and variation to brush strokes.
- Size Jitter: Controls the variation in brush tip size within a stroke.
- Angle Jitter: Randomizes the angle of the brush tip.
- Roundness Jitter: Introduces variation in the roundness of the brush tip.
- Control Dropdowns: Many jitter options can be controlled by factors like Pen Pressure, Pen Tilt, Stylus Wheel, or even Fade (which varies the effect over the length of a stroke). Pen Tilt and Stylus Wheel offer advanced control when using pressure-sensitive drawing tablets, mirroring the functionality of Pen Pressure.
- Scattering: This setting distributes brush marks randomly along the stroke.
- Both Axes: When checked, scattering occurs along both the X and Y axes.
- Count Jitter: Adds randomness to the number of brush marks within a stroke.
- Color Dynamics: This powerful feature allows for variations in color across a single stroke.
- Hue Jitter: Introduces random variations in the hue, shifting the color within a defined range from the foreground color.
- Saturation Jitter: Controls the percentage by which the saturation of the stroke varies, moving between the foreground and background colors.
- Brightness Jitter: Similar to saturation jitter, this option introduces random variations in brightness.
- Dual Brush: This advanced setting allows you to combine two brush tips to create a unique, composite mark. The second brush texture is applied within the stroke of the primary brush, and only where both strokes intersect are pixels painted.
- Texture: This enables you to apply a pattern to your brush strokes, simulating painting on a textured surface. You can select from various patterns and adjust their scale.
- Texture Each Tip: If selected, a new instance of the texture is applied with each individual brush mark, creating a more varied effect.
- Build Up: This option simulates the behavior of a traditional airbrush. Holding down the mouse button or applying continuous pressure results in a larger, more saturated mark.
- Smoothing: Particularly useful when drawing with a mouse or when aiming for fluid lines, smoothing reduces the choppiness of brush strokes, producing more graceful curves.
- Protect Texture: This ensures that the same pattern and scale are applied to all brush presets that utilize texture, regardless of their individual settings.
Creating Custom Brushes from Scratch
One of the most empowering features of Photoshop is the ability to transform any image into a custom brush tip. This opens up immense possibilities for unique textures and effects.
- Select or Create Your Brush Shape: Find an image that contains the shape you want to use as a brush. For instance, an image of birds on a transparent background is ideal.
- Isolate the Desired Shape: Use tools like the Eraser Tool or Layer Masks to remove any unwanted elements, leaving only the desired brush tip shape.
- Define the Brush Preset: With the brush shape isolated, go to
Edit > Define Brush Preset. Photoshop will prompt you to name your new brush. - Access Your Custom Brush: Your newly created brush will now appear in the Brush Preset Picker and the Brush Settings Panel, ready for use and further customization.
Once defined, you can edit its properties within the Brush Settings Panel, adjusting spacing, dynamics, and other parameters to fine-tune its behavior.
Practical Applications: Painting Masks and Blend Modes
The Brush Tool's utility extends far beyond simple color application. It's a critical tool for non-destructive editing, particularly when working with masks.
Using the Brush Tool for Layer Masks
Layer masks are fundamental for compositing and selective editing in Photoshop. They allow you to reveal or conceal parts of a layer without permanently deleting pixels. The Brush Tool is the primary instrument for painting on these masks.
- Create a Layer Mask: With a layer selected in the Layers Panel, click the "Add layer mask" icon at the bottom of the panel. A white thumbnail will appear next to your layer thumbnail, indicating the mask is active.
- Select Your Brush: Choose a brush tip, adjust its size, hardness, opacity, and flow according to your needs.
- Paint on the Mask:
- Black hides, White reveals: Painting with black on the mask will conceal the layer's content, while painting with white will reveal it. Grays will create semi-transparent areas.
- Soft vs. Hard Edges: A hard-edged brush will create a sharp transition between visible and hidden areas. A soft-edged brush will produce a gradual, feathered blend.
- Opacity and Flow for Gradual Blending: Using a low opacity or flow brush allows for subtle transitions. For example, when blending two images, painting with a low opacity brush on the mask of the top layer will gradually reveal the layer beneath, creating a smooth composite.
- Build-up with Opacity: With opacity set to a low value (e.g., 20%), each stroke adds 20% more concealment or reveal. The area only gets darker (more hidden) with subsequent passes or clicks.
- Continuous build-up with Flow: With flow set to a low value, holding down the mouse button and painting continuously over an area will gradually build up the effect. There's no need to repeatedly click; the paint builds up continuously as you drag. This is ideal for soft, smooth blends.
Exploring Blend Modes for Creative Effects
When painting directly on a layer or on a layer mask, the Blending Mode in the Options Bar dictates how the brush color interacts with the pixels beneath it. Experimenting with these modes can lead to dramatic and unexpected results:
- For adding color and depth: Darken, Multiply, Overlay.
- For adding light and highlights: Lighten, Color Dodge, Linear Dodge.
These modes are incredibly versatile and can be used for everything from subtle color adjustments to creating atmospheric lighting effects.
Advanced Techniques and Useful Tricks
Beyond the core functionalities, several advanced features and shortcuts can significantly enhance your workflow.
The Mixer Brush Tool
For a more realistic painting experience, the Mixer Brush Tool simulates traditional wet-media blending. It allows you to pick up color from the canvas and mix it with your brush strokes.
- Loading Paint: To load paint into the brush's reservoir, Alt-click (Windows) or Option-click (Mac OS) on a sampled area of the canvas.
- Mixing Ratios: The options bar allows you to control the amount of paint loaded in the reservoir and the ratio of canvas paint to reservoir paint.
- Wetness: You can also control the "wetness" of the paint, influencing how it blends.
Adobe Photoshop Class #16 | The Mixer Brush Tool | Photoshop Course | Graphics Life
Keyboard Shortcuts for Efficiency
Mastering keyboard shortcuts is crucial for a streamlined Photoshop experience:
- Brush Size:
[and]keys. - Opacity: Pressing a number key (1-9) sets opacity in 10% increments (e.g.,
5for 50%). Pressing two number keys sets a specific opacity (e.g.,25for 25%).0sets opacity to 100%. - Flow: Hold
Shiftwhile pressing a number key to adjust flow in 10% increments. - Switch Foreground/Background Colors:
Xkey. - Undo/Redo:
Ctrl+Z(Windows) orCmd+Z(Mac OS) for undo.Ctrl+Shift+Z(Windows) orCmd+Shift+Z(Mac OS) for redo (step forward).
Working with Folders and Custom Brush Management
Photoshop organizes brushes into folders, making it easier to locate and manage them. You can load, save, replace, or append brush collections. To delete a brush or a group of brushes, Right-Click on them in the Brush Preset Picker or Brush Settings Panel and select "Delete Brush."
Beyond Built-in Brushes: Exploring External Resources
While Photoshop's built-in brushes are extensive, the artistic community has created a vast ecosystem of downloadable brush packs. These can dramatically expand your creative toolkit:
- Shader Brushes: Perfect for adding gritty, textured effects to illustrations.
- Realistic Paint Brush Effects: Brushes designed to mimic the feel of traditional painting.
- Spray Paint Splatters: Ideal for posters, collages, and dynamic graphic design.
- Abstract Brushes: High-resolution and versatile brushes for adding movement and energy.
- Smoke Brushes: For creating dramatic atmospheric effects.
- Halftone Gradient Brushes: Useful for comic book styles, photo overlays, and visual effects.
- Network Turbulence Brushes: Add intricate, futuristic details to designs.
These readily available resources can help achieve specific styles and aesthetics without needing to create every brush from scratch.
Conclusion
The Brush Tool in Photoshop is a fundamental and immensely powerful instrument. From its basic application of color to its advanced customization options and its integral role in masking and blending, it offers an almost limitless canvas for creativity. By understanding its core settings, exploring brush dynamics, and leveraging practical techniques like mask painting and blend modes, users can significantly elevate their digital art and image manipulation skills. The ability to create custom brushes and the wealth of external brush resources further underscore its importance, making the Brush Tool a truly indispensable component of any Photoshop user's workflow.