Editing hair in Photoshop can be a notoriously intricate and time-consuming process. The unique nature of each person's hair, from its texture and color to its style and density, demands a keen eye for detail and unwavering concentration to achieve professional-looking results. While there isn't a single, universally simple method for editing hair in Photoshop, understanding various techniques can empower you to tackle even the most challenging selections and refinements. This comprehensive guide delves into several effective approaches, offering a spectrum of methods suitable for diverse hair types and editing goals.
The Power of "Select and Mask": A Refined Approach to Hair Extraction
One of the most accessible and powerful tools for isolating hair from its background is Photoshop's "Select and Mask" workspace. This environment provides a dedicated suite of tools designed to refine selections, particularly for complex edges like those found in hair.
The process often begins with an initial, rough selection of the background using the Quick Selection tool. If the tool inadvertently selects parts of the foreground subject, holding down the Alt key (or Option on macOS) allows you to subtract those areas from the selection. Once a general background selection is established, clicking the "Select and Mask" button in the control panel opens the dedicated workspace.
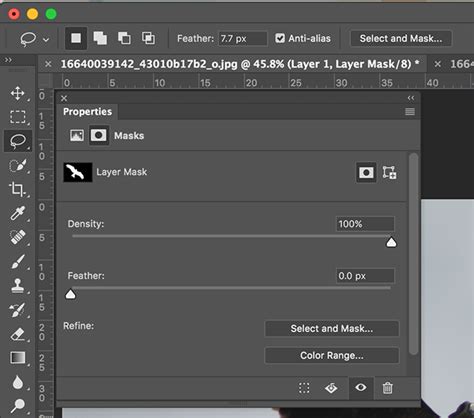
Crucially, within "Select and Mask," you'll want to invert the mask so that your subject, including the hair, is selected rather than the background. This is typically done by clicking the "Invert" button. The workspace offers various display modes on the right-hand side, allowing you to view your selection against different backgrounds like white or black, or using an "Overlay" mode. This visual feedback is essential for clearly identifying areas that need further refinement.
The Quick Selection tool can be used again within "Select and Mask" for more detailed adjustments, either adding to or subtracting from the selection to ensure all hair strands are captured. While it's beneficial to select as much of the hair as possible, don't be overly concerned if some background is included at this stage, as subsequent steps address this.
The Refine Edge tool is invaluable for tackling the finer details of hair. By adjusting its brush size to encompass the edges of the hair where background might still be visible, you can paint over these areas to meticulously remove any lingering background traces. The "Select and Mask" workspace also offers additional options for fine-tuning the mask. The "Decontaminate Colors" option, typically found at the bottom, is particularly useful for eliminating any color "bleeding" from the background into the subject's hair.
When you're satisfied with the refined mask, the "Output" menu allows you to choose how to apply it. Selecting "New Layer with Layer Mask" is a non-destructive way to proceed.
To further enhance the mask, you can Alt-click on the layer mask thumbnail in the Layers panel. This makes the mask itself visible. Then, select the Brush tool, change its mode to "Overlay," and use black paint to strengthen background areas that should be masked out and white paint to strengthen the hair you want to keep. Toggling back to viewing the layer by Alt-clicking the thumbnail again allows you to see the cumulative effect.
Leveraging Channels for Complex Hair Selections
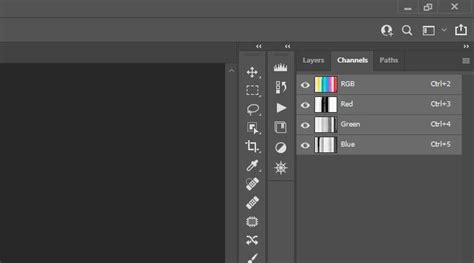
For more intricate selections, especially those involving subjects with fine or wispy hair against a challenging background, the Channels panel offers a powerful, albeit more complex, method. This technique leverages the contrast information within the Red, Green, and Blue channels to create a highly accurate mask.
The process begins by examining the Channels panel to identify the channel that exhibits the greatest contrast between the subject and the background. Often, for hair, one of the color channels will present a clearer separation.
Once the most suitable channel is identified, tools like Levels or Curves (found under Image > Adjustments) can be employed to further enhance this contrast. The goal is to make the background as white as possible and the subject (including the hair) as black as possible, effectively creating a silhouette.
A new channel can then be created from this high-contrast channel, serving as the foundation for your mask. The Burn tool, set to target "Shadows," can be used to deepen the blacks and further refine the mask.
To load this channel as a selection, Command-click (or Control-click on Windows) on the channel's thumbnail. This selection can then be applied to a layer mask. This method requires a good understanding of tonal values and precise adjustments but can yield exceptionally clean results for difficult hair extractions.
The Background Eraser Tool: A Targeted Approach to Background Removal
When the primary objective is to remove the background from hair, especially in images where the hair has a wispy or detailed edge, Photoshop's Background Eraser Tool can be a highly effective, albeit sometimes tricky, solution. This tool is designed to sample colors and erase them, making it ideal for isolating subjects.
A crucial preparatory step involves setting up your layers wisely. Duplicating the original background layer is paramount to preserve your source image. Then, creating a new layer filled with a bright, high-contrast color (like a vibrant pink or green) and positioning it between your duplicated background and a new empty layer can provide a visual aid. This high-contrast layer helps you clearly see which parts of the background are being removed as you work.
When using the Background Eraser Tool, several settings in the Options Bar are critical:
- Limits: For hair with wispy edges, "Contiguous" is often the preferred setting, as it erases pixels of similar color that are touching. For more abrupt edges, "Find Edges" might be more suitable.
- Sampling: Ensure the eyedropper icon on the far right is selected. This setting tells the tool to continuously sample the background color as you drag.
- Tolerance: This setting controls the range of colors the tool will erase. A lower tolerance is more precise, while a higher tolerance erases a broader range of similar colors. Adjusting this value is key to avoiding accidental erasure of the subject's colors.
- Protect Foreground Color: Checking this box helps prevent the tool from erasing colors that you've designated as foreground colors, offering an additional layer of protection for your subject.
Begin by erasing around the hair, paying close attention to the tolerance and brush size. You may need to reduce the tolerance and brush size significantly when working near the edges of the hair to maintain detail and avoid accidentally erasing parts of the hair itself. As you move away from the hair to larger areas of the background, you can often increase the brush size and tolerance for faster removal.
Once the background is sufficiently removed, you can hide the high-contrast color layer and the original background layer, revealing a transparent background. This allows you to then place any new background image behind your subject.
How to Change Background of Photo; Hair Masking Tutorial for Photoshop
Filling Voids and Retouching Flyaways: The Clone Stamp and Spot Healing Brush
Beyond initial background removal, Photoshop offers tools for refining the hair itself, such as filling in gaps or removing stray strands.
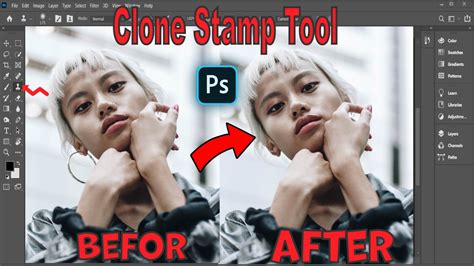
The Clone Stamp Tool is a versatile instrument for this purpose. By holding down the Alt key and clicking on a source area with desirable hair texture and color, you can then paint over areas that need correction. It's advisable to work on a new, empty layer to maintain non-destructive editing. When using the Clone Stamp Tool, making short, directional strokes that follow the natural flow of the hair often yields the most convincing results. If you're fixing hair over clothing, consider treating the clothing as a background and applying the same cloning techniques.
For smaller imperfections like flyaway hairs, the Spot Healing Brush tool, set to "Content-Aware," is remarkably effective. Simply click and drag over the stray strand, and Photoshop will intelligently sample surrounding pixels to blend it away seamlessly. A brush hardness of around 60% can often provide a good balance between blending and detail preservation.
Advanced Techniques: Custom Brushes and Manual Hair Painting
For extremely challenging hair selections or when aiming for a completely stylized look, manual techniques can be employed.
One approach involves using custom hair brushes. If you find a photo with a subject whose hair is well-defined against a clean background, you can create a brush preset from that hair. This involves selecting the hair, going to Edit > Define Brush Preset, and then using this new brush to paint in new strands of hair or to refine existing edges. When painting in new hair, it's beneficial to set the opacity of the original layer to around 70% as a reference. Start with a slightly larger brush size (e.g., 4px) and gradually reduce it to add finer strands, ensuring the strokes follow the natural direction of the hair.
When dealing with longer, flowing hair, manually drawing individual strands can become impractical. In such cases, Photoshop hair brushes that offer pre-made curls and ringlets can be a time-saver. These brushes can be scaled and rotated to fit the desired style.
Another advanced technique involves manual hair painting. This is particularly useful when there's insufficient contrast in the original photograph to make a clean selection. Using the Pen tool or Polygonal Lasso tool, you can manually trace the main body of the subject, making a rough selection of the hair. Then, on a new layer, you can begin painting in new hair strands. Using a reference layer with reduced opacity, you can draw new strands in the appropriate directions, varying brush sizes to create a realistic effect.
When using custom brushes or manually painted hair, adjusting the blending mode of the new hair layer (e.g., to "Hue" or "Color") can help integrate it with the original subject while still allowing the underlying details to show through. It's also important to apply a layer mask to the new hair layer and carefully erase any portions that overlap the face or original subject in a way that looks unnatural or causes color discoloration.
The ability to define a brush preset from a hair silhouette can also be used to remove hard outlines from an initial clipping. By applying a layer mask to a new hair layer and carefully erasing overlapping sections, you can achieve a more organic transition.
Ultimately, mastering hair editing in Photoshop is an iterative process that combines understanding the various tools with creative problem-solving. By experimenting with these techniques, you can elevate your retouching skills and achieve professional, visually compelling results.