Resizing images is a fundamental skill for anyone working with visual content, whether for web design, print media, or digital art. Photoshop, a powerhouse in image manipulation, offers a variety of tools and techniques to adjust image dimensions precisely. Understanding these methods ensures that your images maintain quality and fit the intended application, from a small avatar on a website to a large-format print. This guide delves into the core concepts and practical applications of resizing images within Photoshop, covering both desktop and iPad versions.
Understanding Image Properties: Resolution and Color Mode
Before diving into resizing, it's crucial to grasp two key image properties: resolution and color mode.
Resolution refers to the fineness of an image, quantified by the number of pixels packed into a linear inch. This is commonly expressed as Pixels Per Inch (PPI) for screen displays or Dots Per Inch (DPI) when ink meets paper. A standard default for web and mobile screen displays is 72 PPI. For printing to a typical desktop inkjet printer, increasing the resolution to 300 PPI is often recommended to ensure sharpness and detail. The higher the PPI, generally the higher the image quality.
Color Mode dictates the color detail and file size of an image. Different color modes are suited for different outputs. For instance, the CMYK color mode is the standard for professional printing, while RGB is typically used for digital displays. Understanding these differences helps in achieving the desired color fidelity and managing file sizes effectively.
The Core of Resizing: Image Size Dialog
The primary tool for resizing an image's dimensions and pixel count is the "Image Size" dialog. Accessible via Image > Image Size, this dialog presents several critical options.
The "Image Size" dialog typically displays an image preview and editable fields for dimensions. At its heart lies the concept of resampling. When resampling is enabled, Photoshop analyzes the image and either adds new pixels (upscaling) or removes existing ones (downscaling) to achieve the desired size. This process can significantly impact image quality.
Understanding Resampling Options
When resampling is enabled, Photoshop offers various interpolation presets to adjust the total number of pixels proportionally. These algorithms determine how new pixels are created or existing ones are discarded:
- Automatic: This is the default setting, where Photoshop attempts to choose the best algorithm based on whether you are enlarging or reducing the image. While convenient, it relies on Photoshop's decision-making.
- Enlarge - Preserve Details: This method is designed to maintain image detail when scaling up an image.
- Enlarge - Preserve Details 2.0: A newer iteration of the "Preserve Details" algorithm, often offering improved results.
- Enlarge - Bicubic smoother: This aims for smoother gradients when enlarging images.
- Reduce - Bicubic sharper: A good method for reducing the size of an image, based on Bicubic interpolation with enhanced sharpening. This method effectively maintains detail in a downscaled image.
- Bicubic (smoother gradients): A slower but more precise method that bases its calculations on the values of surrounding pixels, leading to smoother transitions.
- Nearest Neighbor (hard edges): A fast but less precise method that simply replicates existing pixels. It's ideal for illustrations with sharp, anti-aliased edges, as it preserves these hard lines and results in a smaller file size.
- Bilinear: This method adds pixels by averaging the color values of surrounding pixels, providing a moderate balance between speed and quality.
If you wish to resize the image without altering the number of pixels (i.e., changing the physical dimensions without adding or removing data), you can disable the "Resample" option. In this state, changing width or height will automatically adjust the resolution proportionally, and vice-versa.
Units and Aspect Ratio
Within the "Image Size" dialog, you can choose to size your image using a wide variety of measurements, depending on your workflow. When "Resample" is disabled, common units include:
- Pixels: Ideal for images intended for online use, where screen real estate is measured in pixels.
- Inches and Centimeters: Essential for print work, where physical dimensions are paramount.
- Percentages: Useful for scaling an image relative to its original size.
- Picas: A traditional typesetting unit, sometimes used in print design.
When adjusting the Width (W) and Height (H) fields, Photoshop on the iPad (and the desktop version when the link icon is highlighted) automatically preserves the aspect ratio. This ensures that the image is not distorted, maintaining its original proportions. The link icon, typically found between the W and H fields, should be kept highlighted to preserve these proportions.

Expanding or Shrinking the Canvas: Canvas Size
Sometimes, you need to resize the image area without altering the existing image content. This is where the Canvas Size function comes in, accessed via Image > Canvas Size. This tool allows you to add or subtract space around your image.
The "Canvas Size" dialog provides options for adjusting the width and height. You can select your desired units (pixels, percentages, inches, etc.). For example, to add an inch of space on either side of an image, you would switch the measurement to inches and increase both the width and height by two inches.
A crucial element in the "Canvas Size" dialog is the Anchor. This visual representation allows you to dictate where the added canvas space will appear. The central dot represents your current image, and the arrows indicate the direction in which the canvas will expand based on your anchor point selection. If you select an anchor point in the corner, the canvas will grow primarily from that corner outward.
Finally, you can choose the color for any Canvas Extensions - the newly added areas. Common choices include white, black, or other project-specific colors.
Image Size vs Canvas Size - What is the difference in Photoshop?
Cropping for Precision: The Crop Tool
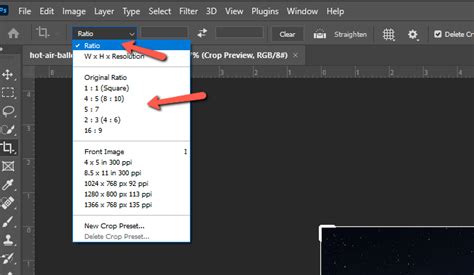
The Crop Tool (shortcut: C) is invaluable when you need to trim an image to a specific size or aspect ratio, effectively reducing the canvas size. Once selected, the top options bar reveals powerful controls:
- Aspect Ratio Presets: You can select a desired aspect ratio (e.g., 16:9, 1:1) from a dropdown menu. The cropping overlay will then automatically conform to this ratio as you adjust it.
- W x H x Resolution: You can input specific width, height, and resolution values directly into the options bar. Be mindful that some of these presets can affect the PPI of the final image.
Dragging the handles of the crop overlay allows you to precisely define the area you want to keep. This method is excellent for isolating a subject or fitting an image into a predetermined frame.
Exporting and Saving for Different Platforms
Photoshop provides several streamlined options for exporting images at specific sizes, without altering the original PSD file.
Export As
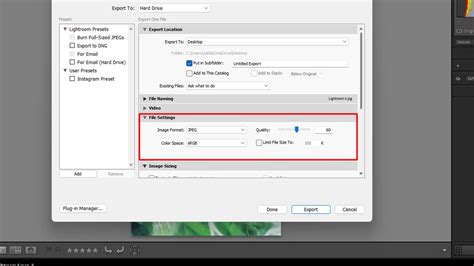
The File > Export > Export As command offers a flexible way to prepare images for various uses. This dialog allows you to:
- Change File Type: Select from formats like PNG, JPEG, and GIF.
- Adjust Image Size: Directly input new dimensions or scale by percentage.
- Modify Canvas Size: Similar to the Canvas Size dialog, you can expand or contract the canvas.
- Control Resampling: Choose the resampling algorithm.
- Manage Metadata: Remove embedded metadata, which can be useful for privacy or reducing file size.
This is particularly useful for quickly generating web-ready images or preparing assets for social media.
Quick Export
The File > Export > Quick Export as PNG (or other chosen format) provides a rapid way to export your current image with pre-defined settings. It bypasses some of the more detailed options of "Export As" for speed.
Save for Web (Legacy)
The File > Export > Save for Web (Legacy) dialog, while older, remains a powerful tool for optimizing images for the web. It offers a live preview of how different file types, compression levels, and settings will affect both the image quality and the resulting file size. This allows for informed decisions when balancing visual fidelity with download speeds. You can experiment with various formats and compression settings to find the optimal balance for your needs.
Advanced Resizing with AI: Neural Filters
Photoshop's integration of Adobe Sensei AI has introduced powerful new tools, including the Neural Filters. One particularly relevant filter for resizing is Super Zoom.
Accessed via Filter > Neural Filters, Super Zoom allows you to intelligently enlarge specific areas of an image. After enabling the filter and downloading it if necessary, you can use zoom controls within the filter's window to focus on a desired region. The AI then processes this area, attempting to upscale it with enhanced detail.
Super Zoom also offers additional AI-powered adjustments:
- Remove JPEG Artifacts: This option instructs the AI to clean up compression artifacts commonly found in JPEG images, improving clarity after resizing.
- Enhance Face Details: While trained primarily on human faces, this can sometimes improve details in other subjects when resizing portraits.
The processed image can be outputted as a new document or a new layer, ensuring your original file remains untouched. Comparing a standard resize with Super Zoom often reveals a noticeable improvement in crispness and detail, especially in challenging areas like fine textures or edges.
Image Size vs Canvas Size - What is the difference in Photoshop?
Conclusion
Mastering image resizing in Photoshop is an essential skill that empowers creators to adapt their visuals for any medium. From understanding the fundamental concepts of resolution and resampling to leveraging advanced AI-powered tools like Super Zoom, Photoshop offers a comprehensive suite of functionalities. Whether you're preparing an image for the web, print, or a specific design project, the ability to accurately and effectively resize your images ensures professional results. Experiment with the various methods-Image Size, Canvas Size, Crop Tool, Export options, and Neural Filters-to discover the most efficient and high-quality approach for your unique workflow.