Clip Studio Paint (CSP) stands as a powerful and adaptable digital art program, offering a rich ecosystem of brushes and creative tools. While the software provides an extensive library of pre-made brushes, and users can readily tweak the properties of these existing options, there are moments when these adjustments may not suffice for achieving a specific artistic vision. For those aspiring to forge entirely unique brushes within Clip Studio Paint, a systematic approach involving the creation and integration of custom brush tips is paramount. This tutorial will guide you through the process, from conceptualizing and creating your brush tip to configuring its intricate settings for optimal performance.
Designing Your Unique Brush Tip
The foundation of any custom brush lies in its tip. To create a new brush tip in Clip Studio Paint, you'll first need to design an image that will serve as the visual representation of your brush’s stroke. This involves creating a new canvas and carefully drawing the desired shape.
Begin by navigating to File and then selecting New. This action will open a canvas creation window. Here, it is crucial to adjust the size of your canvas. For brush tip creation, a larger canvas is generally recommended to ensure sufficient detail and resolution. A size within the thousands of pixels is a good starting point. For the Basic Expression Color, choose Gray. While this might seem counterintuitive for a typical painting, it's essential for brush tip creation. Using gray tones allows the brush to be utilized with any color you choose in your artwork, as these tones will effectively represent the opacity of your brush stroke.
Once your canvas is set up, you can begin creating your brush tip. Employ various tools and techniques within Clip Studio Paint to bring your design to life. When your brush tip design is complete, it's time to save it as a material. If your design spans multiple layers, it is imperative to merge them together before proceeding. Select all layers that are relevant to your brush tip design. Then, access the material library by going to the Edit tab and choosing Register Material. Select Image Material to save your design as a reusable asset. You will be prompted to name your material folder, which helps in organizing your custom assets.
Integrating Your Custom Tip into a New Brush
With your brush tip material successfully saved, the next step is to assign it to a new brush. The most straightforward method for this is to duplicate an existing brush and then modify its properties. Right-click on any brush within your tool palette. The specific brush you choose is inconsequential, as you will be replacing its default tip with your custom one. For ease of use, consider utilizing a right-click gesture if your setup, such as with Astropad Studio, supports it.
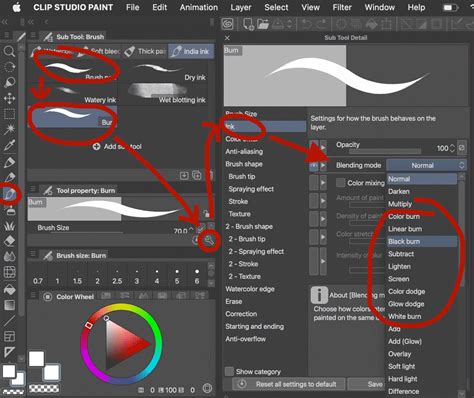
A small settings window will appear for the duplicated brush tool. It is highly recommended to name your duplicated brush something descriptive and easily recognizable, as this is the brush you will be applying your custom material to. Once named, locate the Tool Property tab and click on the wrench icon at the bottom. Within the Tool Property settings, navigate to the Brush tip section. Here, you will find a Material option. Clicking on this will open a material selection window, where you can find and select the custom brush tip you previously created and saved. Click OK to assign this material to your newly created brush. You are now ready to use your custom brush in your upcoming projects.
Exploring and Configuring Brush Settings
Clip Studio Paint offers a vast array of settings to fine-tune the behavior of your brushes, allowing for an unparalleled level of customization. Understanding these settings is key to creating brushes that perfectly match your artistic intent. Let’s delve into some of the most impactful ones.
Brush Tip Dynamics and Appearance
The Brush tip settings are arguably the most critical for creating a truly unique brush. This section allows you to determine the fundamental characteristics of your brush stroke. The Material setting, as discussed, is where you assign your custom brush tip. Beyond the material itself, you can control how the brush tip behaves. The Angle setting allows you to dictate the rotation of your brush tips. With a circular brush tip, changes in angle might not be immediately apparent unless the thickness is adjusted. However, with a custom material brush tip, you can observe the change in angle even without altering the thickness.
The Thickness setting directly influences the size of your brush stroke. More importantly, the Brush Size Dynamics menu, accessible by clicking the box next to the brush size slider, allows you to link brush size to pen pressure. By default, the minimum brush stroke size can be set to zero pixels, meaning that with light pressure, your brush stroke will be almost invisible. Increasing the minimum value, for instance, to a hundred, would effectively disable pen pressure sensitivity for size, making your brush strokes consistently thick regardless of pressure applied.
Stroke Behavior and Texture
Brush Velocity controls how the appearance of your brush stroke changes based on the speed at which you draw. A faster stroke might result in a thinner or less dense line, while a slower stroke could produce a thicker or more opaque mark.
Brush Density functions similarly to opacity but operates through a different mechanism. As you continue to paint over an area without lifting your pen, the density of the brush stroke will gradually build up. This effect can create subtle variations in opacity within a single stroke.
The Gap setting determines the spacing between repeated instances of your brush tip as it's drawn. You can choose between Wide, Normal, or Narrow gaps, influencing the smoothness and continuity of your strokes. The Continuous spraying option is straightforward: when you hold your pen in one spot without moving, the paint will gradually build up, creating a concentrated area of color.
For brushes that require a more organic or textured feel, the Texture settings are invaluable. You can adjust the Texture Density to control how prominently the chosen texture appears within your brush strokes. This allows you to add a tactile quality to your digital art.
Edge and Blending Properties
Anti-aliasing plays a significant role in the perceived smoothness of your brush edges. A brush with strong anti-aliasing will produce smooth, soft edges, while a brush with weak or no anti-aliasing will have harder, more pixelated edges, especially when zoomed in.
The Blending Mode of your brush can also be adjusted. For example, by lowering the Amount of paint value, you are essentially using a smaller pigment of color. When painting over another color, the original color will be barely noticeable. As you continue to paint, the original color will gradually become more prominent, allowing for sophisticated layering and blending effects.
Advanced Brush Tip Settings
For brushes utilizing material tips, the Ribbon Effect can be enabled. This effect can create a unique visual trail as the brush tip moves, adding a dynamic element to your strokes.
When working with particle-based brush tips, you have control over several parameters: Particle Size, Particle Density, Spray Deviation, and Direction of Particle. Experimenting with these settings allows you to create brushes that resemble sprays, splatters, or other granular effects.
Pen Pressure and Tilt Sensitivity
Pen Pressure sensitivity is a fundamental setting for most digital art brushes. It allows the software to interpret how hard you are pressing your stylus onto the tablet, translating that into variations in brush size, opacity, or other properties. Activating pen pressure and adjusting its curve can give your strokes a more natural and expressive feel.
Tilt settings are particularly useful for mimicking traditional art tools like pencils or charcoal. When you tilt a traditional pencil, more of its surface area makes contact with the paper, resulting in a darker, broader mark. Adjusting the tilt settings in Clip Studio Paint can replicate this effect, allowing for more nuanced and realistic pencil-like strokes.
Creating a Custom Pencil Brush for Sketching
Let's put these principles into practice by creating a custom pencil brush for sketching.
- Prepare the Brush Tip: Start by creating a new project. Draw the desired shape for your pencil tip on this canvas. Once complete, convert this layer to grayscale by right-clicking on the layer and selecting
Convert Layer, then changing theExpression ColortoGray. Hide the paper layer and any other unnecessary layers. - Register as Material: Go to the
Edittab and chooseRegister Material, then selectImage Material. Name your material appropriately. - Create a New Brush: Open the Sub Tool panel. Click the box next to the Sub Tool panel and select
Add from Default. Choose thePencategory and select theG-pen. This will serve as our base brush. - Configure Brush Settings: Open the
Tool Propertytab for the G-pen.- Brush Tip: In the
Brush tipsettings, click onMaterialand select the custom pencil tip you registered. - Pen Pressure & Tilt: Activate
Pen Pressurefor brush size andTiltfor brush size. Adjust the values slightly to achieve a subtle variation. - Gap: To give your pencil strokes a slightly more textured and less uniform appearance, increase the
Gapbetween brush tips by a tiny value. This mimics the slight imperfections of graphite on paper. - Density/Opacity: You may wish to adjust the density or opacity settings to control how the lead builds up with repeated strokes.
- Brush Tip: In the
Embracing Experimentation
The true power of custom brush creation in Clip Studio Paint lies in experimentation. The settings described above are merely a starting point. Don't hesitate to play around with each slider, toggle, and option. Try combining different brush tips with various texture settings, or experiment with unique density and blending modes. The brushes created in this tutorial are based on general preferences; your ideal settings will depend on your personal workflow and artistic style.
The process of learning these settings can be approached at your own pace. Take your time to understand how each parameter influences the brush's behavior. By actively engaging with the tools and settings, you will gain a deeper appreciation for the versatility of Clip Studio Paint and unlock your potential to create truly bespoke digital art tools. Remember, the goal is to guide you through the process, empowering you to discover and craft brushes that perfectly align with your creative vision.
For users looking to enhance their digital art workflow, consider pairing Clip Studio Paint with Astropad Studio. Astropad Studio allows you to use your iPad as a drawing tablet for your computer, providing a seamless experience with CSP. You can explore the full capabilities of CSP with your iPad by trying Astropad Studio with their complimentary 14-day trial.