This tutorial will guide you through the process of transforming a simple line art sketch into a vibrant, finished piece of art within Procreate, with the exciting bonus of designing a custom phone case. We will explore essential Procreate techniques, from canvas setup to strategic coloring and efficient exporting, ensuring your artwork is optimized for various applications. Whether you're a seasoned digital artist or just beginning your creative journey, this guide will equip you with the knowledge to bring your line art to life and utilize your creations for unique, personalized products.
Optimizing Your Canvas for Product Design
Before diving into the creative process of coloring, it's crucial to establish a canvas that is optimized for product use. For this specific tutorial, we will be setting up a canvas with dimensions of 7.5 x 15.5 centimeters at a resolution of 600 DPI. This size and resolution are particularly well-suited for printing, making it ideal for a custom phone case. However, it's important to remember that when you are creating your own designs, you should set up your canvas for any size you need, always checking with your manufacturer for their specific requirements. This initial step ensures that your artwork will have the quality and dimensions necessary for a professional-looking final product, regardless of whether it's a phone case, a print, or another item.

The Art of Composition: Telling a Story with Your Art
While we've touched upon composition in previous discussions, it's an element that bears repeating and emphasizing, especially when aiming to create engaging artwork. An important thing to remember is that you want your creation to tell a story. This means thinking beyond just the individual elements and considering how they interact and guide the viewer's eye. For instance, in the example provided, a little honey bee is depicted holding a flower, then enjoying some honey, and finally flying away with a large pot of honey, spoon in hand. This narrative progression creates a sense of movement and engagement.
BONUS: You want to think of the flow of your creation and where it leads your eye. Where are you looking when you look at your creation? You’ll note my bees face left then right then left again. It keeps the eye following along with the images. Even the positioning of your smaller items are important. If you find yourself following them off the main image you may need to move them. A well-composed piece will draw the viewer in, hold their attention, and leave them with a clear understanding of the visual narrative you've crafted. Consider the overall journey your artwork takes the viewer on, ensuring a cohesive and compelling experience.
Crafting Your Palette: Inspired Color Choices
The selection of a color palette is a pivotal stage in bringing your line art to life. For your color palette, you can look at different references including your original bees. This means observing the natural colors of bees, or any other subject matter you are working with, as a starting point. You can pull colors and shades you like from these references. If you want black and yellow bees, you can certainly achieve that. However, as demonstrated in the example, for those particular bees, the artist opted for a more pastel palette, showcasing the flexibility and creative freedom available in digital coloring.
Experimentation is key here. Don't be afraid to try out different combinations and see what resonates with your vision. Consider the mood and atmosphere you want to evoke. Pastels can create a soft, dreamy feel, while bolder colors can convey energy and vibrancy. Exploring online color palette generators or even observing the world around you for inspiration can also be highly beneficial in developing a harmonious and impactful color scheme for your artwork.
The Coloring Process: Strategic Layering in Procreate
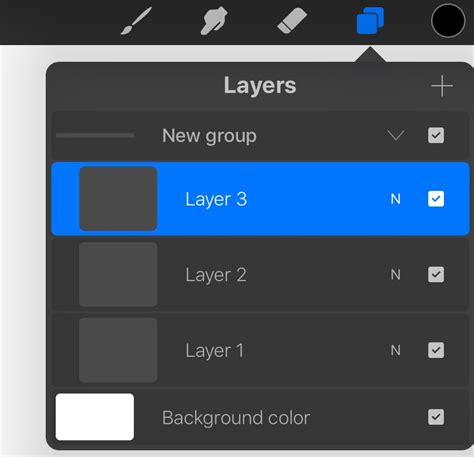
Now comes the truly exciting part - the coloring! Procreate offers a robust set of tools to make this process intuitive and enjoyable. A fundamental Procreate PRO TIP to enhance your coloring workflow is to place each color on a different layer. This is an incredibly powerful technique for several reasons. Firstly, it allows for maximum flexibility; if you decide later that you want to change the shade or hue of a particular color, you can easily select that specific layer and make adjustments without affecting any other part of your artwork.
Secondly, using separate layers for each color or color family makes it significantly easier to manage complex illustrations. You can group layers, adjust their opacity, blend modes, and apply effects independently. For instance, if you are coloring a character with skin, hair, clothing, and accessories, assigning each of these elements to its own layer (or layers) will provide unparalleled control. When you are coloring, you can use the "Alpha Lock" feature on a layer to only color within the existing lines of that layer, or use clipping masks to ensure your colors stay within the boundaries of your line art. This meticulous approach to layering not only streamlines the coloring process but also ensures a polished and professional final output, making it much simpler to find that layer and change all the appearances of that color at once if needed.
Exporting Your Masterpiece for Product Application
After all the hard work and meticulous coloring, it's finally time to prepare your artwork for its intended use. The process of exporting your file from Procreate is straightforward and crucial for ensuring compatibility with various printing services and product manufacturers. To export your artwork, navigate to your Setting > then click “export as a PNG”.
Choosing the PNG format is generally recommended for digital art intended for printing or web use because it supports transparency and offers high-quality image data without significant compression artifacts. This format will preserve the crispness of your lines and the vibrancy of your colors. When you export as a PNG, you'll typically have options for resolution and color profile, so ensure these are set appropriately based on the requirements of your chosen product manufacturer. For example, if you are creating a custom phone case, the manufacturer will likely have specific guidelines on file format, resolution, and color space (e.g., RGB or CMYK). Always double-check these specifications before exporting to avoid any issues with the final printed product.
Why Your Procreate Designs Look BAD When Printed (And How to Fix It)
From Digital Art to Tangible Product: The Custom Phone Case Example
The versatility of digital art created in Procreate extends beyond the screen, allowing for the creation of unique and personalized physical products. The example of designing a custom phone case beautifully illustrates this potential. Once your line art is expertly colored and exported in a suitable format, you can then utilize this digital file to order a custom phone case.
If you like the custom phone case designed using the "kawaii bees" art from this tutorial, check it out in my shop! You can get your very own “kawaii bees” custom phone case. This demonstrates a direct pathway from digital creation to a tangible, marketable item. The process typically involves uploading your high-resolution PNG file to a print-on-demand service or a specialized phone case manufacturer's website. They will then print your design onto a blank phone case, resulting in a one-of-a-kind accessory that reflects your artistic style. This can be a fantastic way to monetize your artwork or simply create personalized gifts for friends and family. The ability to translate digital creations into physical products like phone cases opens up a world of creative possibilities and entrepreneurial ventures.
Sharing the Creative Spark: Spreading the Joy of Art
The journey of creating art is often enriched by sharing it with others and inspiring them to embark on their own creative adventures. If you enjoyed this tutorial and found it helpful in learning how to color line art in Procreate and design a custom phone case, share it with your friends using the buttons below. Social sharing is a powerful way to disseminate knowledge and foster a community of artists.
By sharing this tutorial, you can help others discover the joy and potential of digital art creation. It encourages collaboration and learning, as friends can embark on similar creative projects together. The more people who are inspired to create, the more vibrant and diverse the artistic landscape becomes. Remember, art is a universal language, and by sharing your experiences and knowledge, you contribute to its growth and accessibility. Let’s create awesome kawaii art together! This sentiment encapsulates the collaborative and community-driven spirit that can make the artistic process even more rewarding.