Adobe Photoshop, a powerhouse in image editing, also offers robust capabilities for creating and exporting basic 2D animations. Once an animation is brought to life within Photoshop, a crucial question arises: in which file format should this animated creation be exported for optimal use, particularly on the web? Photoshop supports a wide array of file formats, including JPG, PNG, PSD, PDF, TIFF, and GIF, among others. For web-based applications, the goal is often to achieve the best possible compression without sacrificing too much visual fidelity. The Graphics Interchange Format, or GIF, has become the de facto standard for short, looping animations, despite its technical limitations.
The Evolution and Nature of GIFs
The GIF format, best pronounced like the popular peanut butter brand, stands for Graphics Interchange Format. At its core, a GIF is an image file type. It’s important to understand that it's not always the most optimal format for all types of images. The 8-bit nature of GIFs means they are limited to displaying a palette of 256 colors, which can lead to a grainy appearance in photographic content.
The format was initially introduced by CompuServe back in 1987, a time that could be considered the digital Stone Age. Its original purpose was to facilitate the posting of simple graphics, such as stock market quotations. However, this technological elder has experienced a resurgence in popularity, primarily driven by its capability for animation. Although designed for basic graphics, the format can store multiple images sequentially, enabling animation.
GIFs were once well-suited for their original intent: displaying logos, line art, charts, and similar graphics on the web. Today, however, they are predominantly recognized for their role in short, looping animations. A GIF fundamentally differs from a video; it lacks audio. If you encounter a small animated image on the internet, it is highly likely to be a GIF. Despite their limitations, including the 256-color constraint which prevents photographic quality, GIFs are typically small and highly portable, making them exceptionally well-suited for web images.
Understanding GIF's Place Among Image Formats
To fully appreciate why GIF is chosen for animation, it’s beneficial to compare it with other common image formats:
- JPG (or JPEG): This format is the best choice for nearly all other types of online images, as well as for some printed photographs and artwork. JPG files are compressed, but this compression typically results in only a slight loss of quality. The JPG format supports millions of colors and is widely popular for storing digital photos due to its efficiency. JPG files are extremely common on the internet.
- PNG: PNG (Portable Network Graphics) is a lossless format that was intended as a successor to GIF. It supports transparency, a feature crucial for web design where images need to blend seamlessly with backgrounds, and can display up to 16 million colors, offering a much richer color depth than GIF.
- TIFF: TIFF (Tagged Image File Format) is a robust format often used for high-resolution printing, including professional art photography and other fine artwork. It is a lossless image file type that preserves extremely high photographic quality, making it ideal for scanning and printing processes where detail is paramount.
While a GIF, even an animated one, is fundamentally an image file type, it serves a distinct purpose compared to static images like memes. Memes are typically static images, often a photograph or artwork, usually accompanied by some form of caption. Like memes, GIFs provide a quick visual method for communicating jokes, ideas, or emotions, which is a significant factor in their widespread popularity.
The Rise of Animated GIFs
The earliest animated GIFs were so rudimentary that serious web developers would not have considered using them. However, the landscape of the internet has evolved dramatically. Somewhere between the inception of platforms like YouTube and the expansion of broadband internet access, animated GIFs began to gain traction. Their technical quality improved, and they became progressively easier to create. Social media platforms, which may have initially overlooked them, began to embrace them. Designers and artists started exploring the creative potential of the format. Entire online platforms emerged dedicated to collecting and sharing GIFs. Today, it is nearly impossible to avoid GIFs; they are ubiquitous, appearing in advertisements and digital marketing campaigns that bombard users daily. Animated GIFs have become an integral part of our cultural infrastructure.
Where are the Legendary Internet Memes NOW? (Then and Now)
Creating and Exporting Animated GIFs in Photoshop: A Step-by-Step Guide
Are you ready to create your own animated GIF? When you utilize creative software like Adobe Photoshop, the process of making a GIF becomes remarkably straightforward. The essential requirement to begin is a series of images. These images can be anything you choose: frames from a video clip, individual frames from an animation you've drawn, or even a collection of still photographs. For this guide, we will use a set of animation frames sourced from Adobe Stock as an example.
Step 1: Preparing Your Animation Frames
You can prepare your animation frames in advance, if desired, using other design programs such as Adobe Illustrator. Once your source files are ready, you can import them into Photoshop. To do this, navigate to File > Load Layers.
If you haven't already created your frames in a separate program, you can still create an animated GIF from any Photoshop file that contains multiple layers. The critical requirement is that each distinct frame of your animation must be represented by its own layer, or a group of layers.
Step 2: Setting Up the Timeline for Animation
Once your layers are organized in Photoshop, you need to access Photoshop's animation tools. Open the Timeline panel by going to Window > Timeline. This panel is where you will arrange your layers into a sequence to create motion.
Step 3: Creating Frames from Layers
Within the Timeline panel, you will find an option to create frames from your layers. Click on the menu icon, typically located in the right corner of the Timeline panel, and select Make Frames From Layers. Photoshop will then automatically generate a frame for each layer in your document.

Step 4: Arranging and Timing Your Frames
After creating your frames, you can preview the animation by clicking the Play button within the Timeline panel or by pressing the spacebar on your keyboard. The order of the frames can be easily adjusted by simply clicking and dragging them within the Timeline. You can also fine-tune the duration each individual frame remains on screen. To do this, click on the time value beneath each frame and select your desired duration from the dropdown menu. This allows you to control the pacing and flow of your animation.
Step 5: Setting the Loop and Exporting for the Web
To ensure your animation plays continuously, you need to set the looping option. Click on the repeat menu, usually found at the bottom of the Timeline panel, and select forever. This setting will make your GIF loop endlessly.
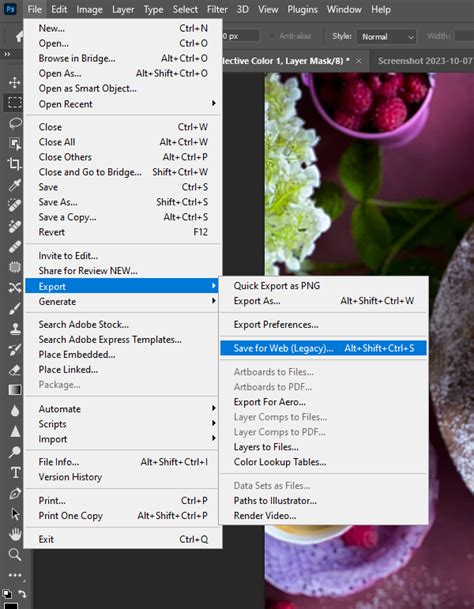
Once you are satisfied with the appearance and timing of your animated GIF, it's time to export it. Navigate to File > Export > Save for Web (Legacy). This legacy option provides the most control over GIF export settings.
In the "Save for Web" dialog box, you will see a variety of options. For optimal results, select GIF 128 Dithered from the dropdown preset menu. This preset offers a good balance between color fidelity and file size. Adjust the image size if necessary, ensuring it meets your requirements for web display. The goal here is to achieve the best possible quality with the least file size.
After configuring your export settings, click the Save... button. Your animated GIF will be exported and ready to be shared across the web. This process ensures that your animation is compressed effectively for web use, providing a good visual experience without excessive loading times.
For those seeking a more in-depth exploration of animation techniques within Photoshop, further tutorials can provide detailed insights into advanced features and workflows.