When the time comes to print your project, there are a couple of important considerations that make a big difference in the quality of your final document. One of the most important considerations you can make in planning your project is whether or not to print in bleed. If you’ve been planning to professionally print a document, you’ve probably come across the terms “full bleed” and “no bleed”. Unless you’re well-versed in printing, you may not know what either means, or what effect they may have on your project.
Understanding the Concept of Bleed in Printing
In basic definitions, full bleed printing is used when a project calls for a printed image or document to have no margins, or in other words, when the printed color and images extend all the way to the edge of the paper. This creates a seamless, professional look where the artwork appears to extend or “bleed” off the page indefinitely. If you have a white background, you do not need to go to the edge of the paper and will not require full bleed printing.
The Practicalities of Bleed
In practical terms, no printing equipment can actually print all the way to the edge of a sheet of paper - not your home printer, or a professional machine. Since something needs to hold the paper in place during the printing process, unfinished print jobs, or jobs produced without bleed, will usually have a white border around each page, much like your home printer does. If a project calls for color and images to extend all the way to the edge of the document, otherwise known as printing in bleed, the white unprinted edges of the document are simply trimmed off after printing.
If you’re working with a document with just a few pages, you might be able to trim the document to size yourself. However, if you’re printing something large like a book or magazine, you’ll likely want to go the professional route to have your document professionally printed and trimmed down to the correct size. This correct size is indicated on your document with crop lines, which you can set in all professional printing software programs.
Simple enough, right? In practice, mistakes involving bleed are very common. In fact, incorrectly set bleed is one of the most common mistakes encountered in files sent to professional printers.
Key Terminology for Correct Bleed Setup
You should know that the following terms accompany bleed and will ensure your project is set up correctly for printing:
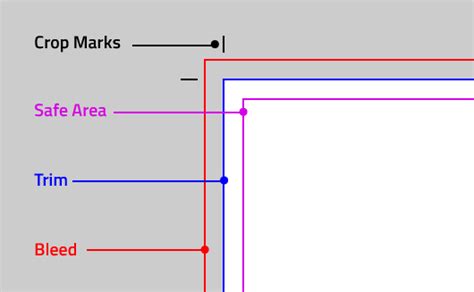
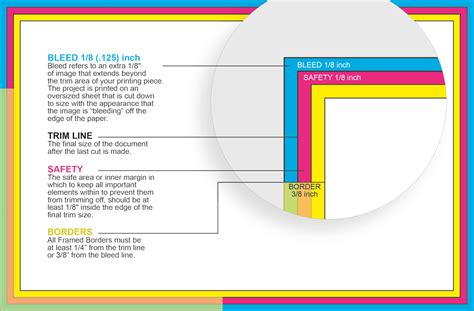
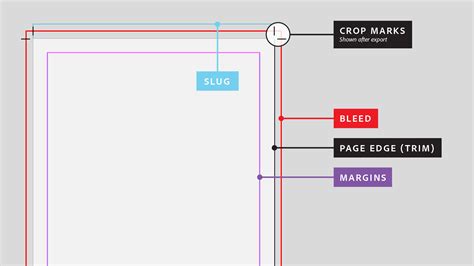
- Bleed: This is an extra ⅛” (or 3mm) of image or color that stretches beyond the trim area. This extra area ensures that when the paper is trimmed, no unintended white edges appear.
- Borders: These are elements that are intentionally kept away from the edge of the document to avoid being trimmed off. A safe border is typically at least ¼” from the trim line or ⅜” from the bleed line.
- Trim Line: This refers to the final size of the document after all cuts are made. It’s the intended finished dimension of your printed piece.
- Safety (or Safe Area): The safe area is the region within the trim line where all critical design elements, such as text and logos, are kept. This is to avoid them being trimmed or cut off during the printing and finishing process.
Setting Up Full Bleed in Adobe InDesign
Adobe InDesign is a popular choice for designers due to its robust features for print layout. Setting up bleed in InDesign is a straightforward process, whether you're starting a new document or modifying an existing one.
Creating a New Document with Bleed in InDesign
If you know you want a document with full bleed ahead of time, you can set this when you first create the file in InDesign.
- When you first create your document, select the Print option.
- Choose your desired paper size.
- Under the Preset Details section, and near the bottom of the options, you will find “Bleed and Slug”.
- Simply set the top, bottom, left, and right fields to include a 0.125 inch (⅛ inch) bleed.
Adding Bleed to an Existing InDesign Document
If your document is already set up and you want to add bleed after the fact, follow these steps:
- Go to File > Document Setup.
- In the Bleed and Slug options, set the top, bottom, left, and right fields to include a 0.125 inch (⅛ inch) bleed.
- Click OK.
Once you've set up the bleed, red lines should appear on your InDesign canvas, indicating the bleed guides, which are ⅛ of an inch off the edge of your document. You should also see a trim line in black, representing the edge of your finished document. The area between the trim line and the bleed line is the bleed area.
Extending Artwork to the Bleed Line
Simply setting the bleed in your document settings often isn’t enough. To ensure your document prints correctly with a full bleed, you may need to make changes to your artwork. Many designers set the bleed but then forget to extend their artwork past the trim line to the bleed guide.
Before sending your file to the printer, be sure that the artwork you want to have a full bleed is extended to those bleed guides outside the trim line. Your photos, artwork, and background colors all need to extend to the bleed line. With InDesign, images or objects should snap right to the guidelines when you drag them to them.
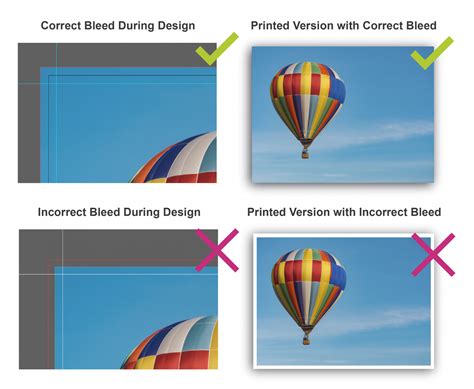
It’s also important to make sure any important artwork, such as text or logos, stays well inside of the trim line, within the safety margin. Anything between the trim and bleed lines will be cut off during printing.
Exporting Your InDesign Document for Print with Bleed
After you’ve gone through your document to ensure that all artwork, background colors, and photos extend to the red bleed line, you're ready to export your file for print. Be sure the right options are chosen when you export your file as a PDF to the printer.
- Go to File > Export.
- Choose Adobe PDF (Print) as the format.
- In the export dialog box, navigate to the Marks and Bleeds section.
- Check the box that says “All Printer’s Marks” to ensure that all of the information the printer needs will be included in your exported file.
- Under Bleed and Slug, check “Use Document Bleed Settings” to carry your bleed settings through into the exported PDF. This should ensure everything appears just as you want it to on the page.
- Click Export.
How to Add Crop Marks in InDesign
Setting Up Full Bleed in Adobe Illustrator
Adobe Illustrator, while primarily a vector graphics editor, can also be used for print design and setting up bleed.
Creating a New Document with Bleed in Illustrator
- Open Illustrator and create a new document (File > New).
- Choose your document size and measurement units.
- In the New Document dialog box, locate the Bleed option and input your desired bleed value. Generally, choose ⅛” or 3mm.
- If the link icon is selected, all sides will receive the same bleed value. If you want different bleeds for each side, click the unlink icon to input values individually.
- Click Create. You will have a new document with bleed guides around your artboard.
Adding Bleed to an Existing Illustrator Document
- Choose File > Document Setup.
- Input your desired bleed values in the Bleed fields.
- Click OK. Your bleed guides will now appear around the artboard.
Extending Artwork in Illustrator
Similar to InDesign, ensure that your artwork, background colors, and any elements intended to go to the edge of the page extend beyond the trim line to the bleed guides.
Exporting Your Illustrator Document for Print with Bleed
- Choose File > Print. (Note: Exporting directly to PDF with bleed marks can sometimes be more complex than using the Print dialog for this purpose).
- In the Print dialog box, select Marks & Bleed on the left-hand side.
- You can change the Adobe PDF Preset to [High Quality Print] for optimal print resolution (300dpi).
- Enter values for Top, Left, Bottom, and Right to indicate the placement of the bleed marks. Click the link icon to make all values the same.
- Check the checkbox for Trim Marks from the top-right hand menu. Ensure you have selected the kinds of printer marks you want. Be sure to enter an Offset value greater than the Bleed value for the trim marks so they don't overlap.
- Select Use Document Bleed Settings to apply the bleed settings defined in your document setup.
- Choose a destination and save your file as a PDF.
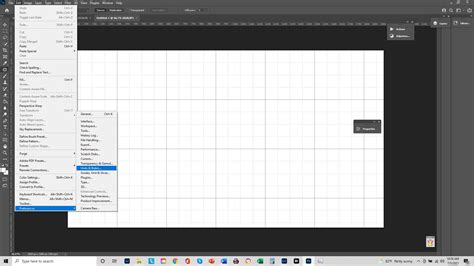
Setting Up Full Bleed in Adobe Photoshop
Photoshop, being a raster image editor, requires a slightly more manual approach to bleed setup, as it doesn't have an automatic bleed setting like InDesign or Illustrator.
Manually Setting Up Bleed in Photoshop
You will need to manually set up the full bleed when you initially set up your file or by adjusting the canvas size.
When Creating a New Document:
- Open the New Document dialog box.
- Choose Print from the pre-set menu. This will ensure you have a print resolution of 300dpi and CMYK color mode.
- Set your page to the desired final size.
- Create your document.
- Enable Rulers by going to the View menu and selecting Rulers.
- Drag guides from the rulers to each side of your blank page to create your bleed guides. A common bleed is ⅛ inch (3mm) on each side.
- To prevent guides from moving, select Lock Guides from the View menu.
- To ensure guides snap to the edge automatically, select Snap in the View menu.
Adjusting Canvas Size for Bleed:
- Select the Image menu from the top of the page.
- Select Canvas Size.
- Add the desired bleed size to the width and height of your document. For example, if you want an ⅛” bleed on all sides, you would add ¼” to both the width and height (⅛” on the left + ⅛” on the right = ¼”, and similarly for height).
- Ensure the anchor point is set to the middle of the page. This will add the bleed evenly to all sides.
- Press OK. Your guides will now show the actual print area within the larger canvas.
For Existing Documents:
If you have already started designing and realize you need to set full bleed before sending your artwork, you simply need to open the document you need to edit and follow the steps above to adjust the canvas size and set up your guides for a full bleed. You will need to review your artwork to see that all design elements fit within the artboard and guides prior to exporting to PDF.
Exporting Your Photoshop Document for Print with Bleed
- Save your document as a PSD file.
- Select the File menu.
- Click on Save As. Name your file.
- Select Photoshop PDF from the Save As Type dropdown.
- Press Save. The export options dialogue box will open.
- Uncheck Preserve Photoshop Editing Capabilities so your file is not too large, unless your printer specifically requests it.
- Under Marks and Bleeds, you may have options to include trim marks and bleed. Ensure these are set correctly if available. Photoshop’s PDF export for bleed can be less robust than InDesign or Illustrator, so it’s always best to confirm with your printer.
- Press Save PDF.
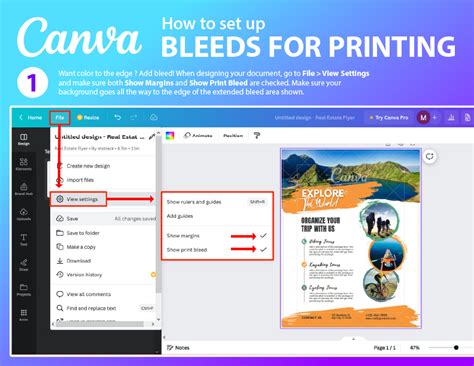
Setting Up Full Bleed in Canva
Canva offers a user-friendly interface for creating designs, and it also supports bleed for print projects.
Enabling and Setting Bleed in Canva
To print Canva artwork to the edge, you will need to follow these instructions:
- Create or open an existing design in Canva.
- From the menu, select File, then View Settings.
- Select Show Print Bleed. You will see a border of dashed lines appearing on the edges of your artwork. This bleed margin is fixed and set to print production standards.
- You will need to resize or stretch your background and any other elements that are intended to go to the edge to cover these dashed lines. If there are design elements there, you can stretch them, as long as you are aware they will be cut off at the trim line.
Exporting Your Canva Design with Bleed
When you are exporting your Canva design for professional printing, you will want to add crop marks as well as bleed to ensure the trim is set correctly.
- After ensuring your design extends to the bleed lines, select Share from the menu.
- Select Download.
- On the File Type selection, choose PDF Print.
- Check the Crop Marks and Bleed checkbox.
- Click Download.
Is Full Bleed Printing Right for Your Project?
The decision to use full bleed printing depends entirely on the desired aesthetic and the nature of your design. If your design features elements that are intended to extend to the very edge of the page without any white borders, then full bleed is essential. This is common for brochures, flyers, book covers, posters, and any design where the artwork is meant to feel immersive and borderless.
If your design has a natural white space or a distinct border that you want to maintain, then full bleed is not necessary. In such cases, standard printing without bleed will suffice, and your home printer or a professional service will produce a document with the intended margins.
Thomas Group, for instance, has every solution you may need for your edge-to-edge printing desires. With cutting-edge digital printing capable of everything from small projects to large-format printing jobs, they can create the prints you need at the sizes you want. Their printing processes are consistent, there’s no minimum or maximum order, and they offer high-quality finished products. They can print on a wide variety of materials, including vinyl, canvas, and all types of paper and cardboard. Whether full bleed or no bleed printing is your final choice, they can accommodate your needs.
The easiest way to find out which options best suit your project is to contact a professional printing service like Thomas Group. Let their experts help you find what will work well for your needs and assist you in achieving the best print job possible. Their staff can help with details like what file format will work best, as well as what finishing options might be most suitable for your project.