The landscape of video editing has been dramatically reshaped by the introduction of DaVinci Resolve's innovative Cut Page. This new interface is not merely an addition; it represents a fundamental shift in how editors approach their craft, prioritizing speed and intuitive workflow. This is particularly critical when tackling demanding projects such as long-form episodic television programming, intricate documentaries, corporate videos, or the fast-paced world of music videos and television commercials. The Cut Page is designed to streamline the editing process, allowing creators to focus more on storytelling and less on the mechanics of manipulation.
The Genesis of the Cut Page: A Response to Evolving Needs
Traditional editing software, while familiar, has seen minimal evolution in its core design over the past three decades. This stagnation is largely due to their inherent design for interaction with a computer mouse, which, while functional, can be a bottleneck for speed and efficiency, especially in high-volume production environments. The Cut Page, conversely, was conceived with a vision for a more dynamic and responsive editing experience. It acknowledges that modern video production demands tools that can keep pace with rapid creative output and tight deadlines. The introduction of a second, dedicated editing page within DaVinci Resolve liberates the software to introduce novel innovations that significantly outperform traditional edit software in terms of speed.
Seamless Integration with Traditional Workflows
Crucially, the Cut Page is not an isolated island within DaVinci Resolve. Editors retain the flexibility to switch to the Edit Page at any time, providing access to the full spectrum of traditional editing features. This seamless interoperability ensures that users can leverage the best of both worlds, employing a combination of edit tools that best suits their project and personal preferences. The Cut Page is also co-designed to integrate flawlessly with hardware panels, most notably the DaVinci Resolve Speed Editor. This hardware synergy amplifies the speed and tactile control offered by the Cut Page, transforming the editing experience into a more fluid and responsive interaction.
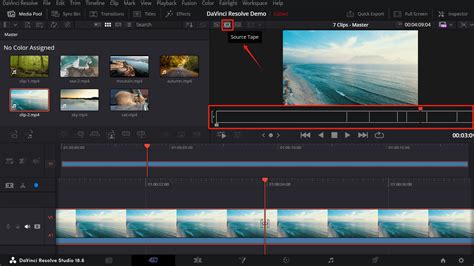
Redefining Media Management: The Source Tape
One of the most significant innovations on the Cut Page is the Source Tape. This feature revolutionizes media management by allowing users to visually scroll through all their clips at once. This eliminates the time-consuming process of navigating through complex bins and folders, a common pain point in traditional editing workflows. With the Source Tape, editors can simply scroll through their media, identify desired shots, and then seamlessly edit them into the timeline. This visual approach to media browsing significantly reduces wasted time and keeps the creative momentum flowing. Furthermore, the Source Tape remains active without switching to the timeline after an edit, allowing for continuous scrolling and the addition of desired shots in rapid succession.
Multicam Editing Reimagined: The Sync Bin
For projects involving multi-camera shoots, the Cut Page introduces the Sync Bin, a feature that offers non-real-time multi-cam editing capabilities. This innovative tool allows editors to work with footage in higher resolutions and provides a more efficient way to select perfect cutaways. Unlike traditional multi-cam features, the Sync Bin is designed for ease of use and speed. Upon selecting the Sync Clips icon, DaVinci Resolve identifies all clips that synchronize with the timeline and displays them in a multi-view format. As the editor scrolls through the timeline, the Sync Bin dynamically updates to show all synchronized clips corresponding to that specific point. This allows for the quick selection of the best cutaway by simply clicking on the desired view and adjusting the in and out points.
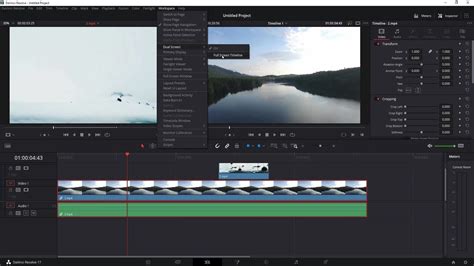
The Dual Timeline: Eliminating Tedious Zooming
A standout feature of the Cut Page is its revolutionary dual timeline system. This innovative approach addresses the often slow and frustrating process of zooming in and out of edit timelines in traditional software. The dual timeline consists of an upper timeline that displays the entire program, providing an overview of the edit, and a lower timeline that presents a zoomed-in view of the precise area where the editor is currently working. This ensures that the lower timeline is always zoomed to the optimal level for trimming tools to function perfectly, eliminating the need for constant zooming. Both timelines are fully functional, allowing editors to move and trim clips in whichever timeline is most convenient. Clips can be effortlessly dragged between the timelines to reposition them anywhere within the edit.
Live Trimming and the Trim Editor: Precision at Speed
Trimming on the Cut Page is incredibly fast, largely due to the automatic selection of trim tools. By simply moving the mouse around an edit point, the appropriate trim tool is automatically selected based on the cursor's position. The mouse icon visually changes to indicate which trim tool has been activated. As trimming commences, a Trim Editor appears in the viewer, offering a filmstrip view of the clips with each frame clearly visible. This facilitates frame-accurate edits with remarkable speed and simplicity. This means edits can be refined in three distinct locations: the upper timeline, the lower timeline, and the Trim Editor itself.
The Trim Editor, also known as an A/B trimmer, provides a graphical view where both the "A" clip (left) and "B" clip (right) of an edit are displayed simultaneously. This allows for precise adjustments to each side of the edit point, with visual confirmation and numeric frame counters for accuracy. When trimming, the clips are laid out in a film strip format, making frame-by-frame adjustments straightforward and fast.
Intelligent Editing Tools: Smart Indicator and AI Features
The Cut Page incorporates a "smart indicator" that visually highlights where edits will be performed. This intelligent feature often eliminates the need to manually set in and out points on the timeline, further accelerating the editing process. As the timeline is scrolled, the smart indicator moves sequentially from one edit point to the next.
For inserting clips, the process is simplified: select the desired portion of the clip in the viewer and click the "smart insert" button. The clip is then added at the nearest edit point, and the timeline ripples to accommodate it. The "append at end" function allows clips or groups of clips to be added to the very end of a timeline, irrespective of the playhead's position. The "place on top" command adds a new clip to the next available upper track on the timeline.
Furthermore, DaVinci Resolve leverages AI and machine learning through its Neural Engine. The "close up" command, for instance, can automatically detect faces within a shot and zoom into them, a powerful feature for quickly creating dynamic close-ups without manual intervention. The "ripple overwrite" function replaces a clip on the timeline with a new clip, even if the new clip has a different duration, intelligently adjusting the surrounding edits. The "source overwrite" is exceptionally fast for creating synchronized cutaways from multiple camera angles.
Cut Page Tips EVERY Editor Should Know in DaVinci Resolve
Comprehensive Trim Tools for Fine-Tuning
DaVinci Resolve offers a robust suite of trim tools for achieving perfect edits. To trim the in or out point of a clip, simply drag the edges of the clip to the left or right of the transition. This action automatically ripples the timeline duration. For slipping a clip within its existing space on the timeline, the "slip icon" located at the midpoint of each clip can be used. Rolling an edit point involves clicking in the middle of the transition and sliding it forward or backward. This "rolling trim" affects both the left and right sides of an edit simultaneously; as one side is shortened, the other is extended by the same number of frames.
Slipping, distinct from sliding, changes the portion of a clip visible within the timeline without altering the clip's duration or the surrounding edits. The "slide" function, accessed by shift-clicking, allows a clip to be moved up or down the timeline without changing its duration, with adjacent clips adjusting in length accordingly. Adjusting the duration of transitions, such as dissolves or wipes, is achieved by clicking and dragging the edge of the transition icon. The new audio trim icon, located on the left side of the upper timeline, provides a magnified view of the audio waveform during trimming.
The Inspector and Tool Strip: Control and Accessibility
The Inspector panel provides comprehensive control over audio and video settings, including keyframe buttons for animating parameters over time. Tabs within the Inspector allow for adjustments to video properties, sizing, audio levels, effects, metadata, and transition controls. The video tab enables features like blend modes, shot stabilization, and lens distortion correction. The sizing tab offers tools for repositioning, cropping, and scaling images. The audio tab allows for detailed sound adjustments, including levels, panning, pitch, and EQ.
For quicker access to frequently used settings, the Tool Strip, located at the bottom left of the viewer, offers consolidated controls. This strip features icons for transformation tools, cropping, audio level adjustments, speed changes, stabilization, lens correction, dynamic zoom, and more, perfect for rapid adjustments without needing to open the full Inspector.
Effects, Transitions, and Titles: Creative Power at Your Fingertips
The Cut Page provides instant access to over 100 transitions, effects, and title templates. These assets are designed with the high-end production values expected from DaVinci Resolve, which is used in Hollywood films. Effects are categorized for easy browsing, including blurs, color adjustments, lighting effects, stylization tools, warping, and textures. Transitions encompass dissolves, iris effects, motion and shape transitions, and wipes. A key feature is the ability to preview any effect or transition by simply hovering the mouse over its title and moving the cursor, allowing for immediate visual feedback before application.
Title generators on the Cut Page enable the creation of simple titles and lower thirds from scratch. Users can select a title type from the top left of the screen, drag it to the timeline, and then use the Inspector to input text and adjust parameters like font, size, and color. Additionally, dozens of professionally designed and animated Fusion title templates are available, including both 2D and 3D options. Hovering over these templates in the title library allows for instant previews, enabling users to create cinematic titles without requiring advanced motion graphics expertise.
The Boring Detector: Maintaining Audience Engagement
To help editors maintain audience engagement, the Cut Page features a "boring detector." This intelligent tool analyzes the timeline and highlights clips that may be too long, potentially causing viewer fatigue. It can also identify quick jump cuts that might be distracting. The boring detector can be configured by clicking its icon on the left of the upper timeline, allowing users to define the maximum acceptable length for shots and the minimum frame count for jump cuts.
Optimized for All Displays: Scalable User Interface
The Cut Page is ingeniously designed to function optimally on smaller laptop screens. Its user interface automatically scales and reconfigures to maximize usable screen real estate, facilitating quick editing sessions. When connected to a larger display, the interface scales up gracefully, providing even more workspace. This dynamic scaling means editors no longer need to constantly open and close windows or rearrange elements to optimize their view. The Cut Page even includes menus for importing media and rendering finished edits, allowing for a complete workflow without necessitating a switch to other pages.
Broad Compatibility and Efficient Media Handling
DaVinci Resolve's Cut Page supports virtually all native camera formats, eliminating the need for media file conversions or proxy creation before editing. The Media Pool, located at the top left of the screen, features intuitive buttons for importing individual files or entire folders. When folders with subfolders are imported, their structure is preserved. Users can switch between icon, filmstrip, customizable list, or slate views, with each view offering sorting options. The slate view displays a thumbnail alongside essential clip information such as shot, scene, take, name, or timecode.
Quick Export: Streamlined Delivery
For editors working under tight deadlines, the Quick Export tool offers a fast way to render and upload finished programs directly to online services like YouTube and Vimeo. After logging into the desired service within DaVinci Resolve preferences, users can initiate a quick export. Custom quick export presets can also be created for saving local files, further streamlining the delivery process.
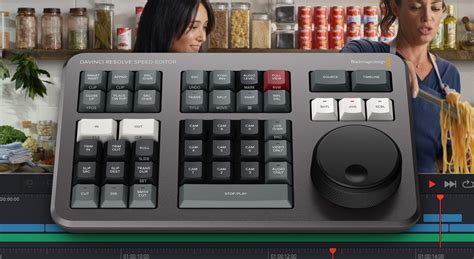
DaVinci Resolve Hardware and Keybindings: Enhancing Workflow
DaVinci Resolve keyboards and hardware panels are engineered to significantly accelerate the editing process compared to mouse-based workflows, enabling the use of both hands simultaneously. The DaVinci Speed Editor, for example, features dedicated edit function keys on the left and a high-quality search dial and transport controls on the right. This allows users to leverage their right hand for locating shots via the search dial and source tape buttons, while simultaneously marking in/out points, performing edits, and live trimming with their left hand, all without touching a mouse.
Other hardware solutions include editor panels specifically designed for multi-cam editing in news and live sports, featuring buttons for rapid camera selection and editing. The premium metal design of the full-sized QWERTY editor keyboard includes a metal search dial with clutch and extra edit, trim, and timecode keys. For color grading, the powerful color panel offers extensive control for cinematic image creation, including refined grading tools and windowing. Audio post-production is enhanced by the Fairlight studio consoles, designed for incredibly fast audio editing on tight deadlines, allowing for the mixing of large projects with numerous channels and tracks. These consoles offer adjustable leg angles for flat or slightly angled working surfaces and blank bays for custom configurations.
Understanding basic keyboard hotkeys is essential for any video editor to maintain a fluid workflow, especially with the increasing complexity of editing software. Keybindings such as 'A' for normal edit mode, 'B' for the blade tool, and 'Ctrl + \' (Cmd + /) for splitting clips at the playhead, allow for efficient cutting without reaching for the mouse. Joining clips with 'Alt + \' (Cmd + ), ripple deleting with 'Ctrl + Backspace' (Cmd + Delete), and toggling clip enable/disable with 'D' are equally important functions. Slip and slide edits can be initiated with 'T + drag', while zooming is managed with 'Ctrl + o -' (Cmd + o -). Full-screen viewing is achieved with 'Shift + F', and saving is a fundamental 'Ctrl + S' (Cmd + S) operation. For those seeking deeper knowledge, courses like Domestika Basics: Introduction to DaVinci Resolve, taught by Juanmi Cristóbal, offer comprehensive guidance.