Adobe Photoshop offers a versatile array of tools for applying color fills, essential for everything from creating solid backgrounds to enhancing existing imagery and speeding up editing workflows. Whether you're a beginner looking to add a simple hue to a shape or an advanced user aiming for complex effects, understanding how to effectively fill layers with color, gradients, and patterns is fundamental. This guide delves into the various methods of color filling in Photoshop, explaining their applications, functionalities, and how to leverage them for maximum creative impact.
The Power of Fill Layers: Non-Destructive Editing and Creative Control
One of the most powerful and flexible ways to apply color in Photoshop is through the use of Fill layers. Unlike directly painting on an image layer, Fill layers are non-destructive. This means they act as a veil coloring the underlying layers without permanently modifying the original pixel data. This approach offers significant advantages, allowing for easy adjustments, modifications, and complete removal of the fill effect at any time.
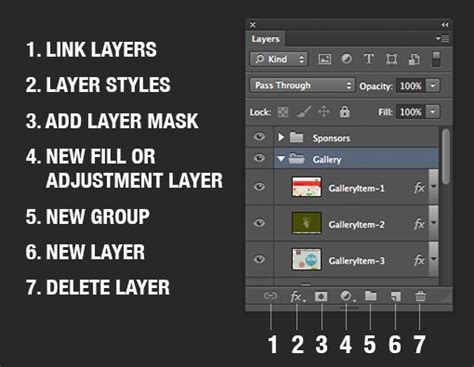
To create a Fill layer, you typically click the "Create New Fill or Adjustment Layer" icon at the bottom of the Layers panel. From the menu that appears, you can choose one of several fill types: Solid Color, Gradient, or Pattern. Each of these options creates a new layer that contains the fill information and is automatically accompanied by a layer mask.
Solid Color Fills: Simplicity and Impact
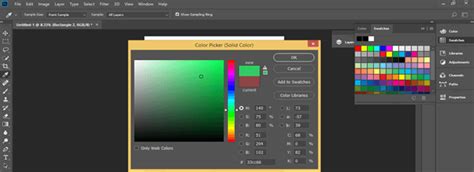
A Solid Color fill is the most straightforward way to introduce a uniform color to your design. When you select "Solid Color" from the Fill/Adjustment layer options, a Color Picker dialog box will appear. Here, you can select your desired hue by moving the round selector and then adjust the color range using the vertical slider on the rainbow-colored bar. Clicking "OK" applies the chosen color to the new layer.
Crucially, a Color Fill layer, by default, affects all the layers below it. This means if you have a "Brick Wall" layer and then add a Solid Color Fill layer above it, the color will be applied to the brick wall. However, the beauty of this method lies in its flexibility. You can easily change the layer blending mode of the selected Color Fill layer from the Blend Mode menu at the top of the Layers panel. For instance, setting the blend mode to "Color" allows the selected color to be applied while still revealing the texture and details of the underlying layers, effectively coloring the image without obscuring its original characteristics. Experimenting with different layer orders and blend modes can lead to a vast array of creative outcomes, transforming a simple color fill into a sophisticated effect.
Gradient Fills: Adding Depth and Dimension
Gradient Fills offer a more dynamic approach to coloring by blending two or more colors smoothly. Similar to Solid Color fills, you can create a Gradient Fill layer by selecting "Gradient" from the "Create New Fill or Adjustment Layer" options. This generates a Gradient Fill layer, which behaves much like a Color Fill layer in terms of its placement and effect on layers below.
Within the Gradient menu, you can choose from a variety of predefined gradient styles. You also have the option to change the angle of the gradient, which dictates the direction of the color transition. Once you're satisfied with the settings, click "OK." The Gradient Fill layer also comes with its own layer mask, allowing for selective application.
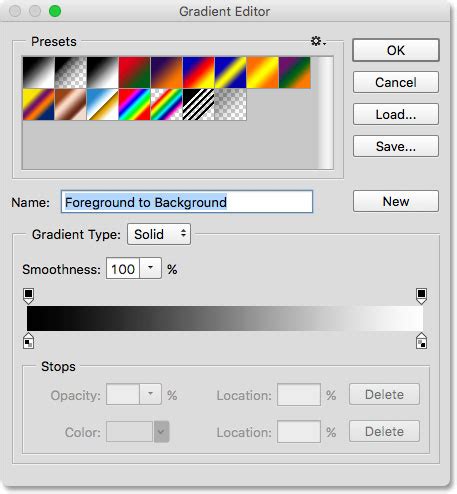
The Gradient Editor itself provides extensive control. You can click on a color gradient within the editor to further customize it, adjusting the color stops, their positions, and the opacity of the gradient. You can also directly manipulate the gradient in the image window by moving the center of the gradient, further refining its appearance.
Pattern Fills: Texture and Complexity
Pattern Fills allow you to overlay a chosen pattern onto your image or a specific area. To create a Pattern Fill layer, navigate to the "Create New Fill or Adjustment Layer" icon and select "Pattern." This action will generate a Pattern Fill layer.
In the Pattern Fill dialog box, you can select your desired pattern from a pop-up panel. Photoshop comes with a range of default patterns, but you can also load custom patterns or create your own. Similar to Color and Gradient fills, the Pattern Fill layer affects all layers below it by default and includes a layer mask for control.
You can adjust the scale of the pattern to fit your needs. The preview in the dialog box updates in real-time, showing how the pattern will appear. You can also reposition the pattern by dragging within the image window while the Pattern Fill dialog box is open, aligning it precisely with your design.
Direct Color Filling: Speed and Specificity
While Fill layers offer non-destructive flexibility, there are instances where a direct color fill is more efficient, particularly for filling selections or specific areas quickly.
Using the Fill Command
Photoshop's "Edit > Fill" command is a direct method for applying color. To use it, you first need to make a selection using any of Photoshop's selection tools (Marquee tools, Lasso tools, Magic Wand, Quick Selection, etc.). Once the area is selected, go to "Edit > Fill."
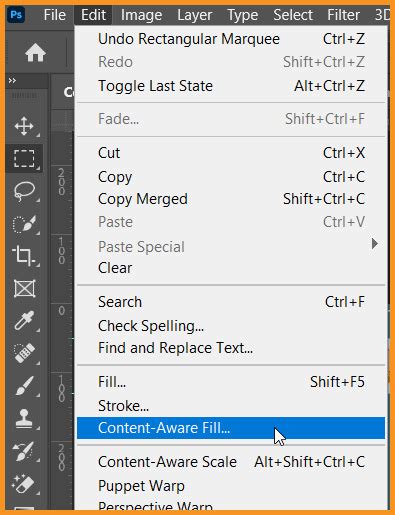
In the Fill dialog box, you can choose what content to fill with, such as Foreground Color, Background Color, a specific pattern, or even content-aware options. Under the "Blending" section, you can select the Mode and Opacity for the paint, controlling how the fill interacts with existing pixels.
Keyboard Shortcuts for Quick Fills
For even greater speed, Photoshop offers keyboard shortcuts for filling selections with the foreground or background color:
- Fill with Foreground Color: Press
Alt + Backspace(Windows) orOption + Delete(macOS). - Fill with Background Color: Press
Ctrl + Backspace(Windows) orCommand + Delete(macOS).
These shortcuts are invaluable for rapidly coloring selections, shapes, or areas within a design.
Understanding Layer Masks and Their Role in Fills
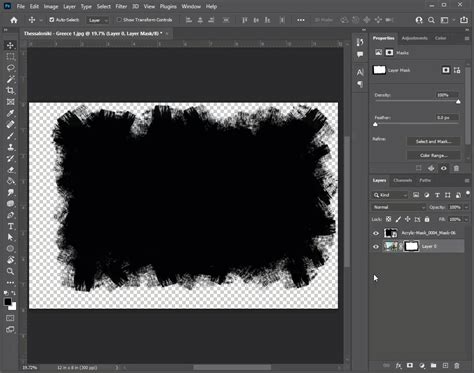
Every Fill layer (Solid Color, Gradient, Pattern) in Photoshop is intrinsically linked to a layer mask. The layer mask is represented by a white box (thumbnail) in the Layers panel next to the fill layer's content thumbnail. This mask controls the visibility of the fill.
- White Mask: When the layer mask is entirely white, it means the fill is fully revealed and applied to the entire image or all layers below it.
- Black Mask: Painting the corresponding area of the mask with black will effectively hide the fill or adjustment effect, making it invisible in those regions.
- Gray Tones: To partially remove the adjustment effect or fill, so that it shows in various levels of transparency, you can paint the layer mask with shades of gray. The extent to which the effect or fill is removed depends on the specific tone of gray used. Lighter grays result in more transparency, while darker grays create less.
This mask functionality is critical for creating sophisticated effects. For example, if you want a color fill to only appear on certain parts of an image, you would use a brush on the layer mask to paint black over the areas where you don't want the color to show. Conversely, if you want the fill to apply to everything except a specific area, you would paint black over that area on the mask.
Advanced Fill Techniques and Considerations
Affecting Specific Layers or Groups
By default, a Fill layer affects all the layers beneath it. However, you can confine its influence to a specific layer or a group of layers.
- Affecting All Layers Below: As mentioned, placing a Fill layer at the top of the layer stack or ensuring itâs not constrained will apply its effect to everything below.
- Affecting Only Specific Layers: To affect only one layer or several successive layers below the adjustment layer, you can use clipping masks. You would create the Fill layer, then right-click on the Fill layer in the Layers panel and select "Create Clipping Mask." This will confine the fill's effect to the layer directly beneath it. You can also group layers and place the fill layer above the group, then right-click the fill layer and select "Create Clipping Mask" to affect only the layers within that group.
- Affecting a Group: When a fill layer is placed inside a group, and the group is in "pass-through" mode (the default for groups), the fill layer affects all layers within that group.
Converting Fill Layers to Image Layers
While Fill layers are designed for non-destructive editing, there might be occasions where you need to convert them into regular image layers. This process is often referred to as "simplifying" the layer. You can do this by right-clicking on the Fill layer in the Layers panel and selecting "Rasterize Layer." Once rasterized, the fill becomes pixel data, just like any other image layer, and can be edited with painting tools, but it loses its non-destructive properties.
Modifying Layer Content Options
Fill layers also have "Layer Content Options" which can be accessed by double-clicking the layer thumbnail (not the mask thumbnail). This opens a dialog box specific to the fill type (Color, Gradient, Pattern) allowing you to modify the fill's properties after it has been created, further enhancing their flexibility. For instance, you can change the color of a Solid Color fill, adjust the gradient's style and angle, or select a different pattern without needing to delete and recreate the layer.
Merging Layers with Fills
When merging layers that include fill layers, it's important to understand how the merge operation will affect the fills. If you merge a fill layer with the layer below it, the fill is effectively applied to that layer, and the fill layer itself is removed. If you are merging multiple layers, a fill layer will be merged into the resulting layer, and its effect will be incorporated into the pixels. To maintain the fill as a separate entity, it's often best to avoid merging it directly with the layers it's intended to modify unless that's the desired outcome.
Photoshop Layer Masks Explained in 7 Minutes!
By mastering these various methods of applying color fills in Photoshop, from the simple elegance of solid colors to the complex interplay of gradients, patterns, and layer masks, you can significantly enhance your design capabilities and streamline your editing process. The key lies in understanding the non-destructive nature of Fill layers and leveraging layer masks for precise control over where and how these fills are applied.