Photopea, a powerful and free online photo editor, offers a versatile suite of tools for manipulating colors within your images. Whether you're a beginner looking to make simple tweaks or an experienced designer aiming for precise control, understanding how to change colors in Photopea is an essential skill. This guide delves into various methods, from altering text hues to transforming the colors of entire objects, providing step-by-step instructions and practical insights.
Changing Text Color: Direct and Dynamic Approaches
Altering the color of text in Photopea can be achieved through two primary, straightforward methods: utilizing the Character Window or employing the Type Tool directly. Both techniques offer efficient ways to customize your text's appearance to match your design aesthetic.
Method 1: Using the Character Window
The Character Window in Photopea provides a dedicated space for fine-tuning text properties, including its color. This method is particularly useful when you want to see all text-related options in one place.
- Add Text: Begin by selecting the Type Tool from the left-hand toolbar and clicking on your canvas to create a text box. Type your desired text.
- Select Text Layer: In the Layers panel, ensure your text layer is selected.
- Activate Type Tool and Select Text: With the Type Tool still active, click directly on the text you wish to modify. Drag your cursor to highlight the specific characters or the entire text block whose color you want to change.
- Access Character Window: Navigate to the top menu bar and click on "Window," then select "Character." This will open the Character panel, displaying various text formatting options.
- Change Color: Within the Character panel, locate the color swatch. Click on this swatch to open the Color Picker. Choose your desired color and click "OK" to apply it to your selected text.
Method 2: Using the Type Tool Directly
This method streamlines the process by allowing you to change text color directly from the options bar that appears when the Type Tool is active.
- Add Text: As with the first method, use the Type Tool to add your text to the canvas.
- Select Text Layer and Activate Type Tool: Ensure the text layer is selected in the Layers panel and that the Type Tool is active.
- Click and Select Text: Click on the text you want to re-color and highlight the desired portion.
- Modify Color in Options Bar: Observe the options bar at the top of the Photopea interface. You will see a color swatch representing the current text color. Click on this swatch to open the Color Picker. Select your new color and confirm by clicking "OK." The selected text will instantly update to the chosen hue.
These two methods provide a solid foundation for customizing text colors, enabling you to integrate text seamlessly into your graphic designs.
Transforming Object Colors: The Power of Hue/Saturation Adjustment Layers
Beyond text, Photopea offers sophisticated tools for altering the colors of objects within an image. The Hue/Saturation adjustment layer is a particularly effective and non-destructive method for this purpose, allowing for significant color transformations with a high degree of control.
Changing the Color of an Object: A Step-by-Step Tutorial
This technique is ideal for modifying the color of specific elements in a photograph, such as the glasses worn by a dog or the eyes of a cat.
Open Your Image: Start by opening your chosen photograph in Photopea. You can do this by going to "File" -> "Open" and navigating to your saved image, or by dragging and dropping the image file into the Photopea workspace. If the image was automatically downloaded, it's likely in your "Downloads" folder.
Opening a saved image for Photopea
Create a Hue/Saturation Adjustment Layer:
- Option A (Top Menu): Go to the "Layer" menu at the top, then select "New Adjustment Layer," and finally "Hue/Saturation."
- Option B (Layers Panel): Alternatively, at the bottom of the Layers panel, click on the half-white circle icon. From the pop-up menu, choose "Hue/Saturation."
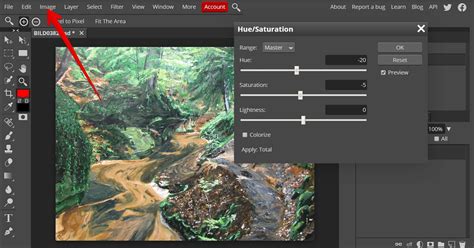
This action will create a new layer named "Hue/Saturation 1" positioned above your background layer. The "Properties" panel will also appear, displaying the settings for this adjustment.
Activate Color Sampling: In the "Properties" panel of the Hue/Saturation layer, click the small, two-sided arrow button. This activates the color sampling mode, allowing you to select a color directly from your image.
Sample the Target Color: Click directly on the area of the photo containing the color you wish to change. For instance, if you're working with an image of a dog wearing pink heart-shaped glasses, click on the pink lenses. Aim for a color that is neither too light nor too dark, ideally representing the mid-tones of the target color. The text next to "Range" in the Properties panel should automatically update to reflect the color range detected (e.g., "Red" if you clicked on pink).
Adjust Hue: Now, you can click and drag the "Hue" slider in the "Properties" panel. As you move the slider, you'll observe the color of the sampled area changing in real-time. Experiment by dragging the slider back and forth to explore different hues.
Refining the Color Change: Adjusting the Range and Masking
The initial color change might not be perfect, potentially affecting other areas of the image or not fully capturing the desired color. Photopea provides tools to refine these adjustments.
Adjusting the Color Range:
- Understanding the Spectrum: The "Properties" panel displays a color spectrum with sliders that indicate the specific range of colors being sampled. Notice how parts of the dog's body might become blotchy if those natural colors fall within the sampled spectrum.
- Modifying Spectrum Sliders: To correct this, you can manipulate the sliders around the color spectrum. Dragging the handle on the right towards the left can help reduce color distortions in unwanted areas. Similarly, pulling the handle on the far left over to the left can help correct blotchy bits within the target area itself (like the glasses lenses).
- Re-evaluating Hue: After adjusting the range, try dragging the "Hue" slider again to see how the refined selection impacts the color change.
Isolating Colors with Layer Masks:
When an image contains multiple instances of the same color, and you only want to alter a specific one (e.g., changing the color of a cat's eyes without affecting background bokeh lights), layer masks are crucial.
Select the Hue/Saturation Layer Mask: In the Layers panel, click on the white square thumbnail next to your Hue/Saturation layer. This is the layer mask. Ensure it's selected (indicated by dashed lines around it).
Choose Black as Your Foreground Color: From the left-hand toolbar, select the "Color Picker" and choose black as your foreground color.
Select the Brush Tool: Choose the "Brush Tool" from the toolbar. You can adjust the brush size using the dropdown menu at the top of the interface for more precise control.
Mask Unwanted Areas: Brush over the areas of the image where you do not want the color change to occur. As you paint with black, the white square (the mask thumbnail) in the Layers panel will turn black in those painted areas. This effectively hides the Hue/Saturation adjustment from those parts of the image.
Correcting Mistakes: If you accidentally mask an area you intended to change, simply switch your Brush Tool's color back to white and brush over the same area to "unmask" it. You can also use the "Undo" function (Ctrl+Z or Cmd+Z) if you make a significant mistake.
Final Hue Adjustment: Once your mask is set up correctly, return to the "Hue" slider in the "Properties" panel. Drag it back and forth until the desired areas (e.g., the cat's eyes) achieve the perfect color, while the rest of the image remains unaffected.
Practical Exercises for Color Transformation
To further hone your skills, Photopea provides several practice images:
- Apples: Download an image of apples and try changing the color of one or more of them.
- Toy Car: Experiment with changing the color of a toy car. This can be more challenging due to the interplay of lighting and reflections.
- Dog with Glasses: (As described in the tutorial)
- Cat with Bokeh: (As described in the tutorial)
These exercises offer hands-on experience in applying Hue/Saturation adjustments and layer masks to achieve specific color modifications.
Advanced Color Manipulation Techniques
Photopea offers a range of selection tools and adjustment layers that empower users to perform complex color edits, from enhancing overall image vibrancy to precisely recoloring specific garments.
Enhancing Image Colors and Saturation
Sometimes, photos suffer from dull or uninspiring colors. Photopea allows you to easily boost the vibrancy and saturation of an entire image.
- Open or Paste Image: Open your image via "File" -> "Open," or paste it onto a new project created by going to "File" >> "New."
- Create a New Adjustment Layer: Click on the "New Adjustment" layer icon (the half-white circle) at the bottom of the Layers panel.
- Select Adjustment Type: Choose the adjustment layer that best suits your goal. For general color enhancement, "Hue/Saturation" is often a good starting point.
- Adjust Saturation: In the "Properties" panel, locate the "Saturation" slider. Dragging this slider to the right will increase the intensity of colors in your image, making them more vivid. Be cautious not to over-saturate, which can lead to unnatural-looking results.
- Export Your Image: Once you're satisfied with the color enhancements, save your work by going to "File" >> "Export As" and selecting your desired file format (e.g., JPG, PNG).
Using the Paint Bucket Tool for Solid Color Fills
The Paint Bucket tool is a straightforward method for filling selected areas with a solid color. This is particularly useful for recoloring simple shapes or solid-colored objects.
- Select a Selection Tool: Choose a selection tool from the toolbar, such as the "Lasso Select" or the "Magic Wand." The best tool will depend on the complexity of the shape you want to select.
- Select the Target Area: Use your chosen tool to create a selection around the object or area you wish to color.
- Zooming: To ensure you capture the entire subject, use Ctrl + '+' (or Cmd + '+') to zoom in and Ctrl + '-' (or Cmd + '-') to zoom out.
- Magic Wand Refinement: If the Magic Wand doesn't select the entire area at once, hold down the "Shift" key while clicking on any unselected parts to add them to the selection.
- Choose the Paint Bucket Tool: Select the "Paint Bucket Tool" from the toolbar.
- Select Your Desired Color: In the Color Picker (or by clicking the foreground color swatch in the toolbar), choose the color you want to use for the fill.
- Fill the Selection: Click within the selected area. The Paint Bucket tool will fill the entire selected region with the chosen color.
- Deselect: To remove the selection outline, go to "Select" -> "Deselect" (or press Ctrl+D / Cmd+D).
Recolor an Outfit Using a Color Fill Layer and Blending Modes
This advanced technique allows for realistic recoloring of clothing or other textured objects.
- Create a Selection: Use any suitable selection tool (e.g., Quick Selection, Pen Tool) to create a precise selection around the outfit you want to change. To ensure you capture the entire area, zoom in and refine your selection carefully.
- Create a New Layer: Go to the Layers panel and click the "New layer" button at the bottom.
- Create a Color Fill Layer: With the new layer selected, go to the "Layer" menu, then "New Fill Layer," and choose "Solid Color." Alternatively, click the half-white circle icon at the bottom of the Layers panel and select "Solid Color."
- Choose a Color: The Color Picker will appear. Select the desired color for your outfit. Click "OK."
- Clip the Color Fill Layer: This is a crucial step. Right-click on the "Solid Color" fill layer in the Layers panel and choose "Create Clipping Mask." This ensures that the color fill only affects the layer directly below it (your selected outfit area).
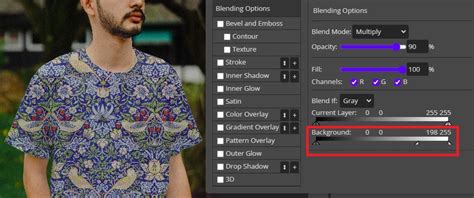
- Change the Blend Mode: With the "Solid Color" layer still selected, look for the "Blend Mode" dropdown menu at the top of the Layers panel (it usually defaults to "Normal"). Experiment with different blend modes. For recoloring outfits, modes like "Multiply," "Color," "Overlay," or "Soft Light" often yield the best results, depending on the original color of the outfit. For instance, if you have a white t-shirt, "Darken" or "Multiply" might work well. Observe how each blend mode interacts with the original colors and textures.
- Refine (Optional): You may need to adjust the opacity of the color fill layer or make further minor adjustments to the selection or clipping mask for a perfect result.
Advanced Selection Tools for Precise Color Editing
Achieving accurate color changes often hinges on making precise selections. Photopea offers several powerful selection tools that can significantly speed up your workflow and improve the quality of your edits.
Magic Wand Tool: Selecting Similar Colors
The Magic Wand tool is excellent for selecting contiguous areas of similar colors.
- Select the Magic Wand Tool: Find the Magic Wand tool in the left-hand toolbar.
- Adjust Tolerance: In the options bar at the top, you'll find a "Tolerance" setting. A lower tolerance selects colors that are very similar to the clicked pixel, while a higher tolerance selects a broader range of colors.
- Contiguous Mode: The "Contiguous" option (often found in the top menu alongside Tolerance) determines whether only connected pixels of similar color are selected, or all pixels of that color range across the entire image.
- Click to Select: Click on the color you want to select. The tool will highlight pixels that match the criteria.
- Adding to Selection: Hold down the "Shift" key to add more areas to your current selection.
Quick Selection Tool: Intuitive Edge Detection
The Quick Selection tool is designed for more intuitive selection, often by simply painting over the area you want to select. It intelligently detects edges based on color and texture differences.
- Select the Quick Selection Tool: Locate this tool in the toolbar.
- Paint Over the Area: Click and drag your mouse over the object or area you wish to select. Photopea will automatically expand the selection to include similar pixels while trying to adhere to the object's boundaries.
- Subtract Mode: If the tool selects too much, you can switch to "Subtract mode" (often indicated by a minus sign next to the tool icon or in the options bar) and paint over the areas you want to remove from the selection. This mode uses a simulated black stroke to intelligently deduce the area to remove by analyzing the image.
Color Range: Selecting by Specific Color Values
The Color Range command allows you to select pixels based on their color values, regardless of their proximity.
- Initiate Color Range: Go to the "Select" menu at the top and choose "Color Range."
- Sample Color: A "Color Range" window will appear. Click on the color in your image that you want to select.
- Preview Selection: The window provides a preview of your selection. Brightness in the preview corresponds to the degree of selection for each pixel â white is fully selected, black is not selected, and grays are partially selected.
- Adjust Fuzziness: Use the "Fuzziness" slider to control the tolerance of the selection. Higher fuzziness includes a wider range of similar colors.
- Confirm Selection: Click "OK" to apply the selection to your image.
These advanced selection tools, when combined with adjustment layers and blending modes, provide immense power for precise and creative color manipulation in Photopea.
Changing Shape Colors: A Fundamental Graphic Design Task
Photopea isn't just for photo editing; it's also a capable tool for graphic design, including creating and customizing shapes. Changing the color of a shape is a fundamental task in this domain.
- Create a New Project: Start by creating a new project: "File" >> "New."
- Select a Shape Tool: From the toolbar, click and hold the shape tool icon (often a rectangle). Choose the desired shape, such as the "Rectangle Tool."
- Draw the Shape: Click and drag on your artboard to create the shape.
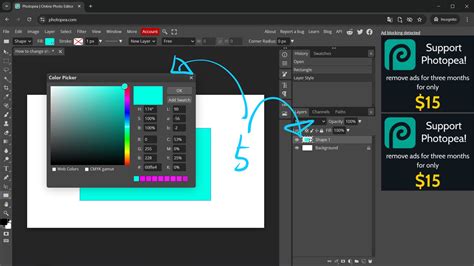
- Access Fill Color Options: With the shape layer selected, look for the "Fill" option in the top options bar. Click on the color box next to "Fill."
- Choose or Customize Color: A color selection dialog will appear. You can choose from pre-defined swatches, enter specific color values, or click the main "Color Box" to open the full Color Picker for detailed customization.
- Apply Color: After selecting your desired color, click "OK." The shape will instantly update to the new fill color.
This process allows for quick and easy color changes to any vector shape created within Photopea, making it ideal for logo design, icon creation, and other graphic elements.
Learning these diverse methods for changing colors in Photopea equips you with the flexibility to achieve a wide range of visual effects, from subtle enhancements to dramatic transformations, catering to both simple adjustments and complex creative visions.