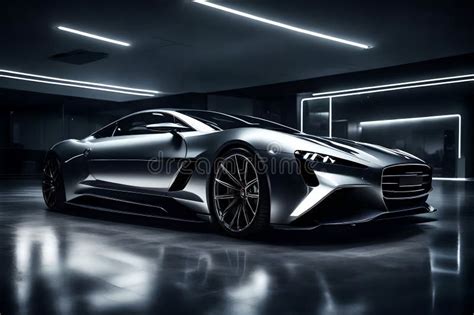
Shooting cars is one of the most rewarding challenges in photography. Whether you’re capturing a multi-million dollar hypercar or your buddy’s freshly washed project car, you’re not just photographing a machine. You’re photographing a piece of art, a symbol of freedom, or the product of countless hours of passion. But as any car photographer knows, getting the shot is only half the battle. For years, Lightroom presets have been the go-to tool for photographers looking to build a consistent style and speed up their workflow. However, cars present unique editing challenges. A preset that makes a red Ferrari pop might turn a blue Subaru a strange shade of purple. This guide is built from professional experience to help you navigate the world of car presets, understand their limitations, and explore the future of automotive photo editing.
The Nuances of Editing Automotive Subjects
Editing a car isn’t like editing a portrait or a landscape. Cars come with their own unique set of problems that can make post-processing a headache. Understanding these challenges is the first step to overcoming them.
Cars Are Mirrors: Managing Reflections
The biggest challenge in automotive editing is managing reflections. A car is basically a giant, curvy mirror. Its surface reflects everything: the sky, trees, buildings, power lines, and you. Unwanted reflections distract the viewer. A bright white reflection of the sky on a side panel can draw the eye away from the car’s shape. To combat this, local adjustments are crucial. Using a brush with negative Dehaze and negative Clarity can help "soften" harsh reflections on windows or body panels. For severe reflections on windshields, a Circular Polarizing filter (CPL) on your lens during shooting is the best preventative measure. In post-processing, a brush mask targeting the windshield and reducing Dehaze can significantly improve the appearance.
Color Is King: Preserving Paint Identity
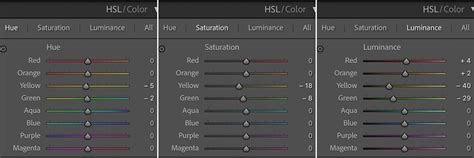
A car’s paint color is its identity. Is that Ferrari Rosso Corsa red or Rosso Mugello red? To a car owner, the difference is everything. A simple preset might apply a global saturation boost, which can make a "classy" deep red look like a "cheap" bright red. The HSL (Hue, Saturation, Luminance) panel in Lightroom is your control center for color. Forget the global Saturation slider for precise control. If a red car looks too orange, slide the Red Hue slider slightly toward magenta. Want the red paint to pop without affecting the (already saturated) blue sky? Adjusting the Luminance of the red channel will make the car's paint appear brighter and more vibrant without oversaturating other elements. Luminance is the most powerful tool here: you can make the car look "brighter" and "pop" without touching the Exposure slider by increasing the Luminance of its color.
Static Presets Have Limits: The Need for Dynamic Editing
A traditional preset applies the same settings to every photo, regardless of light or subject. This is where static presets falter. A preset made on a bright, sunny day will look terrible on a photo shot at night. The "One-Click Wonder" myth doesn't exist. Ignoring White Balance (WB) and Exposure is a common amateur mistake. These two sliders are your responsibility, not the preset’s. Before you even touch your presets, get your exposure and white balance correct. Many cheap presets are also "overcooked," meaning they have Clarity at +100, insane vignettes, and radioactive colors, making them a poor investment. Furthermore, you wouldn't use a dark, moody, desaturated preset on a "for sale" listing that needs to be bright, clean, and commercial. Mismatching the mood of the preset to the photo is another pitfall.
Leveraging Lightroom Presets for Efficiency and Style
Despite their limitations, presets are still a valuable tool for car photographers. They offer consistency and speed, forming the foundation for a professional workflow.
Consistency: The Professional's Cornerstone
Consistency is the number one reason professionals use presets. When delivering a set of 50 photos from a car meet, you want them all to feel like they belong together. A preset ensures your blues, your contrast, and your vignettes are all applied in the same way, creating a cohesive, professional gallery.
Speed: The 80% Solution
A preset acts as your 80% solution. It gets all your base settings (Tone Curve, HSL, Color Grading, Sharpening) in place with one click. This allows you to focus your time on the crucial 20% that matters: the local adjustments, brushing, and masking that make the photo perfect.
Learning and Exploration: Deconstructing and Trying Styles
Presets can be excellent learning tools. Want to know how a famous photographer gets their "look"? Buy their presets. But don’t just use them blindly. Deconstruct them. Apply the preset, then go panel by panel to understand what settings are being changed. This exploration also allows you to try on different styles in seconds, experimenting with moods like "Clean," "Moody," or "Vintage" to see what best suits your image.
A Professional Lightroom Workflow for Car Photography
A professional workflow is methodical and efficient, moving from global corrections to precise local adjustments.
Step 1: Culling and Initial Corrections
First, get your photos off the SD card and into Lightroom Classic. The most important first step is culling: do not edit photos you aren’t going to deliver. Manually culling hundreds of photos can be tedious. AI tools can assist here. Once you have your select "keeper" photos, select the first one.
- Set White Balance (WB): Use the Eyedropper tool. Find something that’s supposed to be neutral gray or white (a white road line, a building, sometimes a white wheel) and click it.
- Fix Exposure: Is the photo too bright or too dark? Adjust the Exposure slider.
- Set White/Black Points: Hold the Alt (or Option on Mac) key and click the Whites slider. Drag it right until you just start to see white dots appear. Repeat for the Blacks slider to set the black point.
Step 2: Applying and Refining Presets
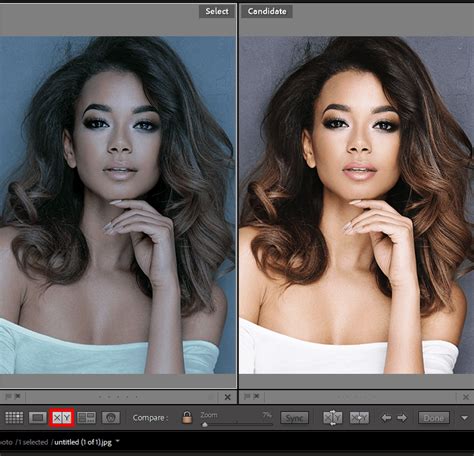
Now, navigate to your preset library on the left. Hover over your car presets to see a live preview. Find one that fits the mood. The first thing you should do after applying a preset is look for the Amount slider at the top of the preset panel. This is a powerful tool to dial back the intensity if the preset is too strong. After applying, your Exposure or Contrast might look "off" again. That’s fine. Just go back to the Basic Panel and re-tweak the Exposure, Contrast, Highlights, and Shadows sliders until it looks good again.
Step 3: Global Adjustments with HSL and Color Grading
- HSL Panel: Is the red car looking too orange? Go to HSL > Hue and slide Red to the left. Is the green grass in the background too distracting? Go to HSL > Saturation and slide Green down. Want the car’s paint to “pop”? Use the Luminance sliders for the car's color.
- Color Grading Panel: This panel is amazing for mood. For a "moody" look, you can add a bit of Teal or Blue into the Shadows.
Step 4: Local Adjustments with Masking and Brushes
This is where the real work happens to refine the image and create separation between the car and its environment.
- Mask the Car: Go to the Masking panel and click "Select Subject." Lightroom will create a mask of the car. You can then invert this mask to edit only the background. Try dropping the Exposure by -0.30, dropping the Shadows, and slightly desaturating the background to make the car the undeniable hero.
- Mask the Background: Create a duplicate of the Subject mask, then Invert it. Now you have a perfect mask of everything but the car.
- Mask the Wheels: Use the Brush tool and paint over the wheels and tires. You can use brushes with positive exposure to "dodge" (brighten) the car’s wheels, headlights, and body lines.
- Mask Reflections: See a distracting reflection on the windshield or body panel? Grab a Brush, set Dehaze to -20, and paint over it to soften it.
Step 5: Transform and Sharpening
- Transform: Is the car at a weird angle? Use the Transform tools to correct perspective.
- Sharpening: Add a final bit of sharpening. The key here is the Masking slider in the Sharpening panel. Hold Alt/Option and drag it to the right. The white areas are what will be sharpened, helping you avoid sharpening noise in smooth areas.
Advanced Techniques for Specific Shots
Not all car photos are static. Special techniques are needed for dynamic shots.
Panning Shots
For panning shots, use a Radial Filter. Draw it over the car, then invert it so you’re only affecting the background. Apply a small amount of negative Motion Blur (a hidden slider in the Effects panel of the mask) to enhance the sense of speed.
Static Shots with Motion Effect
Even in static shots, you can add a sense of motion. To add motion to the wheels, use a Radial Filter and draw it perfectly over the wheel. In the mask’s Effects panel, apply some Angular blur.
Add Motion Blur To Your Car Photography!
Building Your Own Style: The Power of Custom Presets
The best way to stand out is to develop your own look. Creating your own presets is the key to mastering your style. You learn what every slider does and build a workflow that is 100% yours.
Saving Your Custom Presets
When you save your preset, remember the CRITICAL RULE: DO NOT include “White Balance,” “Exposure,” “Transform,” or “Lens Corrections” (unless you always use the same lens). These are elements that must be corrected on a per-image basis.
Example Preset Styles:
Here are two distinct styles you can build:
Style 1: Bright, Sharp, and True-to-Color
- Tone Curve: Add a very gentle “S” curve.
- HSL Panel: Slightly boost the luminance of common car colors: Red (+10), Orange (+10), Yellow (+10), Blue (+10).
- Color Grading: Leave this alone for true color.
- Masking: Hold Alt/Option and drag the Masking slider to 70-80 to ensure sharpening is applied selectively.
- Vignetting: Amount -10.
Style 2: Moody, Desaturated, and Atmospheric (Popular on Instagram)
- Tone Curve: This is key. Create a “faded” look by grabbing the bottom-left point (the black point) and dragging it up slightly.
- HSL Panel: Shift Blues toward Teal. Heavily desaturate colors you don’t want. Boost the colors you do want: Oranges (+20), Yellows (+10).
- Color Grading: Add a bit of Teal or Blue to the Shadows for a moody effect.
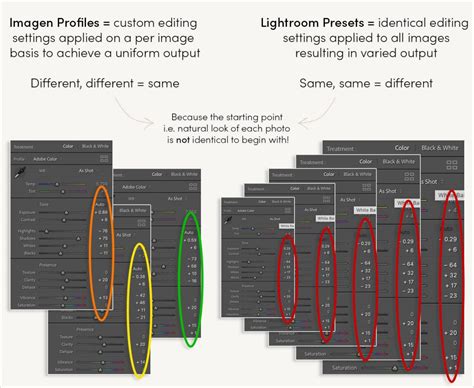
The Evolution of Editing: AI and Dynamic Profiles
While presets are a powerful tool, they are a blunt instrument. For the modern professional photographer, time is the one resource we can’t get back. This is why AI-powered, dynamic editing is the clear next step.
Imagen: AI-Powered Workflow
Tools like Imagen offer a smarter path. Instead of a static preset, you use a dynamic AI Profile that analyzes each photo individually and applies custom edits to match your style. Imagen is not a preset; it’s an AI-powered desktop app that integrates directly with Lightroom Classic catalogs. For each photo, the AI makes dynamic adjustments. It will see one photo is underexposed and raise the exposure. It will see the next is too warm and cool it down. In about 10-15 minutes for a full shoot, Imagen tells you the edits are ready.
Personal AI Profiles and Talent AI Profiles
The most powerful feature for a professional is the ability to train the AI. Point Imagen at several of your completed Lightroom catalogs (you need at least 3,000 of your best, final-edited photos). It uploads them and “learns” your unique style. Now, when you send it new photos, it edits them like you would. After reviewing the edits from Imagen, you might make a few final tweaks in Lightroom. You can then upload those final-final edits back to your profile.
If you don’t have 3,000+ edited photos, or if you just want to try a new style, you can use a Talent AI Profile. This is not like buying presets. You can browse the Talent AI Profiles inside Imagen and find a style that fits. When you apply this Talent Profile, it still edits every photo individually.
Imagen vs. Traditional Lightroom Preset
| Feature | Traditional Lightroom Preset | Imagen AI Profile |
|---|---|---|
| How it works | Applies a fixed set of saved settings. | AI analyzes each photo and applies dynamic settings to match a style. |
| Adaptability | Static. Does not adapt to light, color, or subject. | Dynamic. Adapts to each photo’s unique needs (lighting, subject). |
| Key Sliders | Ignores Exposure/WB (usually). | Edits Exposure and WB as part of the style, analyzing each photo. |
| Consistency | Consistent settings, but inconsistent results. | Consistent results by applying varied settings. |
| Learning | Cannot learn or evolve. | Evolves. |
Where to Find Car Presets
There are many sources for Lightroom presets, each with its own pros and cons.
Free Lightroom Presets
Adobe actually includes a good set of free presets right inside Lightroom. These can be a great starting point for learning.
Paid Preset Marketplaces
- Creative Market / Etsy: These are massive, open marketplaces. You can find thousands of presets for very low prices. The quality varies dramatically. You can find some hidden gems, but you’ll also find many low-quality, overcooked presets. When buying presets, you are paying for an artist’s time and expertise.
- Pro Photographer Stores: Many popular automotive photographers sell their own preset packs. This is the best way to get a specific modern style. Look for photographers whose work you admire and see if they offer presets.
Specialized Preset Companies
- VSCO: Best known for its mobile app and film emulation presets. The look is often subtle, moody, or faded.
- Mastin Labs: This company’s entire focus is on hybrid photography-making your digital photos look like they were shot on specific, classic film stocks (like Kodak Portra 400 or Fuji Pro 400H).
Common Questions About Car Presets
- What’s the one thing I should always fix before applying a car preset? Exposure and White Balance. Always. No preset can read your mind or know what your lighting was.
- How do I deal with strong reflections on a car’s windshield? A CPL filter on your lens is the best way. In Lightroom, your best bet is to use a Brush mask. Select the windshield and lower the Dehaze slider.
- My preset makes the car’s paint color look wrong. How do I fix it? Go to the HSL Panel. Find the car’s main color (e.g., “Blue”). First, try adjusting the Hue slider until the color looks correct.
- Can I use car presets on photos from my phone? Yes. Lightroom presets work on JPEGs (which phone photos are) as well as RAW files. However, a preset will look much different on a JPEG than a RAW file because RAW files are “flat” and contain a huge amount of data, while JPEGs are already “cooked” and compressed by your camera.
- What’s the difference between a preset and a LUT? A preset is a set of slider instructions for Lightroom. A LUT (Look Up Table) is a mathematical formula to change colors, mostly used in video editing.
Traditional Lightroom presets are a fantastic tool. They help you learn, they establish consistency, and they speed up your workflow. But they are a blunt instrument. For the modern professional photographer, time is the one resource we can’t get back. This is why AI-powered, dynamic editing is the clear next step. By using a Personal AI Profile with Imagen, you can move past the repetitive "tweaking" phase, allowing the AI to handle the 95% of repetitive work-the exposure, the white balance, the color correction-that used to take hours.