In the dynamic world of graphic design and digital publishing, Adobe InDesign stands as a cornerstone tool. Its interface, designed for efficiency and precision, relies heavily on the visibility and accessibility of its toolbars. However, like any complex software, users may occasionally encounter situations where the InDesign toolbar disappears from their workspace, leading to frustration and a potential disruption in workflow. This guide aims to provide a thorough understanding of how to get the InDesign toolbar back, addressing common scenarios and offering solutions for a seamless design experience.
Understanding the InDesign Workspace and Toolbar
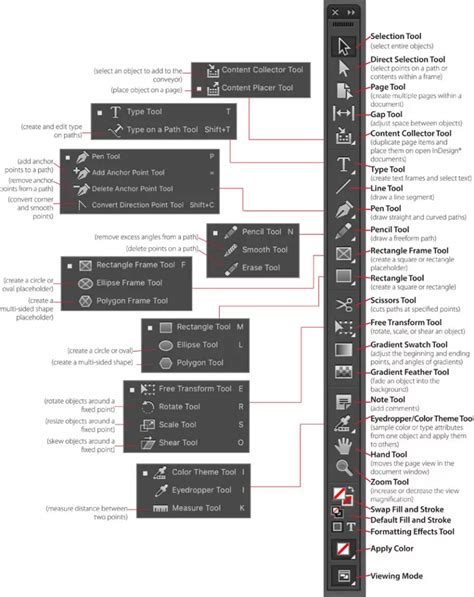
The InDesign toolbar, often referred to as the Tools panel, is a critical component of the application's user interface. It typically appears docked to the left side of the workspace, providing quick access to a wide array of essential tools for creating and manipulating content, such as selection tools, type tools, drawing tools, and more. Its presence is fundamental for efficient page layout and design.

When the toolbar is visible, it offers a clear and organized collection of icons, each representing a specific function. Understanding its default position and how to interact with it is the first step in troubleshooting its disappearance.
The Primary Method: Accessing the Tools Panel Through the Window Menu
The most straightforward and common solution for a missing InDesign toolbar is to access it through the application's menu bar. If you don’t see the toolbar in your workspace, the solution is to navigate to Window > Tools to open it. This action will bring the Tools panel back into view, typically in its last known position or as a floating panel.
This method is universal across different versions of InDesign and operating systems. It acts as a universal "reset" for the visibility of the Tools panel, ensuring that even if it has been inadvertently closed or moved out of view, it can be easily recalled.
Undocking and Repositioning the Toolbar
Once the toolbar is visible, you may find that its current position or orientation isn't ideal for your workflow. InDesign offers significant flexibility in how the toolbar can be managed.
You can undock the Toolbar by grabbing the top of its panel and dragging it away from the edge of the frame. This action transforms the docked toolbar into a floating panel, which can then be moved freely around your workspace. This is particularly useful if you have a multi-monitor setup and want to position the tools on a secondary screen, or if you prefer a more minimalist main workspace.
Customizing Toolbar Orientation
The floating toolbar can also be adjusted in its orientation. If you have a horizontal toolbar and click on the little double arrows (>>) at the top of it, you can make it horizontal. This transformation can be beneficial for users who prefer a more compact toolbar that spans horizontally across their screen, perhaps at the top or bottom of their workspace.
When you have a horizontal toolbar and click on the downward-pointing arrows on the left side, it changes into a two-column vertical toolbar. This is a clever way to condense the toolbar's footprint while still keeping all the tools accessible. It effectively offers a more space-efficient vertical layout.
Addressing Advanced Issues: Submenu Behavior and Screen Configurations
While the basic troubleshooting steps usually resolve the issue of a missing toolbar, some users encounter more peculiar problems. One such issue, as reported by a user, involves the submenu traveling around the screen. The submenu moves to the middle of the screen if aligned to the left edge of the monitor, or, if aligned to the right edge of the screen, it pops out next to the tool but on the wrong side. This behavior can be highly disruptive to a design workflow.
This specific problem often arises in complex display configurations, such as those involving dual screens. The user in question was running macOS Sierra 10.12.5 with InDesign 12.1.0.56 on dual screens. InDesign had been running fine until a few days prior to reporting the issue. Attempts to reset InDesign and move the screens around did not resolve the problem.
Potential Causes for Submenu Anomalies
Such erratic submenu behavior can be attributed to several factors:
- Display Driver Issues: Outdated or corrupted display drivers can interfere with how applications render their user interfaces, especially across multiple monitors. Ensuring that graphics drivers are up-to-date is crucial.
- Operating System Updates: Sometimes, an operating system update can introduce subtle incompatibilities with existing software. If the issue began shortly after an OS update, rolling back to a previous version (if feasible) or checking for InDesign updates that address compatibility might be necessary.
- InDesign Preferences Corruption: InDesign, like many applications, stores user preferences that can become corrupted over time. Corrupted preferences can lead to a wide range of unexpected behaviors, including UI glitches.
- Screen Resolution and Scaling: Inconsistencies in screen resolution settings or scaling preferences between multiple monitors can sometimes confuse applications about the optimal placement of UI elements.
- Third-Party Plugins or Extensions: While not explicitly mentioned in the user's report, third-party plugins or extensions can sometimes conflict with InDesign's core functionality, leading to unusual display issues.
Solutions for Advanced Submenu Problems
For users experiencing the perplexing submenu issue, the following steps, building upon the basic troubleshooting, can be explored:
Reset InDesign Preferences: This is a common and often effective solution for various InDesign glitches. To reset preferences:
- Quit InDesign.
- Locate the InDesign preference folder. On macOS, this is typically
~/Library/Preferences/Adobe InDesign/Version [X]. You might need to hold down the Option key while clicking the Go menu in Finder to reveal the Library folder. - Rename the InDesign preference folder (e.g., to
Adobe InDesign DefaultsorOld Preferences). This forces InDesign to create a new, default preference file upon the next launch. - Restart InDesign.
How to Reset InDesign Preferences: A Quick Fix for Errors
Check and Update Display Drivers: Visit the website of your graphics card manufacturer (NVIDIA, AMD, Intel) and download the latest drivers for your specific model and operating system.
Verify Display Settings: Ensure that the display settings (resolution, scaling, arrangement) on your dual monitors are consistent and configured correctly within your operating system's display preferences. Try disabling one monitor temporarily to see if the issue persists on a single screen.
Test in a New User Account: Creating a new user account on your macOS system can help determine if the issue is system-wide or specific to your user profile. If the problem doesn't occur in a new user account, it suggests that your original user profile's settings or files might be the cause.
Update InDesign: Ensure you are running the latest available version of InDesign. Adobe frequently releases updates that include bug fixes and performance improvements. Check for updates via Adobe Creative Cloud.
Disable Third-Party Plugins: If you have any InDesign plugins or extensions installed, try temporarily disabling them to see if one of them is causing the conflict.
Workspace Reset: Within InDesign, you can also reset the workspace to its default layout. Go to Window > Workspace > Reset [Workspace Name]. This is less drastic than resetting preferences but can sometimes resolve UI issues.
The Importance of a Functional Toolbar for Design Workflow
The InDesign toolbar is not merely a collection of icons; it's the primary gateway to the application's powerful design capabilities. When it disappears or malfunctions, it can feel like losing a vital limb. The ability to quickly select tools, switch between modes, and access different functionalities directly impacts the speed and fluidity of the design process.
For instance, the Type Tool is essential for adding and editing text, the Pen Tool for creating precise vector paths, and the Selection Tool for manipulating objects. Without easy access to these, designers would be forced to rely on keyboard shortcuts or lengthy menu navigations for every action, significantly slowing down their work.
Understanding Toolbar Customization Options
Beyond simply getting the toolbar back, InDesign offers advanced customization options that can further enhance user productivity.
The Control Panel
While the Tools panel contains the core tools, the Control panel (Window > Control) is another indispensable element of the InDesign interface. It dynamically displays options relevant to the currently selected tool or object. For example, when the Type Tool is active, the Control panel shows text formatting options like font, size, and leading. When an object is selected, it displays transformation and appearance controls. Integrating the Control panel with your workflow can significantly reduce the need to delve into deep menus for common adjustments.

Customizing Menus and Keyboard Shortcuts
For those who wish to streamline their workflow even further, InDesign allows for the customization of menus and keyboard shortcuts. This can be accessed via Edit > Keyboard Shortcuts and Edit > Menus. By assigning frequently used commands to specific key combinations or reorganizing menu structures, designers can create a truly personalized and efficient working environment. This level of customization can be particularly helpful when dealing with complex projects or repetitive tasks.
The O'Reilly Perspective: Learning and Adaptation in the Digital Age
While not directly related to the technical steps of recovering an InDesign toolbar, the provided text from O'Reilly offers a valuable perspective on continuous learning and adaptation in the technology landscape. The testimonials highlight how platforms like O'Reilly provide access to a vast array of resources, including books, courses, and live events, enabling individuals to "upgrade the capabilities and competencies of our teams" and "improve overall team performance."
This ethos of continuous learning is directly applicable to mastering complex software like InDesign. As software evolves and new features are introduced, designers must remain adaptable and willing to learn. Understanding the nuances of the InDesign interface, including how to manage its toolbars and panels, is a fundamental aspect of this ongoing learning process. The ability to troubleshoot and adapt when faced with unexpected interface behavior is a testament to a designer's proficiency and their commitment to mastering their tools.
Conclusion: Empowering Your InDesign Workflow
The InDesign toolbar is an integral part of the design process, and its disappearance can be a source of significant inconvenience. By understanding the straightforward methods of accessing and managing the Tools panel through the Window > Tools menu, and by employing more advanced troubleshooting techniques for complex issues, designers can ensure their workspace remains functional and efficient. The flexibility offered by InDesign in terms of docking, floating, and reorienting toolbars, coupled with the possibility of deep customization, empowers users to tailor their environment to their unique working style. Ultimately, a well-understood and readily accessible toolbar is key to unlocking the full potential of Adobe InDesign and maintaining a productive and creative workflow.