Adobe InDesign is a powerful tool for creating professional layouts and publications. While its capabilities extend far beyond simple text formatting, understanding how to effectively underline text can significantly enhance your designs. Underlining, when used judiciously, can draw attention to specific words or phrases, providing emphasis. This article will guide you through the various methods of underlining text in InDesign, from the most basic applications to advanced customization options, ensuring your text achieves the desired impact without compromising the overall aesthetic of your design.
The Fundamentals of Underlining Text
Figuring out how to underline in InDesign is a straightforward process. The primary method involves using the Underline option found within the Character panel or the Control panel.
To begin, select the text you wish to underline using the Type Tool (T). Once your text is highlighted, you can access the Underline feature in a couple of ways. One common approach is to locate the Underline option within the Control panel, which is typically displayed at the top of your InDesign workspace. Another way to access the Underline feature is by bringing up the Character panel. If you have trouble finding the Character panel, go to Window > Type & Tables > Character. Within the Character panel, you will find a checkbox or an icon corresponding to the Underline function. Ticking this box will apply a standard underline to your selected text.
While the default underline is functional, its appearance is often quite basic. Originally a proofreader’s mark for italics, underlines took on a life of their own during the typewriter years, when they were one of the only ways one could emphasize text. However, in professionally typeset documents, you are very unlikely to see underlines used for emphasis; instead, you might see italics, a weight change, a color change, or some combination of the above. This is where InDesign's advanced customization options come into play, allowing you to transform a mundane underline into a sophisticated design element.
Customizing the Underline: Weight, Offset, and Color
Simply underlining text can sometimes appear amateurish, a common sign for those new to design and layout. Fortunately, InDesign offers robust control over the appearance of underlines, allowing you to tailor them to your specific design needs.
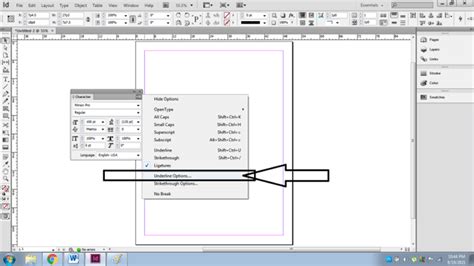
To change the weight of the underline, highlight the text with the Type Tool (T). Then, you can access the Underline Options by holding down the Alt/Opt key on your keyboard while clicking the Underline button in the Control panel. Alternatively, you can navigate to the Character panel menu (often represented by a small triangle or lines in the corner of the panel) and select Underline Options.
Once the Underline Options dialog box is open, you will find several settings to adjust:
- Weight: This controls the thickness of the underline. You can select from a range of predefined weights or enter a custom value. The thickness of the underline line is a crucial element in its visual impact.
- Offset: This setting determines the distance of the underline from the baseline of the text. The offset is measured from the baseline. Adjusting this value allows you to position the underline precisely where you want it relative to the text.
- Color: You can choose a specific color for your underline. This can be a solid color, or you can select a tint to create a lighter or darker shade of the chosen color. Choosing a color and tint allows for fine-tuning the underline's visibility and integration with your overall color scheme.
- Type: Beyond a solid line, InDesign offers various styles for your underline, such as dashed or dotted lines. These options can be found within the Underline Options dialog box, allowing for a more decorative or thematic underline.
By turning on the Preview button within the Underline Options, you can see the effects of your changes in real-time. Experimenting with these options-Weight, Offset, and Color-can dramatically alter the perception of the underline, transitioning it from potentially "boring" to "fun" and sophisticated.
Advanced Underlining Techniques and Related Features
Beyond the direct Underline Options, InDesign provides other powerful tools that can be used to achieve underline-like effects or to manage text formatting more efficiently.
Baseline Shift for Vertical Positioning
While the Offset in Underline Options controls the underline's position relative to the baseline, the Baseline Shift feature offers more granular control over the vertical positioning of individual characters or selected text. You can use Baseline Shift to move a selected character up or down relative to the baseline of the surrounding text. In the Character panel or Control panel, type a numeric value for Baseline Shift. To increase or decrease the value, select the Baseline Shift box and then select the Up Arrow or Down Arrow. This is particularly useful for creating subscripts or superscripts, but can also be employed subtly to adjust the perceived position of underlined elements.
Superscript and Subscript
The Superscript and Subscript options, also found in the Character panel or Control panel, automatically format text to be smaller and raised or lowered relative to the baseline, respectively. The values applied are percentages of the current font size and leading and are based on the Type Preferences settings. While not directly an underlining feature, understanding these for positioning can be relevant when combining emphasis techniques.
OpenType Features and Ligatures
For users working with OpenType fonts, there are additional possibilities for refining text appearance. When you choose Ligatures from the Character panel menu, Control panel menu, or in-context menu, InDesign produces any standard ligature defined in the font, as determined by the font designer. Choose Ligatures from the pop-up. Ligatures are special characters where two or more letters are joined together, often for aesthetic reasons. While not directly related to underlining, these advanced typographical features demonstrate the depth of control InDesign offers for text styling.
Change Case Command
The Change Case command is another powerful text formatting tool within InDesign. This command changes the case setting of selected text. The distinction between different case settings is important when searching or spell-checking text. The Change Case command can automatically change the case of selected text. Options include:
- Sentence case: Capitalizes the first letter of the first word in a sentence and marks the ends of sentences.
- Lowercase: Changes all characters to lowercase.
- UPPERCASE: To change all characters to uppercase.
- Title Case: Capitalizes the first letter of each word.
- All Caps: Applies All Caps to the word.
- Small Caps: Applies small caps to the text. This is a stylistic choice where capital letters are rendered in a smaller font size, designed as part of the font, if available. It creates more elegant type.
- OpenType All Small Caps: Similar to Small Caps but leverages OpenType font features for potentially better results.
In addition to All Caps, Small Caps, and OpenType All Small Caps, InDesign now includes a Lowercase option in the Properties panel. To achieve better results, use the Change Case command rather than simply typing everything in caps.
InDesign Advanced Tutorial
Language Settings for Spelling and Hyphenation
Accurate spelling and hyphenation are crucial for professional documents. InDesign uses spelling and hyphenation dictionaries for text. To set the language for text formatting, select the text, and then choose the language from the Language menu in the Control panel or Paragraph panel. You can also set a default language for all new documents by choosing Edit > Preferences > Hyphenation and Justification (Windows) or InDesign > Preferences > Hyphenation and Justification (Mac OS) and selecting the language from the Language pop-up menu. This ensures that the correct dictionaries for both spelling and hyphenation are used. This setting does not affect existing text frames or documents. For example, a word like “Glockenspiel” is recognized and treated correctly in different languages, such as A. “Glockenspiel” in English, B. in Traditional German.
Understanding Paragraph Rules and Borders
Sometimes, what appears to be an underline might actually be a Paragraph Rule or a Paragraph Border. This is a common point of confusion, especially when working with pre-existing documents.
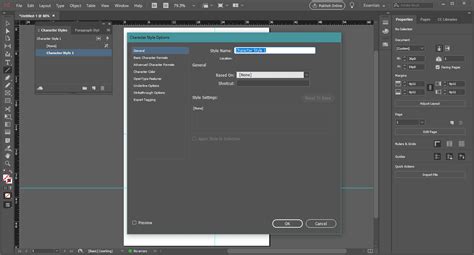
If you are working on a pre-existing document and are stuck on an underline used for section titles, it might be a rule. To adjust this, it's often recommended to create a new text box and write your title. Then, select the title and create a new Paragraph Style. If the Paragraph Style is not visible, hit F11. Double-click on the recently created Paragraph Style, and a new window should appear. Within this window, you can turn on the Underline by ticking the "Underline On" box. There are several settings you can control, like width, offset, and color (you can specify it to have the same color as the text or any other color).
If paragraph rules are turned on, you may need to turn them off to avoid conflicts with custom underlines. Uncheck either the "rule above" or "rule below" option. If a paragraph style was used to format the text, ensure underlines are turned off in the style. Underlines can also be set in the Underline Options portion of a style, too. And they also could be done with Paragraph Borders. It can be hard to tell from a screen capture which method was used.
When to Use Underlines and When to Avoid Them
While InDesign provides extensive control over underlines, it's important to consider their impact on your design. As mentioned, in professionally typeset documents, underlines are rarely used for emphasis. Instead, designers often opt for:
- Italics: A classic and effective way to add emphasis.
- Weight Change: Making text bold or a heavier weight.
- Color Change: Using a contrasting color to highlight text.
- Combinations: Employing a mix of these techniques.
Underlines can sometimes identify a designer as new to the field. However, with InDesign's advanced customization, you can make underlines a deliberate and stylish choice. If you choose to use them, ensure they complement your overall design and are not merely a default setting.
For those seeking further exploration, the Adobe InDesign Community is a valuable resource. If you have a question to ask or an idea to share, participating in this community can offer insights and solutions from fellow designers. This set of tutorials will help you dive deeper into the ins and outs of the program.
By mastering the various methods of underlining text in Adobe InDesign, from basic application to intricate customization through character and paragraph styles, you can effectively draw attention to key elements within your layouts, ensuring your message is communicated with clarity and style.