Adobe Lightroom Classic is a powerhouse in the photography world, offering a vast array of tools and processes that can initially seem daunting. At its core, however, Lightroom is designed to streamline three fundamental aspects of a photographer's workflow: organizing, post-processing, and exporting images. Whether you're a novice just picking up your first camera or an experienced professional, understanding Lightroom Classic is crucial for efficient and effective image management and enhancement. This guide delves into the process of using Lightroom Classic from beginning to end, offering insights into often-confusing areas and providing a solid foundation for your photographic journey.
It is important to note that this article specifically focuses on Lightroom Classic, distinct from the cloud-based, less comprehensive "Lightroom / Lightroom CC." For a detailed comparison, consult guides on Lightroom Classic versus Lightroom. To quickly locate specific information within this extensive article, utilize the "Control F" (or "Command F" on Mac) keyboard shortcut. You can also navigate directly to different sections by clicking on the provided links:
- Introducing Lightroom Classic
- Why Lightroom is Unique
- Demystifying the Lightroom Catalog
- Importing a Photo into Lightroom
- Explaining the Layout of Lightroom’s Library and Develop Modules
- How to Organize Your Photos in Lightroom
- How to Post-Process Your Photos in Lightroom
- How to Export Your Photos from Lightroom
- Backing Up Your Catalog
Our objective is to furnish beginners with all the essential knowledge for Lightroom Classic, irrespective of whether you are using an older standalone version (like Lightroom 5 or Lightroom 6) or the latest iteration. By the end of this tutorial, even those starting with no prior knowledge should possess a medium- to high-level understanding of Lightroom's most critical concepts. This is an extensive resource, so feel free to bookmark it for future reference. Lightroom can be overwhelming initially, and this guide aims to simplify its complexities.
What is Lightroom Classic?
Lightroom Classic is a sophisticated software application designed for both the organization and post-processing of digital photographs. It empowers photographers to manage their image libraries, refine their photos through editing, and export them in various formats and sizes suitable for different purposes. Let's explore these three core functions in detail.
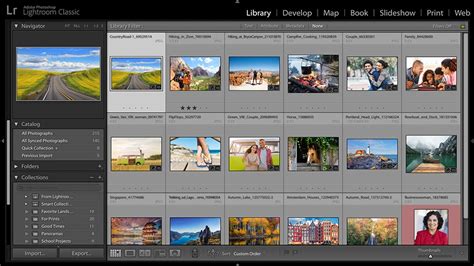
Organizing Your Photos
One of Lightroom's primary strengths lies in its ability to sort and organize your photographic collection. When you import images into Lightroom, the software also displays their location on your computer's file system, typically shown on the left-hand side of the screen. It's crucial to understand that photos already residing on your computer do not automatically appear within Lightroom. To incorporate them into your Lightroom workflow, you must import them. The intricacies of the Import Dialogue will be discussed later, but for now, it suffices to know that importing is the gateway to managing your images within the software.
Beyond simply indicating file locations, Lightroom offers a multitude of features for organizing your photos. Consider a scenario where you capture a photograph you particularly admire and wish to easily retrieve it later. Lightroom provides several methods to achieve this. You can assign a five-star rating, apply flags, or add the image to a designated "Best Photos" collection, among other options. We will delve deeper into these organizational tools and their applications later in this guide. For the time being, it is sufficient to recognize Lightroom as a leading, and arguably the most popular, software solution for photo organization and sorting within the photography community.
Editing Your Photos
While organizing is a significant aspect, Lightroom's capabilities extend far beyond mere sorting. Its most vital function is enabling you to edit your photographs. Although Lightroom doesn't offer the exhaustive range of editing tools found in software like Photoshop, its post-processing features are more than adequate for the vast majority of photographers. Many professionals can seamlessly manage their entire editing workflow within Lightroom alone. While Photoshop is a powerful tool, its utility is often better suited for graphic design or highly specialized image manipulation rather than routine photo editing.
Lightroom's post-processing tools cover all essential adjustments, including brightness, contrast, color, sharpness, and a wide array of other refinements. Furthermore, it supports local adjustments, allowing you to selectively modify specific areas of an image without affecting the rest. In essence, Lightroom is engineered for photo editing.
Exporting Your Photos
A less commonly highlighted, yet equally important, function of Lightroom is its export capability. Efficiently exporting your images is essential for sharing them online, preparing them for print, or simply managing file sizes. For instance, when preparing to send photos via email or for web use, you might need to reduce their file size. Instead of sending 4000-pixel images with 0% compression, you can export smaller, 1000-pixel versions with 20% compression. This process is straightforward within Lightroom. By right-clicking on a photo and selecting "Export > Export," you can define all the desired settings for your final image. This capability is indispensable for any photographer who regularly shares their work.
What Makes Lightroom Different from Other Software?
A frequent question regarding Lightroom revolves around its unique operational paradigm, which significantly diverges from other image editing software, including Photoshop. The most fundamental difference lies in how Lightroom handles edits.
When you make a change to a photo within Lightroom, that alteration is not applied directly to the original file. Instead, the modification is recorded within the Lightroom catalog. For example, if you brighten a photo in Lightroom, opening that same file in another application will reveal no change; the underlying file remains unaltered. This non-destructive editing approach is a core feature of Lightroom and cannot be disabled.
This might lead to the question: if edits are only visible within Lightroom, why is it so widely adopted by professionals? The answer lies in the numerous benefits of this system.
The Power of Non-Destructive Editing
The primary concern regarding edits being confined to Lightroom is easily addressed: your edited images become visible outside of Lightroom through the export process. While your original files remain untouched, exporting a photo embeds all your applied edits. Therefore, after spending time perfecting an image in Lightroom, you simply right-click, select "Export > Export," and choose your desired output settings. The resulting exported file is a new image incorporating all your edits, without overwriting the original.
This non-destructive workflow offers significant advantages. You are never altering your original files, thereby safeguarding them from accidental damage. The only actions within Lightroom that directly affect the original file are renaming it, moving it to a different folder, or deleting it from your disk.
Contrast this with software like Photoshop. If you crop an image in Photoshop, save it, and exit, the original file is permanently cropped. While workarounds exist, such as disabling the "delete cropped pixels" option and saving as a PSD file, these are not always intuitive. The risk of inadvertently editing and losing original image data is considerably higher.
Lightroom's strength lies in its preservation of original files. Its non-destructive editing capability is a critical feature for virtually every photographer, ensuring the integrity and longevity of their image library.
Demystifying the Lightroom Catalog
The term "catalog" is frequently encountered when discussing Lightroom, and understanding its function is key to grasping Lightroom's operational philosophy.
Lightroom is fundamentally a cataloging software. This means it doesn't directly manipulate your original image files. Every edit you make, every star rating you assign, and every collection you create is stored not within the photo itself, but within a Lightroom catalog file.
The Lightroom catalog is a single database file that meticulously records every change and adjustment applied to every photograph you've imported. These catalog files are surprisingly efficient in terms of storage. A catalog containing edits for thousands of photos might only be a few hundred megabytes in size.
As you delve deeper into Lightroom, the catalog system can become more complex, particularly if you intend to manage multiple catalogs, share catalogs, or use a single catalog across multiple computers. For such advanced scenarios, dedicated articles on Lightroom catalogs and using Lightroom with multiple computers are recommended.
However, for beginners simply aiming to add photos to a single Lightroom catalog, the basic understanding is sufficient. By default, photos on your computer or memory card are not automatically part of your Lightroom catalog. You must explicitly import them. This process begins with the Import Dialogue.
For photographers new to the world of digital imaging, this guide is designed to provide a clear starting point. Many find visual learning beneficial, and video tutorials can offer a quick overview of Lightroom's features.
It's important to clarify that Adobe offers different versions of Lightroom. This article specifically addresses Adobe Lightroom Classic, also known as Lightroom Classic CC, as opposed to the cloud-centric Lightroom CC version. Lightroom Classic is the preferred and more widely utilized version among professional photographers due to its robust desktop-based functionality. In contrast, Lightroom CC is cloud-based, facilitating synchronization across various devices like desktops, mobile phones, and the web.
While Lightroom Classic may not be as easily accessible when traveling or on the go, its comprehensive features make it an exceptional choice for dedicated editing. The most effective way to begin with Lightroom is by establishing a sound storage and importing process from the outset. This foresight can prevent significant workflow issues later on.
Establishing a Storage System
A crucial recommendation for any photographer, regardless of their experience level, is to invest in an external hard drive specifically for their photography work. Storing your images on an external drive conserves space on your primary computer and mitigates the risk of running out of storage capacity. Several reliable and affordable external drive options are available, including the WD My Passport, Seagate Portable Hard Drive, LaCie Rugged Mini External Hard Drive, and SanDisk Portable SSD. The WD My Passport, for instance, is a popular choice that offers reliable performance. A 2-terabyte or 4-terabyte drive is a good starting point. As your photographic library grows, you might consider larger capacity drives like the LaCie 2big Dock RAID 16TB, which offers ample space and robust features.
Developing a Workflow for Organization
Creating a systematic approach to organizing your photography work is paramount for an optimized workflow. A recommended strategy involves grouping your work by year. Within each year's folder, create a new subfolder for each new import. For example, if you recently captured blue hour shots in your local area, within the "2022" folder on your external drive, you would create a new folder labeled with the year, month, date, and a brief description of the shoot (e.g., "2022-10-26_BlueHourShoot"). Within this dated folder, create another subfolder named "Footage." You might further subdivide this into "Photos" and "Videos" if you shoot both formats.
Navigating the Lightroom Interface
Before diving into the import process, it's beneficial to have a general understanding of Lightroom's layout. The software is organized into distinct modules, accessible via tab-like icons at the top right of the screen. These modules include:
- Library: For organizing and managing your photos.
- Develop: Where the primary editing takes place.
- Map: For geotagging and viewing photos on a map.
- Book: For creating photo books.
- Slideshow: For creating slideshow presentations.
- Print: For preparing images for printing.
- Web: For creating web galleries.
For most users, the Library and Develop modules will be the most frequently used.
Importing Your Images into Lightroom
With a basic understanding of the interface, it's time to import your images. The process begins by ensuring you have a catalog set up. Lightroom catalogs are where your imported images are stored, editing techniques are applied, and settings are saved for future use. Many professional photographers emphasize the importance of a systematic approach to catalog creation and organization as the cornerstone of a professional workflow.
Quick Tip: Importing a copy of your raw images can be exceptionally helpful, especially if you're creating a new Lightroom catalog immediately after connecting your memory card. Instead of creating a new folder and then copying raw images to your hard drive before importing, you can streamline the process.
When you import a copy, the original file remains on your memory card, and a copy of the raw file is imported into Lightroom. Crucially, you must specify the destination for these copied raw images. Beginners may overlook this step, leading to images being stored directly on their computer's main drive, which can quickly consume storage space. Always specify your preferred destination, ideally an external hard drive, before clicking the "Import" button.
If this process seems complex, don't worry. Once you have created your new catalog and imported your raw images, you are ready to begin editing.
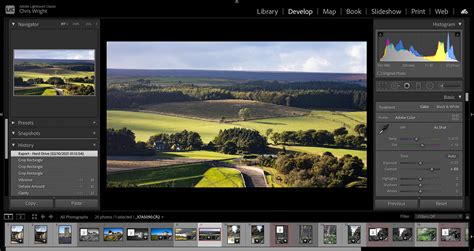
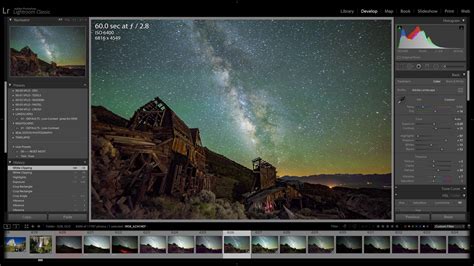
The Develop Module: Where the Magic Happens
The Develop module is where the creative transformation of your photographs truly takes place. While the Library module allows you to view your photos in a grid view by default, the Develop module provides access to a comprehensive suite of editing tools. Let's explore some of the most impactful features:
Basic Adjustments
The Edit section within the Develop module is where you'll perform fundamental corrections. This includes adjusting white balance, exposure, highlights, shadows, whites, and blacks. This panel also houses controls for texture, clarity, and dehaze, which significantly impact the perceived detail and atmosphere of your image.
The Healing Tool
The Healing tool has been significantly enhanced in recent Lightroom updates, incorporating a content-aware feature that utilizes AI to intelligently fill selected areas. While not always perfect, this tool is invaluable for removing blemishes, dust spots, or other imperfections, saving considerable time. It functions differently from traditional spot-healing or cloning by analyzing the surrounding content to create a seamless replacement.
Masking Tools
The masking tools are a game-changer for selective editing. Lightroom offers various mask types, including sky and subject selection, allowing you to apply adjustments to specific elements of your image with remarkable precision.
The Adjustment Brush is a particularly powerful tool for local edits. It functions like a digital paintbrush, enabling you to "paint" a mask over specific areas of your image. Any adjustments made to white balance, exposure, highlights, shadows, and other parameters will then only affect the masked area. You can customize the brush's size, feathering (softness of the edge), and other features to achieve the desired effect. Mastering the Adjustment Brush is a key step in elevating your editing skills.
Tone Curve
Below the Basic panel, the Tone Curve offers more granular control over the quality, depth, and brightness of specific colors within your images. For instance, if you dislike the yellow tones in a particular image, you can adjust the saturation and luminance of that color range using the Tone Curve.
Color Grading
Following the Tone Curve is the Color Grading section, a highly favored tool for imparting specific moods and aesthetics to your photographs.
Detail Panel
The Detail panel provides essential tools for refining the sharpness and reducing noise in your images. These adjustments can significantly enhance the clarity and overall quality of your photographs.
Transform Panel
Professional photographers place a high emphasis on composition and ensuring images are straight and well-proportioned. The Transform panel is instrumental in correcting perspective distortion and straightening tilted horizons, contributing to a more polished and professional final image.
Effects Panel
Within the Effects panel, you can add vignetting and grain to your images. Vignetting, a darkening of the image edges, can help draw the viewer's eye towards the subject. Adding grain can lend a vintage or old-school aesthetic. While grain might not be to everyone's taste, it can be a powerful creative tool when used judiciously.
Calibration Panel
The Calibration panel is another area where you can subtly enhance the look and feel of your images. It's particularly useful for adding a desirable "pop" to skin tones, often imparting a subtle, almost golden hue that can significantly improve portraits.
Custom Text and Metadata
As you become more proficient, you might want to add custom text, such as your initials or business name, to your exported images. This can be done within the export settings, allowing you to brand your work. For example, using "EJW" as a personal identifier.
Furthering Your Lightroom Education
This comprehensive overview has provided a solid foundation for understanding Lightroom Classic's core functionalities. To truly master the software and unlock its full potential, continuous learning and practice are essential.
Several excellent resources can aid your educational journey:
- Online Tutorials: Watching video tutorials from experienced photographers is an incredibly effective way to see Lightroom features in action and learn different workflows.
- Professional Photographers on Social Media: Many professional photographers share valuable tips and advice on their social media platforms. Following those whose style you admire can provide insights into their Lightroom practices.
- Online Courses: Structured online courses offer a systematic approach to learning Lightroom, often providing in-depth instruction and practical exercises. Consider courses like "Lightroom for Photographers" by Darlene Hildebrandt, which offers over 20 hours of step-by-step guidance with real RAW files for practice. Another comprehensive option is "Lightroom Illuminated" from The School of Photography, which caters to beginners and intermediate users alike.
- Lightroom Cheat Sheets and Guides: Handy cheat sheets can serve as quick references for keyboard shortcuts and essential functions.
The key to progress lies in consistently applying what you learn. Initially, you might seek out specific tutorials for tasks like importing, editing, or exporting. As your understanding grows, you'll develop a more refined and efficient workflow.
Everything You Need to Get Started! (Lightroom Classic Starter Guide)
Advanced Concepts and Workflow Integration
As you become more comfortable with Lightroom Classic, you'll naturally explore more advanced techniques and integrate it with other tools.
Advanced Editing Techniques
Beyond the basic adjustments, mastering local adjustments with masks, understanding the nuances of the Tone Curve, and utilizing the HSL (Hue, Saturation, Luminance) panel for precise color control will significantly elevate your images. Learning to create and apply Develop Presets allows you to quickly achieve consistent looks across multiple photos, streamlining your workflow.
HDR and Panorama Stitching
Lightroom Classic also offers tools for creating High Dynamic Range (HDR) images, which combine multiple exposures to capture a wider range of tones, and for stitching together multiple photos to create seamless panoramic images. These features are invaluable for landscape and architectural photography.
Lightroom Classic and Photoshop Integration
For more complex retouching or compositing tasks, Lightroom Classic integrates seamlessly with Adobe Photoshop. You can send images from Lightroom to Photoshop for advanced editing and then bring them back into Lightroom to continue with your cataloging and final export. This synergy allows you to leverage the strengths of both powerful applications.
Metadata and Copyright
Ensuring your images are properly tagged with metadata, including copyright and contact information, is crucial for professional practice. Lightroom allows you to embed this information directly into your photos, protecting your work and making it easier to manage.
Syncing with Lightroom CC (Cloud)
For photographers who need to access and edit their photos across multiple devices, syncing their Lightroom Classic catalog with Lightroom CC (the cloud-based version) is an option. This allows for a more flexible workflow, enabling editing on mobile devices or accessing images from anywhere with an internet connection.
Exporting for Different Platforms
Understanding how to export your images for various purposes is vital. This includes optimizing file size and resolution for web use, preparing high-resolution files for print, and creating watermarked images for online sharing. Lightroom's export presets can automate these processes, saving considerable time.
Backing Up Your Lightroom Catalog
A critical, yet often overlooked, aspect of using Lightroom is regularly backing up your catalog file. Since your catalog contains all your edits, organizational data, and metadata, its loss would be catastrophic.
The recommended backup strategy involves:
- Regular Backups: Lightroom prompts you to back up your catalog periodically. It's advisable to accept these prompts and choose a backup location separate from your primary working drive, ideally an external hard drive or cloud storage.
- Multiple Backup Locations: For added security, consider maintaining multiple copies of your catalog backup in different physical locations.
- Backup Your Photos Too: Remember that backing up your catalog does not back up your actual photo files. You must have a separate backup strategy for your image library itself, typically involving external hard drives and potentially cloud backup services.

By implementing a robust backup routine, you safeguard your invaluable photographic work and ensure peace of mind.
Conclusion
Lightroom Classic is an indispensable tool for photographers seeking to efficiently organize, powerfully edit, and seamlessly export their images. While its initial learning curve might seem steep, by understanding its core principles-particularly its non-destructive workflow and catalog-based system-and by utilizing the wealth of educational resources available, you can transform your photographic output. Consistent practice, exploration of its diverse modules, and a commitment to ongoing learning will undoubtedly lead to enhanced creativity and a more streamlined workflow, allowing you to truly bring your photographic visions to life.