Noise in digital images has long been a challenge for photographers and image editors alike. In Photoshop, noise refers to unwanted visual artifacts, which can degrade the quality of an image. Understanding and addressing noise in Photoshop is essential for professional image editing. There are numerous tools and methods available within Photoshop to reduce or eliminate noise, resulting in cleaner, sharper images.
Understanding Digital Noise in Images
In Photoshop, noise is an undesirable visual distortion that we can often find in digital images. Noise typically appears as grainy speckles or random color variations, which can significantly degrade the quality and detail of our images. Digital noise is an inherent aspect of digital photography, and it can sometimes resemble film grain. Just like film grain, digital noise occurs when the camera's sensor captures light in less-than-ideal conditions. This issue particularly affects images taken in low light conditions.
There are two common scenarios where noise creeps into our photos. One is when shooting at high ISO, typically indoors or at night. The other is when we try to lighten and extract detail from the shadows. In both cases, the problem is a lack of light and the solution is to either gather more light when shooting or use noise reduction during post-processing.
Luminance Noise vs. Color Noise
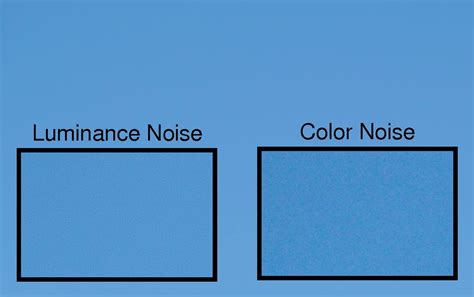
Noise can be broadly categorized into two main types: luminance noise and color noise.
Luminance noise affects the brightness values of pixels, causing fluctuations in the intensity levels. It resembles film grain, giving a somewhat textured appearance to the image. Luminance noise is the most common type of digital noise. This type of noise looks like grains of sand in your image.
On the other hand, color noise (also known as chromatic noise or chrominance noise) is manifested as random red, green, and blue pixels. When isolated pixels pop out with a color like green or red, you are looking at color noise. Color noise is created when your sensor gets hot. Even though I was on a tripod and shooting at ISO 100, this image has red and green dots of color noise. Color noise appears as random-colored specks throughout an image, which is more visible in the underexposed portions of your images.
Other Forms of Noise: JPEG Artifacts
JPEG artifacts are another form of noise in Photoshop that occurs during the compression process of JPEG files. These artifacts can cause visible blocky regions, blurriness, or even introduce additional color noise into the image.
Factors Influencing Noise Levels
Several factors can cause noise in your photos, including low light scenarios, high sensitivity modes, or slow shutter speeds.
The Role of ISO
Adjusting the ISO setting can have a significant impact on noise levels in our images. High ISO values increase the sensitivity of the camera sensor, allowing it to capture more light. However, this also leads to a higher noise level in our photos. Modern camera sensors can handle noise better than their predecessors, but even the most advanced cameras have limitations. You may also see grain if you lighten shadows too much. It helps if you use a bright exposure to keep the shadows from getting too dark.
Exposure Time and Shutter Speed
In addition to ISO settings, other factors, such as exposure time and shutter speed, can also affect the noise levels in our photos. Longer exposure times and slower shutter speeds can introduce more noise.
Noise Reduction Techniques in Photoshop
To address all these types of noise, we can use different noise reduction techniques in Photoshop.
The Reduce Noise Filter
One popular method is the Reduce Noise filter. We can access this filter by navigating to Filter > Noise > Reduce Noise. This filter is easy to use, but you have to be careful with this tool.
When working with high ISO images, we can create Smart Objects and apply Smart Filters to maintain non-destructive editing.
Tip To Reduce Noise in Photoshop | Reduce Grains | Photoshop Tutorial
Using the Reduce Noise Filter:
- Open a photo in Photoshop by going to the File dropdown menu and selecting File > Open.
- Duplicate the original image by going to the Layer dropdown menu and selecting Layer > New > Layer via Copy (Ctrl+J or Command+J).
- Convert the duplicated layer to a “Smart Object.” You can filter noise and then re-adjust your settings later with a Smart Object. Go to the Layer dropdown menu and choose Layer > Smart Objects > Convert to Smart Object.
- With the Denoise layer selected, go to the Filter dropdown menu and choose Filter > Noise > Reduce Noise.
- Position the preview screen to show your subject. By default, the preview will be at 100% zoom.
- The Strength slider adjusts the amount of luminance noise. The scale is 0 to 10.
- Move the Reduce Color Noise slider if your image has color noise. The scale is 0 to 100%.
- Use the Preserve Details and Sharpen Details sliders to bring back some lost detail. The scale for both sliders is 0 to 100%. Move the sliders in increments.
- If you are working with a JPEG, check the box at the bottom to remove JPEG artifacts.
The Reduce Noise filter in Photoshop has an advanced option. If you have noise throughout your image, use the first option. But if one channel has most of the noise, the advanced option may be helpful.
The Adobe Camera Raw (ACR) Filter
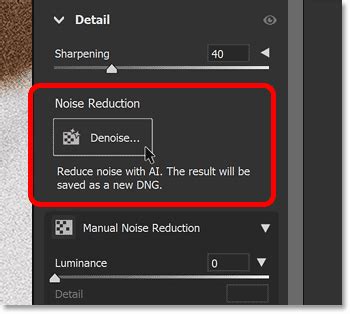
Another effective technique is using the Noise Reduction Filter in Adobe Camera Raw.
Using the Adobe Camera Raw Filter:
- Open your image in Photoshop.
- Duplicate the layer and convert it to a Smart Object (as described above).
- Go to the Filter dropdown menu and choose Filter > Camera Raw Filter (Shift+Ctrl+A or Shift+Command+A). This opens the ACR workspace.
- In the ACR workspace, you will find separate sliders for Noise Reduction (luminance) and Color Noise Reduction.
- Hold the Alt or Option key as you slowly drag the sliders. This turns your preview black and white, making it sometimes easier to see the grain.
- As with the Reduce Noise filter, adding too much will soften the edges, and you will lose detail.
- The Detail slider works like the Reduce Noise filter’s Sharpen and Preserve Details sliders. The higher the detail value, the more details remain in your image-and more grain. You have to find a balance between reducing grain and keeping details.
- The Contrast slider is the difference between the light and dark tones in your image. A higher contrast value emphasizes these differences and sharpens the photo. But more contrast also means more grain. The detail slider brings back edge detail.
Tools that reduce noise in Adobe Camera Raw work like Lightroom. But using ACR means that you can mask the results in Photoshop.
Lab Color Mode for Luminance Noise Reduction
For more precise control over luminance noise, you can utilize Photoshop's Lab Color mode.
- Open your image in Photoshop.
- Go to Image > Mode and select "Lab Color." This separates the image into Lightness and Color channels.
- Create a new layer by duplicating the background layer.
- Select the "Lightness" channel.
- Create a copy of the "Lightness" channel by dragging it to the "Create New Channel" icon.
- Apply the "Glowing Edges" effect to this new channel (Filter > Filter Gallery > Stylize > Glowing Edges). Adjust "Edge Width," "Edge Brightness," and "Smoothness" to define the edges.
- Invert the channel (Image > Adjustments > Invert).
- Hold down Command (Mac) or Control (PC) and click on the new channel to load it as a selection.
- Switch back to the RGB composite view.
- Apply a blur filter, such as Smart Blur (Filter > Blur > Smart Blur), with high quality and a low radius.
- After applying the blur, access the Layers palette and adjust the "Opacity" of the blurred layer to blend the results.
- Finally, you can flatten the image or further refine the noise reduction using the "Reduce Noise" filter on the overall image with "Strength" set to 0% and carefully adjusting "Preserve Details."
Photoshop Neural Filters for JPEGs
If you are working with a JPEG instead of a RAW file, you may want to apply JPEG Artifacts Removal. This is a type of remove noise filter.
- Go to the Filter dropdown menu.
- Select Filter > Neural Filters.
- Toggle on the button next to the "JPEG Artifacts Removal" tool.
- You have a choice of low, medium, or high settings. Wait for the processing to finish.
Third-Party Plugins and AI-Driven Software
In addition to these built-in tools, there are several third-party plugins designed to reduce noise and improve image clarity. Recently, there has been an explosion of software tools that remove noise. Some are part of complete programs. Others are stand-alone programs or plugins that work with Photoshop. Looking to reduce noise in Photoshop? Look no further than powerful AI-driven software. Improve image quality with ease and preserve important details and texture.
One of the best-selling noise plugins is DeNoise AI by Topaz Labs. After you install the program, it appears under the Filter dropdown menu. You can make changes in DeNoise AI.
Best Practices for Noise Reduction
Denoise tools are for the worst-case scenario. Ideally, you want to make the cleanest photo possible with your camera.
Non-Destructive Editing with Smart Objects
When working with high ISO images, we can create Smart Objects and apply Smart Filters to maintain non-destructive editing. This allows you to go back and adjust the noise reduction settings later without re-processing the original image.
Masking Noise Reduction Effects
You can reduce noise in two different ways on separate layers, then use layer masks to blend the results. For example, you might heavily reduce noise on a background layer and apply less noise reduction with more sharpening on a foreground subject layer. Select the layer with more digital noise and add a mask by clicking the "add vector mask" icon at the bottom of the Layers panel. Select the subject using one of Photoshop’s selection tools. Using a soft, black brush, paint on the layer mask. Black hides this layer and reveals the layer underneath.
Balancing Noise Reduction and Detail Preservation
A common challenge in noise reduction is preserving image detail. Noise reduction algorithms work by smoothing out noise, which can inadvertently smooth out fine details. Use sliders like "Preserve Details" and "Sharpen Details" in Photoshop or "Detail" in Camera Raw to reintroduce lost sharpness and texture. You have to find a balance between reducing grain and keeping details.
When Noise Can Be Beneficial
Despite the unwanted side effects, noise can sometimes be used creatively in our photography. In some cases, adding a touch of noise or grain to a photo can give it an artistic, film-like quality. Adding noise in Photoshop can enhance an image by creating a sense of texture or depth. We can apply this effect subtly to make digital images appear more film-like or to unify composited elements by creating a consistent grain pattern. Most black-and-white images also look good with a bit of grain.
Workflow and Photoshop Interface Considerations
The workspace in Photoshop includes a variety of panels and tools that enable us to efficiently edit images. Learning keyboard shortcuts can significantly speed up our workflow. For example, using Ctrl + T (Cmd + T on Mac) allows us to quickly transform a selected layer.
When it comes to managing images, we might need to resize images. We can easily do so by navigating to Image > Image Size or pressing Alt + Ctrl + I (Option + Cmd + I on Mac).
We often encounter dialog boxes while using Photoshop. These boxes help us set the various options for tools and commands, making our editing process more intuitive. To access preferences, we can press Ctrl + K (Cmd + K on Mac).
As beginners looking to edit their first photo, it's important to familiarize themselves with essential tools like the Move Tool, Lasso Tool, Brush Tool, and others. We can use sharpen details to enhance the overall image quality after noise reduction. Working with opacity gives us better control over the noise reduction effect.
System requirements play a crucial role in the performance of advanced noise reduction techniques.
A Note on Other Software Options
There is a lot of debate about which software does the best job of reducing noise. There are many great options, and some of them can outdo Adobe in some scenarios. However, many users prefer using Lightroom or ACR (Adobe Camera Raw in Photoshop) most of the time for a few reasons. First, while some results might be better, they are often only slightly better and not very compelling. Second, the Adobe tools are generally much simpler to learn and use than other options (which sometimes have dozens of confusing sliders). Third, it is typically much faster to adjust a few sliders when you’re already working in LR or ACR.
Lightroom / ACR offer several tools that can affect and control noise in the “details” tab. These tools fall into a few categories including sharpening, luminance noise reduction, and color noise reduction.
Sharpening and Its Impact on Noise
Sharpening is very important to set correctly, as sharpening adds noise and therefore has a strong impact on noise reduction. Masking in sharpening is intended to help avoid sharpening noise, but tends to create strange artifacts/transitions. A recommended workflow for sharpening involves setting the radius to its minimum (0.5) and detail to its maximum (100) for deconvolution sharpening, and setting masking to its minimum (0).
Luminance Noise Reduction Sliders
These sliders are the critical tools for noise reduction. Luminance Detail acts like “masking” for sharpness. Luminance Contrast helps restore contrast lost to noise reduction. A recommended workflow is to adjust sharpening first, then set luminance temporarily to a high value to visualize while tweaking detail and then contrast.
Color Noise Reduction Sliders
Most cameras have a “Bayer filter” to capture color and need some color noise reduction. The "Color" slider controls the overall amount of color noise reduction. "Color Detail" controls the pixels that should NOT get color noise reduction. "Color Smoothness" helps smooth color over larger areas of the image. A recommended workflow is to adjust sharpening and luminance noise reduction first, then set color temporarily to a high value to visualize while tweaking detail and then smoothness.
Conclusion
Learning properly how to reduce noise in Photoshop can help you make adjustments to your images. There are several actions you can take to create unforgettable images in Photoshop as well as in Lightroom. By understanding the types of noise, the factors that contribute to them, and the various tools available within Photoshop, you can effectively manage and reduce noise, leading to cleaner, more professional-looking images.