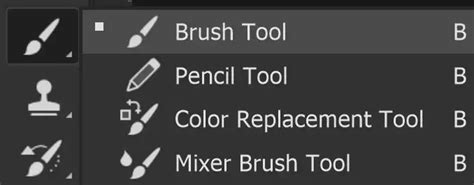
The Brush Tool in Adobe Photoshop is far more than a simple digital paintbrush; it's a gateway to an entire universe of creative expression. For beginners and experienced users alike, understanding its nuances unlocks a deeper level of control and artistry in digital design and illustration. This tutorial will guide you through the fundamental aspects of the Brush Tool, from utilizing its extensive presets and modifying their properties to creating your own unique brushes from scratch, and even delving into advanced techniques like blend modes and pressure controls.
The Foundation: Understanding the Brush Tool
At its core, the Brush Tool functions much like a traditional drawing instrument. It applies color to a layer by creating marks as you drag your cursor or stylus across the canvas. Each press of your mouse button or pen on a tablet initiates a stroke, composed of multiple marks laid down in succession until pressure is released. The essential options governing the Brush Tool's behavior are found in the Options Bar at the top of the Photoshop interface. These include Brush Tip Shape, Blending Mode, Opacity, and Flow.
The Brush Tip Shape settings are fundamental to how color is applied. Within the Brush Preset Picker, a dropdown menu accessible from the Options Bar, you'll encounter a variety of built-in brush presets. The Size option directly controls the dimensions of the brush tip, with default keyboard shortcuts of the [ and ] keys allowing for quick adjustments. The Hardness setting dictates the sharpness of the brush tip's edge; a harder brush has a more defined edge, while a softer brush has a feathered, less distinct boundary. The color being applied by the brush tip is determined by the Foreground Color, which is prominently displayed in the color swatches at the bottom of the Tools toolbar.
Beyond simply selecting a brush, Photoshop offers robust management capabilities for your brush collections. You can load, save, replace, or append existing brush sets, allowing for organized and efficient workflow.
Unleashing Creative Potential with Brush Settings
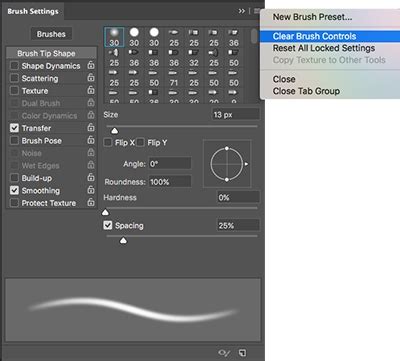
The true power of the Brush Tool lies in its extensive customization options, primarily accessed through the Brush Settings Panel (Window > Brushes). This panel is where you can delve into the intricacies of brush behavior, from basic shape modification to complex dynamic controls.
Brush Tip Shape and Spacing
While the Brush Preset Picker offers a curated selection, the Brush Settings Panel provides granular control. Spacing, for instance, determines the distance between individual brush tip impressions as you create a stroke. Increasing spacing can create a dotted or broken line effect, while decreasing it leads to a smoother, more continuous stroke.
Shape Dynamics: Adding Randomness and Control
The Shape Dynamics section is crucial for introducing variation and organic qualities to your brush strokes. Here, you can control randomness in Size, Angle, Roundness, and Axis values. The Control dropdown within Shape Dynamics offers powerful modifiers that can be linked to pressure sensitivity from a tablet, stylus wheel, or even the direction of your stroke. For example, setting Angle control to "Direction" ensures the brush tip rotates to follow the path you're drawing, creating a more natural feel.
Scattering is another vital parameter that influences the distribution of brush marks within a stroke. The Both Axes checkbox allows for scattering along both the X and Y axes, creating a more dispersed effect. Count Jitter introduces randomness to the number of marks within a stroke, further enhancing unpredictability.
Color Dynamics: Introducing Hue, Saturation, and Brightness Variations
The Color Dynamics section allows for sophisticated control over the color applied by the brush. Hue Jitter introduces variations in the hue of the applied color, allowing for subtle shifts that can create depth and richness. Saturation Jitter controls the degree to which the saturation of the stroke varies, moving between the foreground and background colors. Similarly, Brightness Jitter affects the brightness of the applied color. These settings are particularly useful for creating painterly effects or for adding subtle color variations to textures.
Dual Brush and Texture: Layering and Surface Effects
The Dual Brush feature allows you to combine two brush tips to create a single, more complex brush. The second brush texture is applied within the stroke of the primary brush, with only the intersecting areas being painted. This opens up possibilities for intricate and unique brush effects.
Textured brushes utilize a pattern to simulate painting on a textured surface. By selecting a pattern from the pop-up panel and setting a Pattern Scale, you can influence the appearance of the texture. The Texture Each Tip checkbox ensures that a new instance of the texture is applied with each individual brush mark, while deselecting it applies the texture consistently across the entire stroke. Protect Texture is a useful option that applies the same pattern and scale to all brush presets that have a texture, regardless of their individual settings.
Other Important Brush Settings
- Build Up: This setting simulates traditional airbrushing, where a longer press of the mouse or stylus results in a larger or more opaque mark.
- Smoothing: Essential for creating fluid and clean lines, especially when drawing with a mouse. A higher smoothing percentage results in smoother curves and reduces jitter in your strokes. Photoshop's smoothing engine uses a "pulled string" concept, where the length of the string increases with the percentage. You can visualize this by enabling "Show Brush Leash" in Preferences > Cursors.
- Protect Texture: As mentioned, this ensures consistent texture application across multiple brush presets.
- Include Tool Settings: When saving a brush preset, this option ensures that settings like Opacity, Flow, and Blending Mode are saved along with the brush tip.
Creating Your Own Custom Brushes
One of Photoshop's most powerful features is the ability to create custom brushes from scratch, using any image or shape as a source. This process opens up a nearly limitless array of artistic possibilities.
Defining a Brush Preset
To create a custom brush, begin by preparing your source image. This can be a drawing, a photograph, or any graphic element. It's crucial that your source image is in grayscale. Areas filled with white will become transparent in the brush, while black areas will be fully opaque. Shades of gray will result in varying levels of transparency.
- Prepare Your Image: Open your desired image in Photoshop. Use tools like the Eraser Tool or Layer Masks to isolate the shape you want to turn into a brush. For best results, ensure the background is white and the foreground element is black or dark gray.
- Define Brush Preset: Once your image is ready, navigate to Edit > Define Brush Preset. This action will prompt a dialog box where you can name your new brush. Choose a descriptive name that will make it easy to identify later.
- Locate Your Brush: Your newly created brush will appear at the bottom of the brush list in the Brush Preset Picker and the Brush Settings Panel.
Make your own custom brushes in photoshop
The size at which you initially create your brush will become its default size. While Photoshop allows for brushes up to 2500x2500 pixels, it's generally advisable to create brushes at a size appropriate for your typical workflow. Remember that custom brushes are pixel-based, meaning they behave like any other image when resized; they tend to remain crisp when scaled down but can become soft and dull when significantly enlarged beyond their original dimensions.
Blending Modes and Brushwork
Just as layers in Photoshop have blending modes that alter how they interact with underlying content, so too do brush strokes. When you select a brush and apply it, you can choose a Blending Mode from the dropdown menu in the Options Bar. These modes function similarly to layer blending modes and offer a vast array of creative possibilities for how color is applied.
- Darken, Multiply, Overlay: These modes are particularly useful for adding depth, shadows, and contrast to your artwork. Multiply, for instance, darkens the image by multiplying the color information, creating rich shadows. Overlay blends the colors in a way that preserves highlights and shadows of the base image, increasing contrast.
- Lighten, Color Dodge, Linear Dodge: These modes are ideal for adding highlights and luminosity. Lighten brightens the image by selecting the lighter color between the brush stroke and the underlying pixels. Color Dodge creates a brighter, more saturated effect by increasing the intensity of the base color, while Linear Dodge adds brightness by increasing the values.
Experimenting with different blending modes for your brush strokes can dramatically alter the mood and appearance of your artwork.
Opacity and Flow: Controlling Paint Application
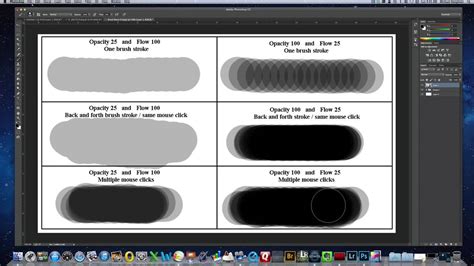
Opacity and Flow are two critical settings that control how paint is laid down by the Brush Tool, and they work in distinct ways.
Opacity: This setting determines the overall transparency of the brush stroke. A lower opacity value means the stroke will be more transparent, allowing more of the underlying layers to show through. A higher opacity value results in a more opaque stroke. Each stroke laid down with a specific opacity setting will deposit paint at that exact transparency level until you lift your stylus or mouse button.
Flow: Flow offers a more nuanced control over paint application, aiming to mimic traditional painting techniques. It controls the speed at which paint is applied. With a lower flow setting, each pass of the brush over the same spot will build up more paint gradually, creating a layered effect. This is distinct from opacity, where each stroke is applied at the full opacity setting. Working with flow can feel more "painterly," as layering multiple low-flow strokes creates subtle variations and a distinctive texture. Some media brushes have programmed Flow functions to more accurately replicate traditional tools like pencils or dry brushes.
While Opacity always applies paint in a single, direct application of its set value, Flow allows for a build-up of color over successive passes. For many digital painting scenarios, especially when using a pressure-sensitive tablet, controlling Pressure-Flow in the Transfer section of the Brush Settings Panel is recommended for a more dynamic and responsive painting experience.
Beyond the Basics: Advanced Techniques and Useful Tricks
The Brush Tool's capabilities extend far beyond simple color application.
- Pressure Controls: When using a pressure-sensitive tablet, you can configure brush settings like Size, Opacity, and Flow to be controlled by pen pressure. This allows for incredibly expressive strokes, where the pressure of your hand directly influences the appearance of the brush mark.
- Build Up: This setting, as mentioned, simulates traditional airbrushing. When enabled, holding the brush in one spot will continue to spray color until it reaches 100% opacity, much like a physical airbrush.
- Smoothing Modifiers: Beyond the standard smoothing percentage, Photoshop offers options like "Pulled String Mode" (which can be visualized by enabling "Show Brush Leash"). This feature helps create exceptionally smooth and controlled lines, which is particularly beneficial when drawing with a mouse or for achieving precise curves.
- Brush Angle Control: Precisely controlling the angle of a brush tip can be achieved by entering a numerical value or by clicking and dragging the angle icon in the Brush Settings Panel. This is useful for creating specific textures or mimicking the angle of a real-world brush.
- Dual Axis and Radial/Mandala Replication: Within Shape Dynamics, options like Dual Axis scattering and Radial/Mandala replication allow for complex patterns and symmetrical designs to be created with a single brush stroke.
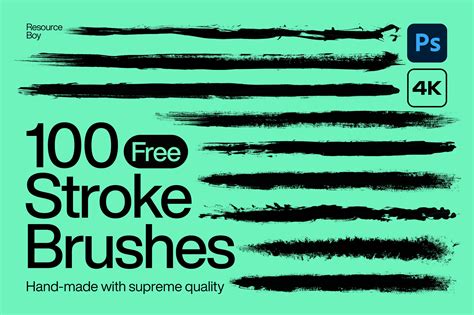
Leveraging External Brush Resources
While Photoshop comes with a solid set of default brushes, the ecosystem of custom brushes available online is vast and ever-expanding. Websites like Envato Elements offer extensive libraries of high-quality Photoshop brushes, catering to a wide range of artistic styles and needs. These can include:
- Shader Brushes: Perfect for adding grunge, grit, and complex textures to illustrations.
- Realistic Paint Brushes: Designed to mimic the feel and appearance of traditional painting tools.
- Spray Paint Splatters: Ideal for creating dynamic posters, collages, and graphic designs.
- Abstract Brushes: Versatile tools for adding movement and visual interest to both illustrations and photographs.
- Smoke Brushes: Excellent for adding dramatic effects and atmospheric elements.
- Halftone Gradient Brushes: Popular for comic book styles, photo overlays, and vintage effects.
- Network Turbulence Brushes: Useful for adding intricate, futuristic details to designs.
These pre-made brush sets can significantly speed up workflow and introduce professional-level effects without the need for extensive custom brush creation.
The Brush Tool in Context: Photography and Digital Art
Photography is often described as "painting with light," and in the digital realm of Photoshop, the Brush Tool serves as a bridge between these disciplines. It's not just for creating digital paintings from scratch; it's an indispensable tool for photo manipulation and enhancement.
- Retouching and Enhancement: The Brush Tool can be used for subtle color adjustments, such as adding a touch of blush to cheeks or defining eyelids. It's also instrumental in creating dynamic contrast, darkening or lightening specific areas to sculpt the image.
- Masking and Selection: When used in conjunction with selection tools like the Magic Lasso or Quick Select, the Brush Tool allows for precise painting within masked areas. This ensures that edits are confined to the intended regions of an image, acting much like masking tape when painting a wall.
- Creative Applications: Beyond retouching, the Brush Tool can be used to paint graffiti effects onto photos, add text directly as painted elements, or apply downloaded brushes as unique stamps.
The Brush Tool's versatility makes it a foundational element for any Photoshop user, empowering artists and designers to achieve a vast array of creative outcomes, from subtle enhancements to bold, imaginative creations. Mastering its settings and understanding its behavior is a crucial step in unlocking the full potential of digital art.