When creating portraits, flyaway hairs or awkward facial hair can significantly distract from the overall look and feel of your work, detracting from the intended composition and focus. Whether you're retouching a portrait or perfecting a product image, mastering the techniques for handling these errant strands will elevate your Photoshop editing skills and ensure a polished final product. This tutorial explores various methods to seamlessly remove or refine these distracting elements, from simple fixes to more intricate hair extraction.
Understanding the Challenge of Flyaway Hairs
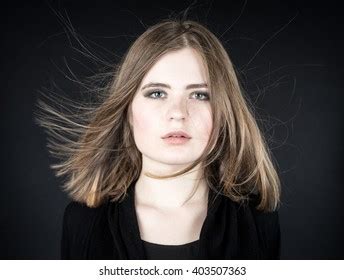
Flyaway hairs are a common and often frustrating issue encountered in photography, particularly in portraiture. These fine, wispy strands tend to defy gravity and styling, sticking out at odd angles. When they cross a subject's face or a critical part of the image, they can draw the viewer's eye away from the intended focal point, diminishing the impact of the photograph. The challenge is amplified when these hairs are against a busy or detailed background, making them harder to distinguish and remove without affecting the surrounding areas. Even blemishes, imperfections, and distortions in a photo can be distracting to a viewer, much like stray hairs.
Basic Removal Techniques: Healing Brush and Spot Healing Brush
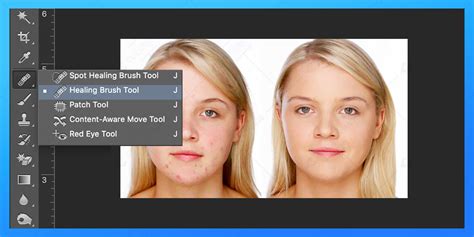
For many instances of flyaway hairs, especially those against a relatively uniform background, Photoshop offers intuitive tools that can achieve seamless results. The Healing Brush and Spot Healing Brush tools are your primary allies in this endeavor. These tools work by sampling pixels from one area of your image and using them to paint over the unwanted elements, intelligently blending the sampled texture, color, and luminosity with the target area.
Using the Healing Brush Tool
The Healing Brush tool allows for more control over the source of the sampled pixels. To use it effectively:
- Duplicate Your Layer: Before making any edits, it's crucial to duplicate your background layer (Ctrl+J or Cmd+J). This non-destructive workflow ensures you can always revert to the original image if needed.
- Select the Healing Brush Tool: Choose the Healing Brush tool from the toolbar.
- Sample the Background: Hold down the Alt key on Windows or Command key on Mac. Your cursor will change to a target or crosshair. Click to sample a piece of the background that you want to use to cover the stray hair. Aim for an area that closely matches the color and texture of the background directly behind the flyaway hair.
- Paint Over the Stray Hair: Release the Alt/Command key. Your cursor will return to the brush icon. Now, click and drag over the stray hair strand. Photoshop will blend the sampled pixels into the area you've painted, effectively removing the flyaway.
Utilizing the Spot Healing Brush Tool
The Spot Healing Brush tool is even more streamlined, often requiring less manual sampling. It works by automatically sampling surrounding pixels to blend the correction.
- Select the Spot Healing Brush Tool: Choose this tool from the toolbar.
- Set Brush Properties: For this task, it's often beneficial to set the brush mode to Content-Aware. This setting instructs Photoshop to analyze the surrounding pixels and generate a blend that is contextually appropriate. For brush settings, a Hardness around 60% can be effective, providing a good balance between blending and edge definition.
- Click and Drag: Simply click and drag over the stray hair strand. Photoshop will analyze the area and attempt to remove the hair while seamlessly integrating the background.
If you encounter blurry or distorted pixels after using the Spot Healing Brush, don't be discouraged. This can sometimes happen, and you may need to try a slightly different brush stroke or re-sample if using the regular Healing Brush. This is a fundamental technique for removing stray hairs in Photoshop.
Advanced Techniques for Complex Hair Situations
While the Healing Brush tools are excellent for many scenarios, some situations, particularly those involving fine, detailed hair strands or when the hair needs to be preserved or extracted, require more advanced methods. Extracting or replacing backgrounds when there are stray hairs can be a particularly difficult process that takes practice.
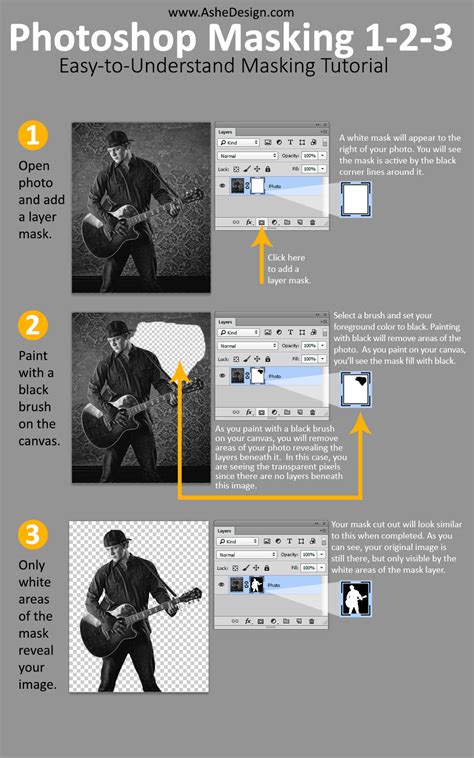
The Channel Masking Approach
For situations where you need to isolate hair precisely, such as for background replacement, channel masking can be a powerful, albeit more complex, technique. This method leverages the color channels (Red, Green, Blue) within an image to create a mask that can isolate fine details like hair.
A common workflow involves:
- Identify the Best Channel: Duplicate your layer. Go to the Channels panel and examine each channel (Red, Green, Blue) to find the one with the highest contrast between the subject (including the hair you want to keep) and the background. Often, the blue channel provides good separation for hair.
- Duplicate and Refine the Channel: Duplicate the chosen channel. Use Levels (Image > Adjustments > Levels) or Curves to increase the contrast further. The goal is to make the hair as white as possible and the background as black as possible. You might need to use brushes to paint in white or black on the channel to clean up stray pixels and refine edges.
- Create a Layer Mask: Load the channel as a selection by Ctrl+clicking (Windows) or Command+clicking (Mac) on the channel's thumbnail in the Channels panel. With this selection active, go back to the Layers panel and click the "Add layer mask" icon at the bottom of the panel. This will create a mask based on your channel selection.
- Refine the Mask: The initial mask might require further refinement. You can paint on the layer mask with black or white to fine-tune the edges and ensure all stray hairs are either removed or included as desired.
This method, while demanding, offers precise control and is invaluable for tasks like passport photos where a clean background is essential, or for compositing subjects into entirely new environments. The passport requirement for a white background, not grayish, highlights the need for such precise control.
Combining Techniques for Optimal Results
Sometimes, the most effective approach is to combine different techniques. For instance, you might use the channel masking method to create a clean selection of the subject and then use the Healing Brush or Clone Stamp tool to clean up any remaining minor flyaways or imperfections around the edges of the hair.
As one user noted in a forum discussion, "I just did it with a B&W photo from the web and it was ridiculously easy compared to the channel masking. But, I got stuck at step 9. Like you said: what is the enhance menu and the adjust lighting submenu? I didn't feel like figuring it out though I think he means levels…" This illustrates the learning curve and the potential for confusion with advanced tutorials, but also the power of these methods when understood.
It's also worth noting that some tutorials might refer to menus or submenus that have been renamed or moved in different Photoshop versions, such as "Enhance > Adjust Color > Remove Color" or the "Enhance" menu itself. Often, these functions can be found under different headings, like "Image > Adjustments" and might involve tools like "Levels" or "Curves."
Reducing Flyaways During the Shoot
While Photoshop offers powerful tools for post-processing, the most efficient way to deal with flyaway hairs is often to minimize them during the photography session itself. If you can reduce them during the shoot, you will save yourself a lot of trouble in post.
- Hair Spray or Water: A light mist of hair spray or even water can help tame unruly strands. Apply it sparingly to avoid making the hair look unnaturally stiff or wet.
- Anti-Static Products: Using anti-static sprays or wipes on clothes and hair can help prevent static electricity, which is a major contributor to flyaways.
- Environmental Control: Wind and dry air can exacerbate flyaway hairs. If possible, shoot in a controlled environment or use wind machines strategically to direct hair rather than letting it fly randomly.
- Subject Positioning: Sometimes, simply adjusting the subject's head position or angle can make flyaways less noticeable.
- Lighting: The direction and quality of light can also influence how flyaways appear. Backlighting can sometimes highlight them, while softer, diffused light might make them less prominent.
When to Seek Professional Help or Alternative Solutions
For critical applications like passport photos, where strict requirements for background clarity and subject appearance are enforced, spending excessive time trying to fix an image in Photoshop might not always be the most practical solution. As one user expressed frustration, "I think I'm going to just breakdown and go have a 'passport' photo taken. I've spent way too much time trying to fix one of my own." In such cases, retaking the photo with the correct background and minimal flyaways is often the most efficient path.
Furthermore, when dealing with extremely complex hair, such as intricate curls or very fine, wispy strands that are crucial to the image's aesthetic, professional retouching services or specialized software might offer more advanced solutions. However, for most portrait and general image retouching needs, the tools within Photoshop, when used with understanding and practice, are more than capable of achieving professional-looking results. The key lies in understanding the strengths of each tool and applying them judiciously to the specific challenge at hand.
The journey of learning to remove stray hairs in Photoshop, or any image editing task, is one of continuous practice and exploration. What might seem difficult at first can become second nature with consistent effort. Registering for forums like "Photoshop Gurus" can provide a supportive community where you can share your results, ask questions, and receive valuable tips from experienced users.