Photoshop offers a remarkably straightforward process for inverting colors, a technique that can transform ordinary images into visually striking pieces. Whether you aim to invert the colors of an entire photograph or just a specific section, Photoshop provides multiple avenues to achieve this effect. Color inversion, at its core, is the application of opposite colors from the spectrum to selected areas of an image. This process, rooted in the analogue photography era, now serves primarily as a powerful tool for creating unique aesthetics in digital art and design.
Understanding the Fundamentals of Color Inversion
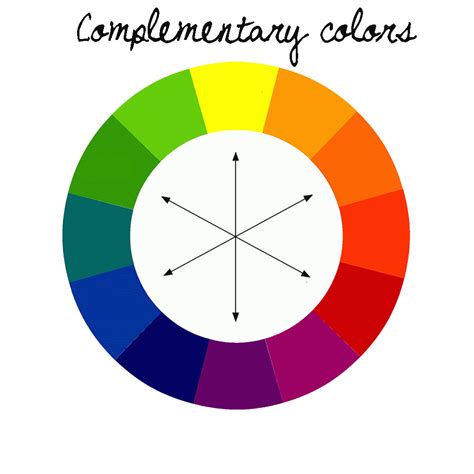
When you invert a color in Photoshop, the software intelligently replaces each existing color with its direct opposite on the color wheel. This means that for any given color, Photoshop finds the hue that is precisely across from it. In the context of digital images, this operation is typically performed based on the RGB (Red, Green, Blue) or CMYK (Cyan, Magenta, Yellow, Key/Black) color models.
For a black-and-white image, the inversion process is quite literal: white pixels transform into black pixels, and black pixels become white. However, when applied to a color image, the result is a complete flip of the color scheme. Every color is replaced by its complementary hue, leading to a surreal and often unexpected visual representation of the original image. This unique outcome makes inverted images ideal for abstract photography, creative photo collages, and various fine art applications.
Furthermore, the Invert tool in Photoshop is invaluable for transforming black-and-white film negatives into recognizable positive images. This digital darkroom process allows for image manipulation akin to traditional chemical-based development but without the use of any chemicals. The ability to invert colors opens up a vast landscape of creative possibilities, enabling artists and designers to explore endless artistic directions.
Practical Methods for Inverting Colors in Photoshop
Photoshop offers several intuitive methods to invert colors, catering to different user preferences and workflows. These range from simple keyboard shortcuts to more nuanced approaches involving adjustment layers and actions.
The Shortcut Method: Speed and Simplicity
One of the quickest ways to invert colors in Photoshop is through a dedicated keyboard shortcut. This method is perfect for rapid edits and for users who prefer working with keyboard commands.
- Open Your Image: Launch Adobe Photoshop and open the image you wish to modify.
- Select the Image or Area: If you intend to invert the entire image, ensure no specific selection is active. If you wish to invert only a portion, use any of Photoshop's selection tools (e.g., Marquee Tool, Lasso Tool, Quick Selection Tool) to isolate the desired area.
- Apply the Shortcut:
- On a Windows PC, press Ctrl + I.
- On a Mac, press Command + I.
This action will instantly invert the colors of the selected area or the entire image. It's worth noting that this shortcut operates directly on the active layer.
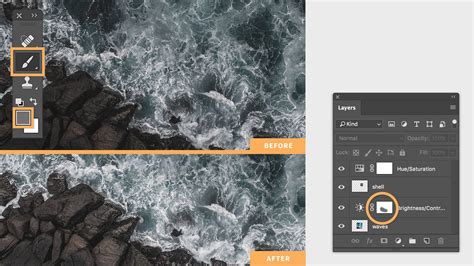
Using Adjustment Layers: Non-Destructive Editing and Control
For a more flexible and non-destructive approach, employing Adjustment Layers is highly recommended. This method allows you to apply color inversions without permanently altering the original image pixels, offering greater control and the ability to refine the effect later.
Open Your Image: Begin by opening your image in Photoshop.
Create an Invert Adjustment Layer:
- Navigate to the Layers panel (typically found on the right side of the screen).
- Click the "Create new fill or adjustment layer" icon at the bottom of the panel (it looks like a half-filled circle).
- From the dropdown menu, select "Invert."
- Alternatively, you can go to the top menu bar and choose Layer > New Adjustment Layer > Invert.
This will add an "Invert" adjustment layer above your selected layer in the Layers panel. The colors of your image will immediately invert.
Inverting Specific Image Portions with Selection Tools
Photoshop's robust selection tools empower you to apply color inversion to precise parts of an image, offering granular control over the creative outcome.
- Open Your Image: Load your image into Photoshop.
- Make a Selection: Utilize any of the selection tools to outline the specific area you want to invert. For example, the Lasso Tool allows for freehand selections, while the Quick Selection Tool can quickly select areas based on color and texture.
- Invert the Selection (Optional but Recommended): If you want to invert the colors outside of your selected area, you can invert the selection itself by going to Select > Inverse or using the shortcut Ctrl + Shift + I (Windows) or Command + Shift + I (Mac).
- Apply Inversion: With your desired area selected, you can then apply the inversion using either the shortcut (Ctrl + I or Command + I) or by adding an Invert Adjustment Layer as described above. If using an Adjustment Layer, it will only affect the pixels currently within the active selection.
Inverting Black and White Images and Film Negatives
The Invert tool is particularly useful when working with black-and-white images or converting photographic negatives into positives.
Inverting a Black-and-White Photo: When you invert a black-and-white photo, the tonal values are reversed. Pure white becomes pure black, and shades of gray are mapped to their opposite gray values. This can create striking graphic effects. To do this, simply open the black-and-white image and apply the Ctrl + I (or Command + I) shortcut or use an Invert Adjustment Layer.
Converting Film Negatives: The process of converting a film negative to a positive image in Photoshop is essentially an inversion. A negative has reversed tones and colors compared to the final positive print. By inverting the negative image, you are effectively mimicking the darkroom development process to reveal the intended image. Open the scanned negative, and apply the Invert command. You may then need to use tools like Levels or Curves to fine-tune the contrast and color balance, much like you would in a traditional darkroom.
How to Edit Negative Scans and keep True Film Colours
Enhancing Inverted Images: Beyond Basic Inversion
While a simple color inversion can yield dramatic results, there are several techniques to refine and enhance the inverted image, adding depth and artistic flair.
Adjusting Levels for Dimension
Sometimes, a direct color inversion can result in colors appearing somewhat flat or lacking dimension. To counteract this, you can use the Levels adjustment.
- Add a Levels Adjustment Layer: Go to Layer > New Adjustment Layer > Levels.
- Refine Tonal Range: In the Properties panel for the Levels adjustment, you'll find sliders for Shadows, Midtones, and Highlights.
- Shadows Slider (Black Triangle): Dragging this to the right will lighten the darkest areas.
- Highlights Slider (White Triangle): Dragging this to the left will darken the brightest areas.
- Midtones Slider (Gray Triangle): Moving this slider adjusts the overall brightness of the mid-range tones.
- Monitor the Histogram: The histogram in the Levels panel provides a visual representation of your image's tonal distribution. Use it as a guide to ensure you're not clipping (losing detail in) the shadows or highlights.
By carefully adjusting these sliders, you can restore contrast and add depth to your inverted image, making the colors more vibrant and the overall image more visually engaging.
Blending Modes and Opacity for Creative Effects
Experimenting with layer blending modes and opacity can unlock even more creative possibilities with inverted colors.
- Opacity: After applying an Invert Adjustment Layer, you can reduce its opacity in the Layers panel. This allows you to blend the inverted colors with the original image, creating a subtler or more complex color shift.
- Blending Modes: Try changing the blending mode of the Invert Adjustment Layer (or a duplicated image layer that has been inverted). Modes like "Overlay," "Soft Light," or "Hard Light" can interact with the underlying layers in unique ways, producing novel color harmonies and textures.
Combining Inversion with Other Adjustments
For truly unique results, consider combining color inversion with other Photoshop adjustments. For instance, you could:
- Swap Colors First: Use the "Swap Colors" command (available under Image > Adjustments > Replace Color, though not a direct command, it can be achieved with targeted adjustments) or specific color replacement techniques before inverting the image. This will make the subsequent inverted colors appear even more mysterious and unexpected.
- Apply Filters: After inverting, apply artistic filters or blur effects to further transform the image. For example, applying a Gaussian Blur to an inverted layer and setting its blend mode to "Overlay" can create a soft, ethereal glow.
Advanced Techniques: Inverting Specific Channels and Luminosity
For users seeking more precise control, Photoshop allows for the inversion of specific color channels or luminosity values without affecting colors, or vice-versa.
Inverting Luminosity in LAB Color Mode
To invert the brightness or luminosity of an image while keeping the colors intact, you can work within the LAB color mode.
- Convert to LAB Color: Go to Image > Mode > Lab Color.
- Select the Lightness Channel: In the Channels panel, select the "L" channel, which represents the lightness values.
- Invert the Lightness Channel: Apply the standard Invert command (Ctrl + I or Command + I) to the "L" channel. This will invert the highlights and shadows.
- Convert Back to RGB: Return to Image > Mode > RGB Color.
This technique is particularly useful for creating high-contrast effects or for specific artistic manipulations where only the tonal range needs to be reversed.
Batch Inversion with Actions
For photographers or designers who frequently need to invert colors across multiple images, Photoshop's Actions feature is a significant time-saver.
- Open an Image: Start with one of the images you want to process.
- Record an Action:
- Open the Actions panel (Window > Actions).
- Click the "Create new action" icon (looks like a square with a plus sign).
- Name your action, for example, "Invert Photo Colors," and click "Record."
- Perform the Inversion: Apply the color inversion to the current image using your preferred method (e.g., Ctrl + I or an Invert Adjustment Layer).
- Stop Recording: Click the "Stop playing/recording" button in the Actions panel (a square icon).
- Run the Action on Multiple Files:
- Go to File > Automate > Batch.
- In the Batch dialog box, select your recorded action ("Invert Photo Colors").
- Specify the "Source" folder containing your original photos.
- Choose a "Destination" folder where the processed images will be saved.
- Click "OK."
Photoshop will then automatically apply the inversion action to every image in the specified source folder, saving you from performing the task manually on each file.
Creative Applications and Considerations
The ability to invert colors in Photoshop extends beyond mere aesthetic experimentation; it has practical applications and opens doors to unique artistic expressions.
Accessibility and User Interface Design
Color inversion is a fundamental principle behind "dark mode" or "night mode" features found on many digital devices and platforms. By inverting the color scheme, these modes reduce the amount of bright light emitted from screens, which can alleviate eye strain for users in low-light conditions or for those with certain visual sensitivities.
Graphic Design and Branding
Inverting colors can provide a fresh, unexpected, and attention-grabbing look for logos, web graphics, marketing materials, and other design elements. This technique can help a brand stand out by offering a visually distinct and memorable aesthetic.
Fine Art and Abstract Photography
As mentioned earlier, inverted images possess an otherworldly quality that lends itself perfectly to fine art photography. They can transform familiar scenes into abstract compositions, encouraging viewers to see the world in a new light. This technique is also a staple in creating surreal photo manipulations and digital collages.
Key Tips for Effective Color Inversion
- Non-Destructive Editing: Always strive to work on duplicate layers or use adjustment layers. This preserves your original image data and allows for easy modifications or removal of the inversion effect.
- Color Balance Check: After inverting, take a moment to assess the color balance. Sometimes, the inversion can shift the overall color cast. Use tools like Color Balance or Hue/Saturation adjustments to fine-tune the colors if necessary.
- Experiment with Blending Modes: Don't limit yourself to the default blending mode. Explore how different modes interact with the inverted layer to discover unique visual outcomes.
- Consider the Context: Think about the intended purpose of the inverted image. Is it for an artistic statement, a design element, or a functional application like dark mode? This will guide your refinement process.
By mastering the various techniques for color inversion in Photoshop, you gain a powerful tool to enhance your creative workflow, produce striking visual effects, and explore new artistic frontiers. Whether for subtle adjustments or dramatic transformations, the ability to flip colors on command is an indispensable skill for any Photoshop user.