Adobe Photoshop, a cornerstone for many creative professionals, offers a surprisingly robust set of tools for animation, extending its capabilities far beyond static image editing. While not exclusively designed as animation software, its unparalleled control over aesthetics and layered workflow provides a hands-on approach with limitless potential for final output. This guide aims to bridge the gap between design and animation, catering to both beginners and seasoned professionals.
Understanding Photoshop's Animation Environment
Before diving into the animation process, it's essential to grasp the fundamental features Photoshop offers for creating motion. For versions earlier than Photoshop CC, some functionalities discussed here might have been exclusive to Photoshop Extended. However, with the advent of Creative Cloud, Photoshop’s animation capabilities are integrated, and the distinction between standard and Extended versions has been removed.
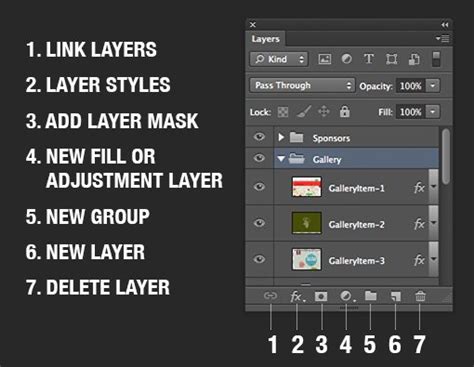
Photoshop allows you to edit individual frames of video and image sequences. Beyond basic editing and painting with its vast array of tools, you can apply filters, masks, transformations, layer styles, and blending modes directly to video content. When you open a video file or an image sequence in Photoshop, its frames are organized within a "video layer." In the Layers panel, video layers are visually identified by a filmstrip icon. This feature enables direct manipulation of individual frames using brush and stamp tools, much like working with regular layers. You can create selections or apply masks to confine edits to specific areas within a frame. Furthermore, video layers can be managed like any other layer, allowing adjustments to blending mode, opacity, position, and layer styles. Grouping video layers in the Layers panel is also possible for better organization. For non-destructive editing, you can create a blank video layer and perform your edits on it. Crucially, a video layer acts as a reference to the original file, meaning modifications to the video layer will not alter the source video or image sequence. To maintain this link, ensure the original file remains in the same location relative to your Photoshop document (PSD file).
Photoshop supports a wide range of file formats for importing, including BMP, DICOM, JPEG, OpenEXR, PNG, PSD, Targa, and TIFF. Cineon and JPEG 2000 formats are also supported, provided the necessary plug-ins are installed.
The Animation Timeline: Your Animation Control Center
An animation is fundamentally a sequence of images, or frames, displayed over time. In earlier versions of Photoshop's standard edition, the Animation panel (accessible via Window > Animation) operated in "frame mode," presenting a thumbnail of each animation frame. The panel's menu offered commands for editing frames, adjusting durations, and configuring display settings.
- Frame Navigation: The panel provides controls to select the first frame, the previous frame, and the next frame, as well as a general animation playback control. It also allows for the selection of multiple animation frames and the deletion of selected frames.
- Mode Switching: A key feature is the ability to switch between "frame mode" and "timeline mode." Timeline mode offers a more nuanced view, displaying frame durations and animation properties for document layers.
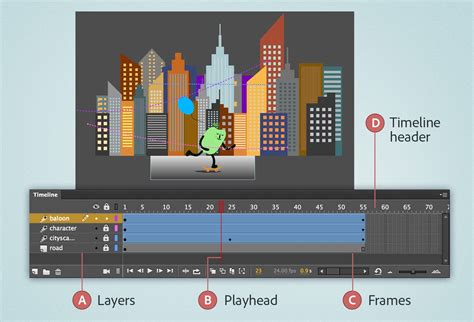
In timeline mode, the Animation panel synchronizes with the Layers panel, displaying each layer (excluding the background layer) in your Photoshop document. When animated layers are grouped as a Smart Object, the animation data is embedded within that Smart Object. The Animation panel menu also allows for the insertion of text comments at specific points in time, which appear as icons on a comments track and can be viewed as tooltips or edited by double-clicking.
Key Timeline Features:
- Current Time Indicator: This indicator specifies a layer's position in time within a video or animation. You can reposition layers by dragging their corresponding bars on the timeline. For video layers, a duration bar appears for altered frames, aligning with the document's overall duration and frame rate.
- Zoom Controls: Various zoom settings allow you to adjust the display of the timeline, from timecode views to thumbnail sizes representing frames or layers.
- Keyframing: A crucial element for animation, keyframing enables or disables animated properties for a layer. By setting keyframes, you define specific states of a layer's properties (like position, opacity, or transformation) at different points in time. Photoshop interpolates the changes between these keyframes, creating smooth motion.
- Layer Tracks: As you add layers to your document, they appear as individual tracks on the timeline. By default, all document layers are visible. The current-time indicator can be precisely positioned by dragging it to a desired frame number or time, which can be entered in the "Set Current Time" dialog box. Playback controls within the Animation panel allow for seamless previewing and exporting of your animation.
Frame Animation vs. Timeline Animation
Photoshop offers two primary animation modes: Frame Animation and Timeline Animation.
- Frame Animation: In this mode, each frame is treated as a separate entity, allowing you to set unique durations and layer properties for each. This mode is ideal for simpler animations or when a frame-by-frame approach is preferred.
- Timeline Animation: This mode provides a more sophisticated approach, synchronizing layer properties and durations across a timeline. It's particularly useful for more complex animations, character animation, or when working with video.
You can convert between these modes. The "Convert To Frame Animation" icon transforms a timeline animation into a series of frames, while the "Convert To Timeline Animation" icon does the opposite. Ideally, you should choose your preferred mode before commencing your animation project.
Creating Animations: A Step-by-Step Approach
Part 1: Getting Started with Animation in Photoshop
This section introduces the essential features for creating animations within Photoshop, including an introduction to the animation timeline and the steps for exporting your work.
Setting Up Your Document:
- Create a new document in Photoshop. The dimensions and resolution will depend on your intended output.
- Consider the frame rate. Film typically uses 24 frames per second (fps), while video standards can vary (e.g., 23.976 fps). For web animations, a frame rate of 10 to 15 fps is often sufficient and can help reduce file size.
- When you create a new document without a specific preset, the default timeline duration is 10 seconds. The frame rate depends on the chosen document preset.
Accessing the Animation Panel:
- Go to
Window > Animationto open the Animation panel. - If your document is set up for animation, you'll see either the Frame Animation or Timeline Animation view. If not, you might need to convert your document.
- Go to
Choosing Your Animation Mode:
- Convert to Timeline Animation: If you see the Frame Animation panel and want to use Timeline Animation, click the "Convert to Timeline Animation" icon at the bottom of the panel.
- Convert to Frame Animation: Conversely, if you're in Timeline mode and prefer Frame Animation, click the "Convert To Frame Animation" icon.
Working with Layers for Animation:
- Each layer in your Photoshop document will correspond to a track or a frame in your animation.
- For Timeline Animation, different properties of a layer (position, opacity, transform, etc.) can be animated by setting keyframes.
- For Frame Animation, each frame can have a different state of layers visible or modified.
Creating Your First Frames/Keyframes:
- Frame Animation: Duplicate frames to create subsequent stages of your animation. Modify elements on different layers for each frame.
- Timeline Animation: Move the current-time indicator to a new position on the timeline, make a change to a layer (e.g., move it, change its opacity), and Photoshop will automatically create a keyframe if keyframing is enabled for that property.
Exporting Your Animation:
- Once your animation is complete, you can export it in various formats.
- For Video: Go to
File > Export > Render Video. Here you can choose your desired frame rate, resolution, and file format (e.g., .mp4, .mov). - For Web (Animated GIF): Go to
File > Export > Save for Web (Legacy). This dialog box offers extensive options for optimizing GIF files, including color reduction, dither settings, and looping options, crucial for managing file size and appearance on the web.
Part 2: Clean-up, Colour, and Creating Actions
This part focuses on streamlining your animation workflow by creating reusable actions and employing efficient techniques for coloring and frame creation.
Creating Actions to Speed Up Your Workflow
Actions in Photoshop allow you to record a series of commands and play them back on other files or at different stages of your work. This is invaluable for repetitive tasks in animation.
- Open the Actions Panel: Go to
Window > Actions. - Create a New Action Set: Click the folder icon at the bottom of the panel to create a new set for your animation actions. Name it appropriately (e.g., "Animation Workflow").
- Create a New Action: Select your action set and click the "Create New Action" button (looks like a page icon). Name your action (e.g., "Color Fill Layer").
- Record Your Steps: Click the "Record" button. Now, perform the steps you want to automate. For example:
- Select a layer.
- Choose the Paint Bucket tool.
- Select a color.
- Click to fill the layer.
- Stop recording by clicking the square "Stop" button.
- Playing Back Actions: To use the action, select it in the Actions panel and click the "Play" button.
Effective Bucket Filling and Color Layers
When working with animation, especially character animation, maintaining clean lines and consistent coloring is vital.
- Coloring on Separate Layers: Instead of coloring directly on your line art layer, create new layers beneath it for each color. This allows for easy color changes and prevents accidental modification of your linework.
- Using the Paint Bucket Tool:
- Ensure you are on the correct color layer.
- Select the Paint Bucket Tool (K).
- Set the
Toleranceto a suitable value to ensure it fills enclosed areas without spilling. - Check the
Anti-aliasoption for smoother edges. - Consider using the
Contiguousoption to fill only connected areas of the same color.
- Clipping Masks for Colors: Another efficient method is to color on a layer above your line art and then create a clipping mask. Right-click the color layer and select "Create Clipping Mask." This ensures the color only appears within the boundaries of the layer below (your line art).
Creating Your Next Frame Efficiently
In Frame Animation mode, creating the next frame often involves subtle changes from the previous one.
- Duplicate the Previous Frame: In the Animation panel (Frame mode), select the current frame and click the "Duplicate Selected Frames" icon.
- Make Changes: On the new frame, modify your layers as needed. You can move elements, change their opacity, or even add new elements.
- Onion Skinning: To see the previous and next frames while working on the current one, enable Onion Skinning. This feature overlays semi-transparent versions of adjacent frames, helping you align and animate motion smoothly. You can adjust the opacity and number of frames displayed.
Creating a hand drawn animation in photoshop (using onion skins)
Part 3: Extra Tips and Tricks for Photoshop Animation
Here are some additional techniques to enhance your Photoshop animation workflow.
- Utilize Smart Objects: Converting layers or groups into Smart Objects can be beneficial. Transformations applied to Smart Objects are non-destructive, meaning you can scale or rotate them without losing quality. This is especially useful for reusable assets like character parts.
- Layer Comps for Variations: If you're exploring different animation states or character designs, Layer Comps can be a lifesaver. They allow you to save different visibility, position, and style settings for your layers, which can then be exported as individual frames or used to inform your animation.
- Keyboard Shortcuts: Familiarize yourself with Photoshop's keyboard shortcuts for animation tools and commands. This significantly speeds up the process. For example, using the arrow keys with a selected layer to nudge its position frame by frame.
- Organize Your Layers: Maintain a clear and organized layer structure. Name your layers descriptively (e.g., "ArmLeft," "HeadMouth_Open"). Group related layers into folders. This organization becomes critical as your animation projects grow in complexity.
- Preview Regularly: Use the playback controls in the Animation panel to preview your animation frequently. This helps catch errors and assess the pacing and flow of your motion early on.
- Consider Resolution and Output: Always keep your final output in mind. If you're animating for web, optimize your file sizes. If for video, ensure your resolution and frame rate match your target platform.
Integrating Photoshop with Other Adobe Tools
Photoshop can be powerfully combined with other Adobe applications, notably Adobe Animate (formerly Flash Professional), to create sophisticated web-based applications, animations, and interactive content.
Photoshop and Adobe Animate Synergy
Photoshop excels at creating detailed still images and artwork, offering a high degree of creative control through its extensive drawing and selection tools, often surpassing those found in Animate. When you import a Photoshop PSD file into Animate, it can preserve many of the attributes applied in Photoshop, maintaining visual fidelity and allowing for further modifications.
Exchanging Video Files: You can exchange QuickTime video files between Photoshop and Animate. Photoshop can be used to edit video footage, allowing for non-destructive painting on its frames. You can then import these edited QuickTime files into Animate. Conversely, Animate documents can be exported as QuickTime video and imported into Photoshop for frame-by-frame enhancements.
Color Space Considerations: Animate works internally with the RGB (red, green, blue) or HSB (hue, saturation, brightness) color spaces. While Animate can convert CMYK images to RGB, it's best practice to create your Photoshop artwork in the RGB color space from the outset to ensure consistency. Animate does not support the CMYK color space, which is common in print design.
PSD Import Options in Animate: Animate's PSD Importer offers various options to maintain the visual appearance and editability of your Photoshop artwork. However, certain attributes may not be perfectly preserved or may lose their editability within Animate.
- Import as Bitmap Image with Editable Layer Styles: This option creates a movie clip with a bitmap inside. Supported blend modes, filters, and opacity are maintained, but unsupported ones are removed.
- Create Movie Clip: Image layers are converted into movie clips upon import.
- Lossy (JPEG) Compression: Images are compressed using JPEG format. You can choose to use the default publish settings or specify a custom quality level (1-100). This is recommended for images with complex color variations like photographs or gradients.
- Animate Layers: Each selected layer from the Photoshop file is placed on its own layer in Animate, named after the original Photoshop layer.
- Keyframes: Selected layers are placed into individual keyframes on a new layer, named after the PSD file.
- Place Objects at Original Position: Preserves the exact coordinates of objects as they were in Photoshop.
- Set Stage Size to Same as Photoshop Canvas: Resizes the Animate stage to match the Photoshop document dimensions.
- Select Photoshop Layer Comp: Allows you to choose a specific layer comp to import.
- Maintain Editable Paths and Effects: Creates an editable vector shape with a bitmap clipped inside.
- Editable Text: Text layers from Photoshop are converted into editable text objects in Animate.
- Flattened Bitmap Image: Rasterizes text into a bitmap for exact visual replication.
When importing a PSD file into Animate's library, it functions similarly to importing to the Stage. A root folder is created with the PSD file's name, and its contents are ordered alphabetically. A movie clip is generated, containing all imported content on its timeline.
Handling Text and Shapes:
- Text Objects: Text layers in Photoshop can be imported as editable text or converted to vector paths for visual fidelity. If converted to vector paths, the text itself is no longer editable, but opacity and compatible blend modes remain adjustable. For editable text to function within a Animate movie clip, it must reside inside that movie clip.
- Shape Layers: Shape layers can be imported as editable vector shapes with clipped bitmaps, maintaining supported blend modes and opacity. Alternatively, they can be converted into movie clips.
Groups and Merged Bitmaps:
- Groups: When importing groups, you can choose to convert the entire group into a movie clip. If not, each layer within the group is converted according to its set type and imported onto its own Animate layer.
- Merged Bitmaps: Merged bitmaps (multiple Photoshop layers flattened into one) can also be converted into movie clips upon import.
Publish Settings: The PSD Importer's publish settings allow you to control compression and document quality for images when publishing Animate documents as SWF files. This is particularly relevant for optimizing the file size of bitmap assets.
By understanding these capabilities, designers can leverage Photoshop's intuitive interface for animation tasks, from simple frame-by-frame sequences to more complex motion graphics, and integrate seamlessly with other tools in the Adobe ecosystem for professional-grade results.