Photoshop, a powerhouse in graphic design, offers a surprising lack of a direct, one-click solution for creating dotted or dashed lines. This can be a point of confusion for both novice and experienced users alike. However, by understanding a few key techniques, you can effortlessly incorporate these versatile elements into your designs. Dotted and dashed lines are not merely decorative; graphic experts frequently utilize them in Photoshop and Illustrator to craft unique graphical content. They serve various purposes, from conveying a sense of movement and delineating document sections to enhancing backgrounds and adding depth to images. This article will explore multiple methods to achieve these line styles, ensuring you can create them with confidence, whether for a simple project or a complex design.
The Versatile Brush Tool: Crafting Dotted Lines with Precision
One of the most accessible and widely applicable methods for creating dotted or dashed lines in Photoshop involves the judicious use of the Brush tool. This approach allows for a high degree of customization and is particularly effective for generating straight dotted lines.
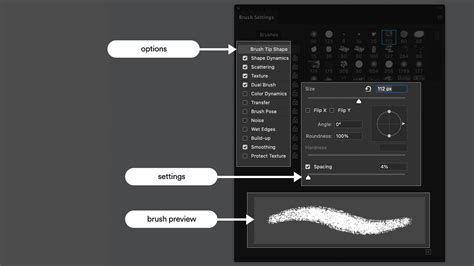
To begin, open your Photoshop application and create a new document by navigating to File > New from the top menu bar. It is advisable to create a new layer for your line to maintain flexibility and non-destructive editing. Access the Brush tool by going to the Window menu and selecting Brush Settings, or by pressing the shortcut F5 (or Fn + F5 on some keyboards). Customizing your Photoshop brush tool is paramount as it directly influences the appearance of your design.
Within the Brush Settings panel, focus on the "Brush Tip Shape" section. Ensure your brush is set to a round tip. For a clean, distinct dot, set the Size to approximately 10 pixels and the Hardness to 100%. This ensures a sharp-edged dot rather than a soft, blurred one. The most critical setting for creating a dotted line is the Spacing. Slide the Spacing slider until the value is over 100%. Experimentation here is key; values around 100% to 160% will yield distinct dots, while higher values will create more space between them.
Once your brush is configured, return to your canvas. Select a color for your stroke by clicking on the Foreground Color swatch. Then, simply click and drag your cursor on the canvas to create a line. With the brush settings adjusted as described, the result will be a series of distinct dots forming your line. If you wish to save this custom brush for future use, you can click on the "Create new brush" icon in the Brush Settings panel. The New Brush dialog box will appear, allowing you to give your new brush preset a name, making it easy to locate in Photoshop’s Brush tool preset library.
Troubleshooting: If the Brush Settings panel opens but you find that you are unable to alter the settings, ensure that you have selected a brush from the default set of Photoshop brushes before attempting to adjust parameters like Spacing. Sometimes, certain legacy or special brushes may have restrictions on modification.
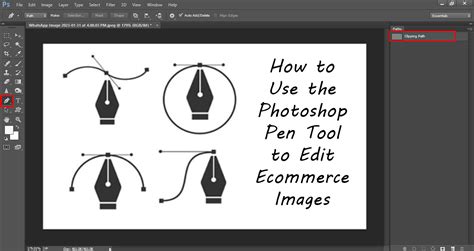
Leveraging the Pen Tool for Precise Dotted Lines
The Pen tool, a staple for creating precise vector paths, also offers a robust method for generating dotted lines, especially when you require absolute control over the line's shape and placement. This method is particularly useful for creating both straight and curved dotted lines.
To start, select the Pen Tool from the left Toolbar in Photoshop. In the Options bar at the top of the screen, set the dropdown menu to "Path." This ensures that you are creating a vector path rather than a shape or pixels. Click on the canvas using your Pen tool to create the first anchor point. Continue clicking to create subsequent anchor points, defining the shape of your line. To draw a perfectly horizontal or vertical straight line, hold down the Shift key while drawing.
Once your path is complete, you have a solid vector line. To transform this into a dotted line, you need to apply a brush stroke to the path. Navigate to Window > Stroke. In the Stroke panel, you will see an option to "Stroke Path." Before clicking this, ensure your Brush tool is selected and configured with the desired settings for your dots (as described in the Brush Tool method: Hard Round, 100% Hardness, and a Spacing of over 100%). With the path still active and the Brush tool selected, click "Stroke Path." Photoshop will then render the path using your currently selected brush, effectively creating a dotted line along the path.
The advantage of using the Pen tool is the editability of the path. You can easily adjust anchor points, add or remove points, and modify curves to refine the shape of your dotted line even after it has been stroked. To make pleasing graphical content, sometimes you might require curve lines. Again, create your path using the Pen tool, ensuring you create curves by clicking and dragging anchor points. Once your curved path is ready, follow steps 5 and 6 of this method to apply the dotted brush stroke. The curve line is ready, and by applying the dotted brush, you will get the dotted line from the dashed line in Photoshop.
After creating your dotted line, you can change its color by selecting the layer containing the path and then changing the Foreground Color before stroking, or by using Layer Styles to adjust the color overlay. You can also adjust the opacity to make a transparent dotted line and export it however you like.
Dotted Lines with Shape Tools: A Direct Approach
For simpler scenarios, particularly when a dotted line is needed as part of a shape or a distinct graphic element, Photoshop's Shape tools offer a more direct, albeit less flexible, method.
To utilize this method, select a Shape tool from the toolbar. For this tutorial, let's say we use the Rectangular Tool, but this method can be applied to Ellipse, Polygon, or Line tools as well. Draw your desired shape on the canvas. Once the shape is created, look for the "Stroke" settings in the Options bar at the top of the screen. Click on the stroke settings. Within these options, you will find controls for stroke color, weight, and importantly, the style of the stroke. Select the dotted line option from the available presets.
This method is excellent for quickly applying a dotted outline to a shape. However, it offers less granular control over the spacing and size of individual dots compared to the Brush or Pen tool methods. The dotted line created here is an attribute of the shape itself.
Understanding the Nature of Dotted Lines in Design
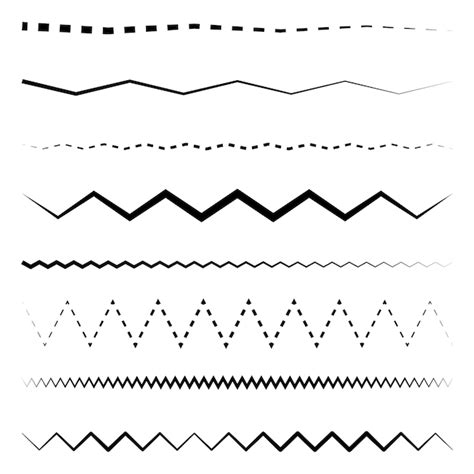
A dotted line in Photoshop is fundamentally a line composed of a series of discrete dots rather than a continuous stroke. These dots can vary in length and spacing, allowing for a wide range of visual effects. While often referred to interchangeably with dashed lines, a dotted line specifically consists of dots, whereas a dashed line comprises short segments separated by gaps.
The application of dotted and dashed lines extends beyond mere aesthetics. In technical drawings and diagrams, they are often used to represent hidden or unseen elements. In user interface design, they can indicate areas that are selectable or interactive. In graphic design, they can create visual rhythm, guide the viewer's eye, or add a texture to a background. For instance, dashed-dotted lines are sometimes used to indicate the boundaries of construction zones in certain types of diagrams.
While Photoshop doesn't offer a single "dotted line" button, its powerful tools-the Brush and Pen tools-allow for the creation of these lines with customizability. The key lies in understanding how to manipulate brush settings or apply strokes to paths.
Advanced Considerations and Creative Applications
Beyond the fundamental techniques, consider how dotted lines can be integrated into more complex designs. For example, to create a dotted circle in Photoshop, you would typically use the Ellipse tool to create a circular path, then stroke that path with a dotted brush. Alternatively, you could use the Brush tool to draw a circle freehand, ensuring your brush spacing is set appropriately.
The beauty of these methods is their adaptability. You can experiment with different brush sizes, hardness values, and spacing to achieve a unique look for your dotted lines. You can also combine dotted lines with other layer effects, such as gradients, shadows, or textures, to further enhance their visual impact. For those looking to master line work in Adobe products, understanding how to create dotted lines in InDesign, for example, often follows a similar principle: drawing a path and applying a dotted stroke through the stroke options. In InDesign, you might create a new layer, use the pen tool to draw a line, and then select the "Line" option from the "Stroke" drop-down menu in the "Control" panel, where dotted line styles are readily available.
The ability to create dotted lines is a fundamental skill that enhances your design toolkit, allowing for greater creative expression and the ability to communicate information more effectively through visual means. Whether you're adding some visual interest to a design project or just looking to improve your Photoshop skills, these techniques are a great addition to any artist's arsenal. With a little experimentation, you can create a variety of dotted line styles to suit any project.