Adobe Photoshop, a powerhouse for digital image manipulation, offers a sophisticated array of tools for managing and refining your creative work. Among the most fundamental yet powerful of these are the mechanisms for connecting layers. Understanding how to link, group, and clip layers is crucial for efficient workflow, precise adjustments, and achieving complex visual effects. This guide will delve into these interconnected functionalities, exploring how to establish relationships between layers to control their transformations, apply targeted adjustments, and unlock advanced editing possibilities.
The Foundation of Layer Interaction: Linking Layers
At its core, Photoshop allows you to establish direct links between layers. This linking feature is designed to synchronize transformations across multiple selected layers. When you select a layer, it is possible to transform it in many ways-move it, rotate it, or resize it. If you want to transform multiple layers at the same time, you can select them with the Control or Shift keys. However, simply selecting multiple layers only allows for simultaneous transformation as long as they remain selected. The true power of linking comes into play when you want these transformations to be permanently associated, regardless of which layer is currently active.
One common approach when dealing with multiple layers that need to be moved or resized together is to put all these layers in a group. Layer groups act as containers, allowing you to treat a collection of layers as a single unit for transformation and organizational purposes. However, this method has its limitations. What if the layers you wish to transform together are not logically meant to be in one contiguous block within the layer stack? This is precisely where the Photoshop linking layers function proves its worth.
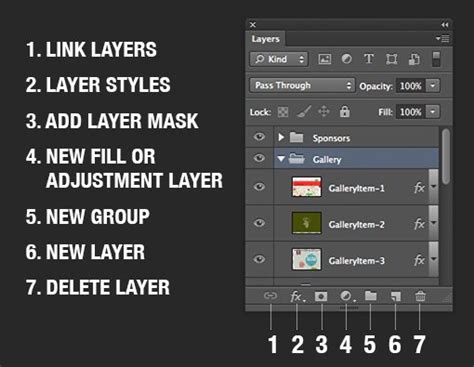
To establish a link between layers, you can utilize the dedicated linking option within the Layers panel. Simply select the layers you wish to connect, and then click the little chain link icon located at the bottom of the Layers panel. Once linked, any transformation applied to one of the linked layers will be mirrored across all other layers connected to it. This ensures that their relative positions and sizes remain consistent, even when moving or resizing them individually or as a group.
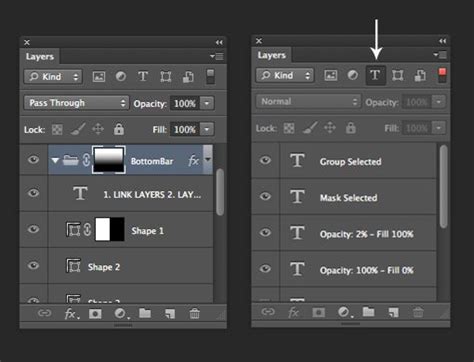
If you need to temporarily unlink a layer, or all layers within a linked set, Photoshop provides a straightforward method. Holding down the Shift key while clicking the chain link icon will toggle the linked status. This allows for quick adjustments or modifications to individual layers without disrupting the established links for the rest of the set. This temporary unlinking is invaluable for making minor edits to a single element within a linked group without breaking the overall synchronized transformation.
Beyond Simple Connections: Clipping Masks for Targeted Adjustments
While linking layers synchronizes transformations, another powerful form of layer interaction in Photoshop is "clipping," more accurately termed "clipping masks." This functionality creates a hierarchical relationship between two layers, where the upper layer's visibility and effects are constrained by the boundaries of the layer directly below it. When layer A is clipped to layer B, it means the effect of layer A is restricted to the content of layer B.
This capability is exceptionally useful, particularly when working with adjustment layers. It lets you, for example, change the color of one layer only. Instead of applying a color adjustment to the entire document or a large portion of it, you can clip an adjustment layer to a specific image layer. This ensures that the color modification, or any other adjustment like brightness, contrast, or hue saturation, will only be visible within the boundaries of the clipped layer.
To create a clipping mask, you typically have two layers in your stack. Select the upper layer (the one you want to be affected by the clipping mask, often an adjustment layer or a decorative layer) and then click the first icon from the left on the bottom of the Layers panel. This icon typically represents "Create Clipping Mask." Alternatively, you can use the keyboard shortcut Control-Alt-G (Windows) or Command-Option-G (Mac). A more intuitive method for many users involves holding down the Alt key (Windows) or Option key (Mac) and clicking the line between the two layers in the Layers panel. A small downward-pointing arrow will appear, indicating that the upper layer is now clipped to the layer below.
The versatility of clipping masks extends to various creative applications. For instance, you can place a texture layer above an image layer and clip it. The texture will then only appear where the image layer has content, effectively applying the texture to the image itself. Similarly, you can use a shape layer as a mask for a photo, revealing only the parts of the photo that fall within the shape.
Advanced Layer Management: Grouping for Organization and Clipping to Groups
While linking layers is excellent for synchronized transformations, and clipping masks are superb for targeted adjustments on a single layer, managing multiple adjustment layers applied to specific, non-contiguous layers presents a unique challenge. As noted, using the standard linking or clipping methods there is no straightforward way to have an adjustment layer affect multiple layers that aren't directly adjacent in the layer order.
To overcome this limitation, Photoshop offers a powerful combination of grouping and clipping. If you have an adjustment layer that needs to affect several layers that are scattered throughout your Layers panel, the most effective strategy is to group those target layers together. Select all the layers you want the adjustment to influence, and then press Control-G (Windows) or Command-G (Mac) to create a new group.
Once these layers are contained within a group, you can then create a clipping mask for the adjustment layer to this entire group. This means the adjustment layer, when clipped to the group, will apply its effects to all layers contained within that group, regardless of their individual positions within the group itself.
For users of Photoshop CC and later versions, there's an even more streamlined approach. When you create an adjustment layer, you can often find a "clip to layer" or similar option directly within the adjustment layer's properties or popup window. Clicking on this option will automatically clip the adjustment layer to the layer directly below it. To achieve the effect of an adjustment layer affecting multiple layers that aren't adjacent, you would still group those target layers first, and then clip the adjustment layer to that group. This is a more efficient workflow than manually creating a clipping mask by clicking between layers.
Clipping Mask vs Layer Mask. Same? Different? [Photoshop Tutorial]
Alternative Approaches: The Role of Layer Masks
The question of why simple Layer Masks cannot achieve the same results as clipping masks for targeted adjustments is a valid one and highlights a subtle but important distinction in Photoshop's functionality. Layer Masks, at their core, control the visibility of a layer. They are essentially black and white canvases where white reveals the layer's content, black conceals it, and shades of gray create partial transparency.
Consider a scenario with a complex image, such as a landscape with a foreground person, a middle-ground mountain, a waterfall, and a background sky. If you want to enhance the blues in the sky and the person, you might create a Curves adjustment layer. Using a Layer Mask, you would then paint black over the mountain and waterfall areas to exclude them from the adjustment's effect. Subsequently, you might want to adjust the brightness of the person and the mountain. For this, you could create another Curves adjustment layer and use its Layer Mask to selectively reveal or conceal its effect on the person and mountain.
The key here is that Layer Masks operate on the layer they are attached to. The mountain layer's position in the layer stack relative to the sky layer is irrelevant for its own Layer Mask. If the mountain layer were to obscure the sky in a way that prevented you from seeing the sky, it would imply a fundamental compositional or layering issue, not a limitation of Layer Masks. Layer Masks provide granular control over what part of a layer is visible or affected by adjustments applied to that layer.
However, the desire to have a single adjustment layer affect multiple, non-contiguous layers without grouping them is where the direct clipping or grouping strategy becomes more efficient. While you could meticulously create and manage individual Layer Masks for each target layer, clipping to a group centralizes this control. The adjustment layer's effect is then dictated by the collective mask of the group, simplifying the workflow when multiple distinct elements need a unified adjustment.
Therefore, while Layer Masks offer unparalleled precision for controlling a layer's appearance, clipping masks (especially when applied to groups) provide a more streamlined method for applying a single adjustment to a collection of layers, irrespective of their sequential order in the Layers panel. The choice between them often depends on the complexity of the image, the number of layers involved, and the desired level of control.
Conclusion: A Synergistic Approach to Layer Management
In essence, mastering layer connections in Photoshop-whether through direct linking, grouping, or clipping-is fundamental to efficient and precise image editing. Linking layers ensures synchronized transformations, preserving the spatial relationships between elements. Clipping masks allow for highly targeted adjustments, restricting the influence of one layer to the content of another. Grouping provides essential organizational structure, and when combined with clipping, it enables powerful, consolidated adjustments across multiple, disparate layers. By understanding and strategically employing these interconnected features, you can elevate your Photoshop workflow, achieve more sophisticated visual effects, and maintain greater control over your creative vision.