Adobe Photoshop offers a versatile toolkit for image manipulation, and at its core lies the ability to precisely alter colors within an image. Whether you're aiming to refine a photograph, create striking graphic designs, or correct color inconsistencies, understanding how to replace colors is an indispensable skill. This guide delves into the various methods Photoshop provides for color replacement, from its dedicated tools to advanced adjustment layers and even third-party plugins, ensuring you can achieve professional results for a wide range of applications.
The "Replace Color" Command: Targeted Adjustments
The "Replace Color" command is a powerful, albeit destructive, tool designed for specific color alterations. It allows you to select a color range within an image and then substitute it with a new hue, saturation, and lightness. This method is particularly useful when you need to target a distinct color and modify it without affecting other parts of the image.
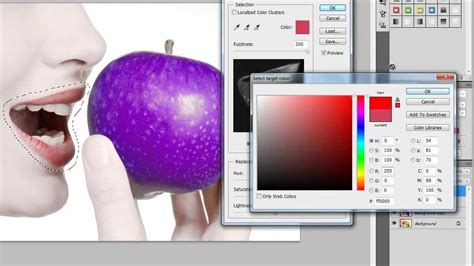
To access this command, navigate to the Menu Bar and select "Enhance" > "Adjust Color" > "Replace Color…". This action opens the "Replace Color" dialog box, where the real magic happens. Within the "Selection" section of this dialog, you'll find two crucial options: "Selection" and "Image." The "Selection" option allows you to manually define the color range you wish to alter, while the "Image" option attempts to automatically identify colors based on your initial selection.
For more precise control over contiguous areas, the "Localized Color Clusters" checkbox can be enabled. This feature ensures that only touching pixels are considered for replacement, preventing unwanted color shifts in disconnected areas. The "Color Picker Tool" button, which should be selected by default, is your primary instrument for sampling colors directly from the image. Simply click on the color you wish to replace.
Once a color is selected, you can refine your selection using the eyedropper tools. The "Add to Sample" eyedropper allows you to include additional similar colors to your selection, while the "Subtract from Sample" eyedropper lets you remove specific colors that may have been inadvertently included. The "Fuzziness" slider is another critical control; it determines the range of colors similar to the one you've selected that will be included in the replacement process. A higher fuzziness value will encompass a broader spectrum of similar hues, while a lower value will be more restrictive.
After meticulously defining your color selection, you move to the "Replacement" section of the dialog box. Here, you can manipulate the "Hue" and/or "Saturation" sliders to introduce the desired new colors. The "Lightness" slider offers an additional layer of control, allowing you to adjust the brightness of the replaced color to better integrate it with the surrounding image.
It's crucial to remember that the "Replace Color" command is a destructive process, meaning it directly alters the pixels of your active layer. To safeguard your original image, it is highly recommended to duplicate your layer before employing this tool. This can be achieved by right-clicking on the layer in the Layers panel and selecting "Duplicate Layer."
Solid Color Fill Layers and Blending Modes: A Non-Destructive Approach
For scenarios where you need to change a large area of a single color, such as converting a white background to a specific hue, a non-destructive method involving fill layers and blending modes offers an elegant solution. This approach is particularly effective for line drawings or graphic elements.
One such method involves placing a new layer filled with your desired color beneath your clipart layer. Then, you change the blending mode of the clipart layer to "Multiply." This mode allows the underlying color to show through the transparent or semi-transparent areas of the upper layer, effectively coloring the white areas of your drawing without affecting the black lines themselves.
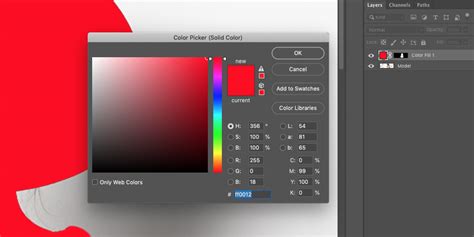
To create a solid color fill, you can utilize a "Solid Color" "Fill Layer." This is generally the recommended approach as it is fully editable and non-destructive. Alternatively, you can create an empty layer and fill it with your foreground or background color. Photoshop provides actions for this in the "Edit" menu, and keyboard shortcuts can also be employed for speed.
The Color Replacement Tool: Brush-Based Precision
The Color Replacement Tool, found nested within the Brush Tool options in the Tools panel, offers a more interactive and brush-based approach to color alteration. This tool is designed to replace a sampled color with your chosen foreground color while preserving the texture and luminosity of the original image.
When you select the Color Replacement Tool, your cursor transforms into a circle with a crosshair in the center. The size of this brush can be adjusted using the left and right bracket keys ( [ and ] ), and the hardness of the edges can be modified by holding down the Shift key in conjunction with the bracket keys.
The core functionality of the Color Replacement Tool lies in its sampling mechanism. As you drag the tool over your image, the crosshair continuously samples the color directly beneath it. This sampled color is the target for replacement. Any pixels within the larger circle surrounding the crosshair that match this sampled color will be changed to your current Foreground color.
To set your desired replacement color, you can click on the Foreground color swatch in the Tools panel and select a color from the Color Picker. Alternatively, you can temporarily switch to the Eyedropper Tool by holding down the Alt (Windows) or Option (Mac) key. This allows you to sample colors directly from your image.
A key advantage of the Color Replacement Tool is its ability to retain the original image's texture and reflections, thanks to its blend modes. The primary blend modes are:
- Hue: Changes only the basic color itself, leaving saturation and brightness intact.
- Saturation: Alters the intensity of the color, without affecting hue or brightness. This is useful for reducing color intensity or even removing color.
- Color: The default mode, it modifies both hue and saturation, while brightness remains unchanged.
- Luminosity: Matches the brightness of the original color to the new color, affecting only brightness.
The "Tolerance" setting in the Options Bar is crucial for fine-tuning the Color Replacement Tool's behavior. It dictates how different a color can be from the sampled color before it's replaced. A higher tolerance will affect a wider range of colors, while a lower tolerance will be more restrictive.
Additionally, the Color Replacement Tool offers different sampling options that mirror those of the Background Eraser Tool:
- Continuous: The default setting, Photoshop continuously samples new colors as you drag the tool.
- Once: Photoshop samples the color only at the initial click and replaces all matching pixels within the brush area.
- Background Swatch: Replaces whatever color is currently set as your Background color.
The "Limits" option provides further control over where Photoshop searches for colors to replace:
- Contiguous: Replaces only pixels that are touching the sampled area.
- Discontiguous: Replaces all pixels within the brush area that match the sampled color, regardless of whether they are touching.
- Find Edges: A more precise option that can change the color of pixels within the same area as the crosshair while being better at detecting edges.
The "Anti-alias" option, selected by default, helps to create smoother transitions between replaced colors.
Advanced Techniques and Third-Party Solutions
While Photoshop's built-in tools are highly capable, complex scenarios or the desire for even greater precision might lead you to explore advanced techniques or third-party plugins.
Hue/Saturation Adjustment Layers
For a non-destructive and highly flexible approach, Hue/Saturation adjustment layers are invaluable. You can create a new Hue/Saturation adjustment layer (Layer > New Adjustment Layer > Hue Saturation). This layer automatically imports a layer mask from any previous selection, ensuring that your adjustments are confined to the desired object. Within the Properties panel, you can then use the Hue, Lightness, and Saturation sliders to achieve your replacement color. For further refinement, you can right-click the adjustment layer and select "Edit Adjustments." To change multiple objects to different colors, you would add new adjustment layers and create new layer masks for each.
Boris FX Optics: A Professional Plugin
For professionals seeking granular control over color manipulation, plugins like Boris FX Optics offer advanced capabilities. Optics is a creative software and plugin suite that provides hundreds of filters for image editing. Its "Ozone" filter, for instance, is based on Ansel Adams's zone system and allows for precise adjustments to luminance, hue, saturation, and individual color channels across 11 defined zones.
Within Optics, you can convert your Photoshop layer to a Smart Object to maintain editability. Then, apply Optics as a filter. By creating masks within Optics (including AI-powered Mask ML), you can isolate specific objects. The Ozone filter then allows you to select extraction methods (Luminance, Hue, Saturation, etc.) and use "Position" and "Range" parameters to target localized color clusters with extreme accuracy. You can then adjust Hue, Saturation, and Brightness settings for each zone, offering unparalleled control over color replacement.
Addressing Specific Use Cases
The provided information highlights several specific scenarios where color replacement is crucial:
- Greyscale Line Drawings: For greyscale clipart on a white background, changing all white pixels to a specific RGB value can be achieved by adding a solid color fill layer below the drawing and setting the drawing layer's blend mode to "Multiply." This preserves the line detail while coloring the background.
- Replacing Specific Colors Without Affecting Others: When you only want to replace certain instances of a color (e.g., black with orange) without altering all occurrences of that color, the Color Replacement Tool with careful sampling and brushwork is often more suitable than a global "Select > Color Range" followed by a fill. The challenge here is often controlling the tool's sensitivity to avoid affecting unintended areas.
- Eliminating Stray Pixels: In indexed color images, small, unwanted colored pixels ("stragglers") can appear. Tools like the Color Replacement Tool, or even a carefully used brush with precise color sampling, can help correct these by painting over them with the desired background color. Some older plugins offered a feature to limit replacement to pixel groups smaller than a certain size, a functionality that is not directly replicated in Photoshop's standard tools but can be approximated with careful selection and masking.
- Color Correction and Matching: The Color Replacement Tool is excellent for matching colors. For example, if an accessory doesn't quite match the overall color scheme, you can sample the desired color and paint over the accessory. Similarly, it can be used to correct color casts or blemishes on skin by sampling healthy skin tones and painting over the problem areas. This is often best done on a duplicate layer, with the opacity adjusted for a natural look.
- Hiding Unwanted Objects: By changing the color of an object to blend seamlessly with its surroundings, you can effectively make it disappear without resorting to cloning or healing tools. This is a subtle yet powerful application of color replacement.
Understanding the nuances of each tool and technique allows Photoshop users to tackle a vast array of color editing challenges with precision and creativity. Whether you're a beginner looking to make simple color swaps or an advanced user seeking intricate control, Photoshop provides the means to achieve your vision.