Adobe InDesign, a cornerstone of professional design and publishing, offers a surprisingly robust set of tools for creating intricate vector graphics directly within your layouts. While often associated with page layout and typography, InDesign's drawing capabilities are more than adequate for many design tasks, allowing you to create anything from basic shapes to more complex illustrations without needing to switch to a dedicated drawing program like Adobe Illustrator. This guide delves into the methods for drawing stars, placing images within these shapes, and even embedding graphics within text, providing a detailed exploration for users ranging from beginners to seasoned professionals.
Unveiling the Polygon Tool for Star Creation
At the heart of drawing stars in InDesign lies the versatile Polygon Tool. While its name might suggest only regular polygons, this tool is ingeniously designed to generate star shapes with adjustable points and insets.
Accessing and Configuring the Polygon Tool
To begin, locate the Rectangle Tool in the InDesign Tools panel. Press and hold your mouse button over the Rectangle Tool, and a pop-up menu will appear, revealing nested tools. Select the Polygon Tool from this menu.
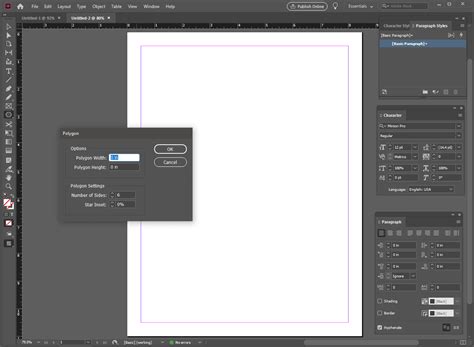
Once the Polygon Tool is active, a double-click on the tool icon itself will open the Polygon Settings dialog box. This is where the magic happens for star creation. Here, you have two primary parameters to adjust:
- Number of Sides: This determines the basic structure of your shape. For a classic five-pointed star, you would set this to 5. However, you can experiment with higher numbers to create more complex starbursts with numerous points.
- Star Inset: This crucial value defines how much the sides of the polygon are "pressed inwards" towards the center. A Star Inset of 0% will result in a regular polygon. As you increase this percentage, the inward angle becomes more pronounced, creating the characteristic spikes of a star. A 50% Star Inset, for instance, will produce a well-defined five-pointed star. A higher percentage leads to longer, thinner spikes, creating a more delicate or sharp star appearance. Conversely, a lower percentage will result in a star with shorter, blunter spikes.
Alternative Methods for Polygon and Star Generation
Beyond the dialog box, InDesign offers dynamic methods for shaping polygons and stars as you draw.
- Arrow Key Manipulation: While dragging out a frame with the Polygon Tool, you can simultaneously use your keyboard's arrow keys. Holding down the Up and Down arrow keys will change the number of sides, allowing you to quickly cycle through different polygon and star configurations. The Left and Right arrow keys, when held down while dragging, will adjust the "star inset" - effectively controlling the depth of the depression between each spike, thus altering the sharpness or fullness of the star's points. It's important to note that on a Mac using CS3 or earlier, the arrow keys will only function if the mouse is actively moving while you are dragging.
- Modifier Keys: Holding down the Shift key while dragging with the Polygon Tool constrains the angle of the shape, helping you create more symmetrical polygons. The Option key (on Mac OS) or Alt key (on Windows) when used with the Polygon Tool can also influence the drawing process, often by drawing from the center outwards.
Modifying Existing Shapes
InDesign also provides a powerful feature to convert existing paths into predefined shapes, including stars. This means you can take a basic rectangle or even a hand-drawn path and transform it into a star.
To convert a shape, first select the object you wish to modify. Then, navigate to Object > Convert Shape. From the sub-menu, choose the desired new shape. The original path's anchor points and overall structure remain the same, but they are reinterpreted to form the new shape. This is particularly useful if you've drawn a shape manually and then decide you want it to be a perfect star, or if you need to convert a 10-sided polygon into a 20-sided one.
A particularly efficient method for modifying multiple shapes at once was introduced in later versions of InDesign (CS4 and beyond). If you have one or more polygons already on your page, you can select them, then double-click the Polygon Tool to open the Polygon Settings dialog box. After adjusting the "Number of Sides" and "Star Inset" to your preference and clicking "OK," all the selected polygons will instantaneously update to reflect the new settings. This undocumented feature significantly streamlines the process of standardizing star shapes across a design.
Integrating Images and Graphics
Once you have your stellar shapes, a common design task is to place images within them. InDesign makes this a straightforward process.
Placing Images into Shapes
To place an image into a star, circle, rectangle, or any other created shape, follow these steps:
- Select the Target Object: First, select the object that will serve as the container for your image. This could be a star you've just drawn, a pre-existing frame, or any vector shape.
- Initiate the Place Dialog: Go to File > Place… or use the keyboard shortcut Command+D (Mac OS) or Control+D (Windows). This will open a dialog box where you can navigate to and select your desired image file.
- Crucial Step: Replace Selected Item: In the Place dialog box, ensure that the "Replace selected item" checkbox is ticked. This is vital. By checking this box, you instruct InDesign to place the selected image inside the currently selected object, effectively masking the image within the shape's boundaries. If this box is not checked, the image will be placed as a separate, floating object.
- Confirm Placement: Click "Open" to place the image.

Adjusting Placed Images
After placing an image, you might need to refine its position or scale within the shape. The Direct Selection Tool (the white arrow) is your best friend here. Selecting this tool allows you to click on the image within the frame. You can then move, scale, or rotate the image independently of the frame itself, allowing for precise control over how the image appears within the star or other container.
Advanced Graphic Techniques: Images within Text
A particularly elegant and powerful technique in InDesign is the ability to place an image within text, creating visually striking typographic treatments. This transforms ordinary text into a canvas for your imagery.
Creating Outlines for Image Embedding
The process involves converting your text into a vector shape, which then becomes a container for your image, much like a drawn shape.
- Type Your Text: Begin by typing your desired text into a separate text frame.
- Select the Text Frame: Once you are satisfied with the text content and formatting, select the entire text frame.
- Create Outlines: Navigate to Type > Create Outlines (or use the shortcut Shift+Command+O on Mac OS, Shift+Control+O on Windows). This action converts each character in the text frame into a vector path. The text is no longer editable as text but is now treated as a graphic object.
- Place the Image: With the outlined text frame still selected, use the File > Place… command (Command+D or Control+D). Again, ensure the "Replace selected item" box is checked in the Place dialog.
- Result: The image will now be placed inside the outlined text, filling the shapes of the letters.
This technique is exceptionally effective for headlines, logos, or any design element where you want to combine strong typography with compelling visuals.
Compound path with text InDesign
Harnessing the Document Grid for Precision
For designs that demand absolute precision, InDesign's document grid is an invaluable tool. It provides a visual framework of lines and intersections that can guide your drawing and placement.
Activating and Utilizing the Document Grid
- Open a Document: If you haven't already, open your InDesign document. For practice, you might open a template like the "fashion flyer template" mentioned in some user notes, or simply start a new document.
- Show the Document Grid: Navigate to View > Grids & Guides > Show Document Grid. You should now see a grid overlaid on your pasteboard and document area.
- Exiting Preview Mode: If you don't see the grid, it's possible your document is in Preview Mode, which hides all non-printing elements. Press the W key on your keyboard to toggle between Preview Mode and Normal Mode, revealing the grid.
The document grid can be customized in the Preferences (Edit > Preferences > Grids on Windows, InDesign > Preferences > Grids on Mac OS) to adjust the grid spacing, color, and visibility, allowing you to tailor it to your specific workflow and design needs. When drawing shapes, especially with tools like the Polygon Tool, you can snap your points and edges to the grid intersections, ensuring perfect alignment and proportion.
Understanding Advanced Drawing Concepts
InDesign's drawing tools, while not as extensive as Illustrator's, offer significant flexibility.
The Pen Tool for Custom Paths
For creating shapes that deviate from standard polygons or stars, the Pen Tool (P) is indispensable. It allows you to draw custom paths by placing anchor points and then manipulating the Bézier curves that connect them. This is how you can create intricate, freeform shapes, including unique starbursts or any other custom graphic element.
When using the Pen Tool, you can draw a star shape one segment at a time. If you need to adjust the shape after it's drawn, the Direct Selection Tool (A) is used to select individual anchor points or segments and modify their position or the curvature of the Bézier handles. This offers granular control over every aspect of your vector drawing.
Creating Shapes with Precise Dimensions
While dragging on the page to create a shape is easy, achieving precise dimensions often requires additional steps. When you drag to create a rectangle or ellipse, the first point you click becomes the upper-left corner of the bounding box that defines the object's width and height. To define exact dimensions, you can either:
- Draw the shape approximately and then use the Transform panel (Window > Object & Layout > Transform) to enter precise Width and Height values.
- Click once with the Rectangle or Ellipse tool to open a dialog box where you can directly input the desired dimensions.
For polygons, as discussed, the dialog box accessed by double-clicking the tool is the primary method for setting precise parameters like the number of sides and star inset.
The Power of InDesign's Hidden Features
Adobe InDesign is replete with features that enhance its power and utility, often in ways that aren't immediately obvious. The ability to draw stars, place images within shapes and text, and utilize grids are testaments to its comprehensive design capabilities. By understanding and mastering these tools, designers can create sophisticated and visually engaging layouts directly within InDesign, streamlining their workflow and unlocking new creative possibilities. The "hidden features," like the ability to modify multiple selected polygons at once, exemplify how InDesign continues to evolve, offering more efficient ways to achieve complex design outcomes.