Photoshop Actions are a powerful feature designed to streamline repetitive tasks, enabling users to automate complex sequences of commands with a single click. Whether you're a seasoned professional or just beginning to explore the depths of image editing, understanding and utilizing actions can dramatically enhance your productivity and consistency. This guide will walk you through the process of creating, managing, and leveraging Photoshop Actions to their full potential.
Understanding the Power of Automation

At its core, an action is a recorded set of predefined tasks that can be executed on a single file or a batch of files. These tasks can encompass a wide range of operations within Photoshop, including menu commands, panel options, and specific tool actions. Imagine needing to resize a series of images to a specific dimension, apply a consistent set of visual effects, or save files in a particular format; actions can automate all of these processes, saving you significant time and effort.
The benefit of actions is particularly evident when dealing with redundant tasks. For instance, consider the scenario of needing to apply a complex "Melted Gold" text effect with a wood grain border to 30 different web page headers. Manually performing this process 30 times could consume hours, if not days. However, if this sequence of steps has been recorded as an action, the entire effect can be applied to each header with a single click, potentially reducing the completion time to mere minutes. This ability to automate such intricate effects is a testament to the power of actions in transforming a laborious process into an efficient one.
Photoshop (Beta) is available for testing and feedback, offering a glimpse into the evolving capabilities of the software, including enhanced features for action management and creation.
Getting Started with the Actions Panel
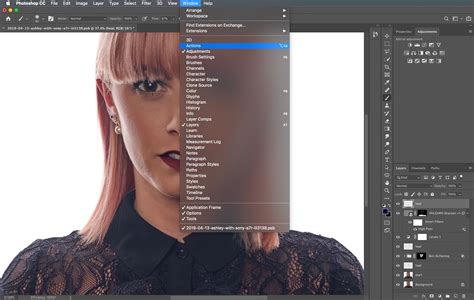
To begin working with actions, you'll need to access the Actions panel. You can do this by navigating to Window > Actions. Within this panel, you'll find two primary modes: Button Mode and Edit Mode.
- Button Mode: This mode presents actions as clickable buttons, making it incredibly intuitive to play them. Simply click the button corresponding to the action you wish to execute, and Photoshop will perform the recorded steps.
- Edit Mode: This mode displays a collapsible tree structure of all the commands within an action. It's invaluable for understanding the sequence of operations, seeing which filters and settings are being applied, and for editing existing actions. This mode serves as an excellent learning tool for dissecting how specific effects are achieved.
You can toggle between these modes via the Actions Menu, typically accessed by clicking a small arrow or icon in the upper-right corner of the Actions panel.
The Actions panel also offers a handy search box, allowing you to quickly locate any of the numerous actions bundled with Photoshop or any custom actions you've created or installed. Furthermore, you can preview an action before fully committing to its execution. Look for the preview icon next to listed actions; mousing over an action in the list will often display a preview of its effect on your document's history.
Organizing Your Actions: The Power of Action Sets
To keep your workflow organized, especially when you begin accumulating a large number of custom actions, it's highly recommended to create Action Sets. An Action Set is essentially a folder within Photoshop where your individual actions are stored.
To create a new Action Set, click the folder icon at the bottom of the Actions panel. A dialog box will appear where you can name your set. Choosing a descriptive name, such as "My Custom Retouching Actions" or "Web Graphics Batch," will help you easily identify its contents later. For a quicker creation, you can hold down the Alt key (Windows) or Option key (Mac) while clicking the New Set button. This bypasses the dialog and creates a set with a default name, which you can always rename later by double-clicking it.
This organizational structure is crucial, especially if you plan on using Photoshop Actions extensively. It prevents clutter and ensures that you can quickly find the specific automation you need for a particular task.
Recording Your First Photoshop Action
Once your Action Set is ready, it's time to record your first action. Click the "New Action" button, which typically looks like a page icon, located at the bottom of the Actions panel (next to the trash can icon).

This action will open the "New Action" dialog box, where you can:
- Name Your Action: Give your action a clear and descriptive name that reflects its purpose (e.g., "Resize to Web 800px," "Apply Sepia Tone").
- Assign to an Action Set: Select the Action Set you created earlier from the dropdown menu.
- Assign a Function Key or Key Combination: For frequently used actions, you can assign a keyboard shortcut (a Function key or a combination of keys) for even faster execution.
- Assign a Color: You can assign a color to the action, which will be visible in Button Mode, making it easier to identify actions at a glance.
Once you've configured these settings, click "Record." From this moment on, everything you do in Photoshop is being recorded as a step within your action. This includes menu commands, tool selections, brush strokes, adjustments, and even typing.
Important Considerations During Recording:
- Self-Sufficiency: Ensure that your action is self-sufficient. This means that all the elements it needs to function correctly must be present when the action is played, or created by the action itself in an earlier step. For example, if your action relies on a specific layer being present, make sure that layer is created within the action itself.
- Mistakes Happen: Don't worry if you make a mistake during recording. You don't need to start over. You can delete unnecessary steps later by dragging them to the trash can icon in the Actions panel.
Editing and Refining Your Actions
After recording your action, it's essential to test and refine it.
Testing Your Action
To test your action, it's best to start with the same image you used during recording. This allows you to immediately see if it performs as intended. After a successful test on the original image, try it on a different image of similar characteristics to ensure it yields consistent results.
To play an action, select it in the Actions panel and click the "Play" button. If you've assigned a function key or key combination, you can simply use that shortcut.
Playing Specific Steps:
- If you wish to play only a single action step, hold down Cmd (Mac) or Ctrl (Windows) and double-click the specific step you want to run.
- If you select a single sub-step and hit the Play button, Photoshop will begin running the action from that selected step until the last action step.
Modifying Existing Steps
To modify a previously recorded step, unfold the action so you can see the individual steps (this requires being in Edit Mode, not Button Mode). Then, double-click the specific step you want to re-record. This will bring up the relevant dialog box for that step. After you click "OK" in the dialog, the action will stop recording again, allowing you to alter only that specific step.
Adding Extra Steps
If you realize you need to add more steps to an existing action, select the last step in the action sequence and click the "Record" button. Any new actions you perform will now be appended to the end of the current action. Click "Stop" when you're finished adding steps.
Controlling Dialog Boxes (Modal Controls)
One of the most powerful features for customizing actions is the ability to control whether dialog boxes appear during playback. By default, most dialogs are disabled for actions, meaning the action will use the settings that were recorded. However, you can choose to enable a dialog box for a specific step.
To do this, look for the small dialog icon on the left side of each action step in the Actions panel.
- Empty Box: Modal dialogs for this action/step are disabled. The action will use the standard settings used during recording.
- White Modal Control Icon: Toggling on modal dialog. This means the dialog box will appear when this step is executed, allowing you to adjust settings for the current image.
- Red Modal Control Icon: Indicates that one or more dialogs are enabled within that specific action or action set.
- Gray Modal Control Icon: Usually means modal controls are enabled, but the step, action, or action set is set to be excluded from playback.
Enabling a modal dialog is incredibly useful when you want an action to perform a task but still have the flexibility to fine-tune the settings for each individual image. For example, you might want an action to apply a blur, but you want to adjust the blur radius each time. By enabling the modal dialog for the Motion Blur step, the dialog will pop up during playback, allowing you to set the desired radius.
Excluding Action Steps From Running
Sometimes, you might want an action to perform most of its steps but skip one or two for specific images. You can exclude a particular action step by toggling off the checkbox to the far left of the action step. When a step is excluded, its checkmark icon will disappear, and a red checkmark icon will appear next to the parent action, indicating that one or more steps are not being executed.
For instance, if you have an action that applies overall sharpening, but you're working on an image with a shallow depth of field where you want to apply sharpening locally, you can exclude the overall sharpening step from the action's playback.
Advanced Actions and Their Applications
The versatility of Photoshop Actions extends far beyond simple edits. They can be used to:
- Batch Processing: Apply actions to an entire folder of images using Photoshop's Batch command (File > Automate > Batch). This is invaluable for photographers and designers who need to process large quantities of files consistently.
- Creating Complex Effects: As mentioned earlier, intricate visual effects like "Melted Gold" text or sophisticated color grading can be packaged into an action.
- Workflow Enhancements: Actions can automate tedious parts of your workflow, such as creating specific layer structures (e.g., a new layer for dodging and burning), applying adjustment layers with predefined settings, or setting up specific document properties.
- Sharpening Techniques: A common and highly useful application is creating an action for sharpening images. One effective method involves creating a new layer at the top, desaturating it, applying a High Pass filter, and then setting the layer's blend mode to "Overlay." This allows for precise control over sharpening by adjusting the layer's opacity or masking it. The radius for the High Pass filter can be set during recording or made a modal control for flexibility.
- Color Adjustments: Actions can automate color correction, apply specific color profiles, or create unique color looks. For example, an action could be created to split the color channels of an image for a stylized effect.
How to Batch Resize Photos in Photoshop in Only 2 Minutes
Saving and Loading Actions
Once you've created and refined your actions, you'll want to save them for future use or to share with others.
- Saving Actions: To save an action, select the Action Set containing the action(s) you want to save, then go to the Actions Menu and choose "Save Actions." Select a desired location on your computer and give your action file a name. Action files typically have the
.atnextension. These files are generally small, ranging from 7 to 20 KB, and are cross-platform compatible. - Loading Actions: To load saved actions, open the Actions panel, go to the Actions Menu, and select "Load Actions." Navigate to where you saved your
.atnfile and select it. The loaded actions will appear in your Actions panel, organized within their respective Action Sets.
It's best practice to create a dedicated sub-directory within your Photoshop file tree for storing custom actions. This aids in organization and ensures you can easily locate and load them when needed.
By mastering the art of creating Photoshop Actions, you unlock a significant level of efficiency and creative control. Whether you're automating simple repetitive tasks or building complex multi-step workflows, actions are an indispensable tool for any serious Photoshop user.