Procreate has emerged as an exceptional tool for interior design, offering designers a powerful platform to visualize their ideas and create stunning presentations. Whether you are an experienced designer or an enthusiast, understanding how to leverage Procreate can elevate your design game, transforming abstract concepts into tangible, visually compelling representations. This guide will walk you through the essential steps and considerations for utilizing Procreate effectively in your interior design projects, from initial concept sketching to final client-ready presentations.
Getting Started with Procreate
The journey into using Procreate for interior design begins with a few fundamental steps. First, install Procreate on your iPad, ensuring you have a compatible device. Procreate is an iOS-exclusive application, so an iPad and Apple Pencil are essential for its full functionality. Once installed, take the time to familiarize yourself with the interface. This initial exploration will empower you to create layers, effectively utilize a vast array of brushes, and employ color palettes strategically. Understanding these core components is the bedrock upon which more complex design techniques will be built.
Sketching and Prototyping Concepts
Procreate truly shines in its ability to facilitate rapid prototyping of design concepts. Start by sketching out your ideas using basic shapes and forms. This is where Procreate's intuitive drawing capabilities allow you to iterate through numerous design possibilities quickly, without the constraints and mess associated with traditional tools like pencils and paper. Don't aim for perfection at this stage; the goal is to explore different layouts, furniture arrangements, and spatial configurations. The freedom to experiment without commitment is a significant advantage.
Mastering the Art of Layers
The layering feature in Procreate is indispensable for organized and efficient interior design work. Once you have a rough layout established, utilize the layering feature to separate different elements of your design. This can include distinct layers for walls, floors, furniture, decorative items, and even lighting. This compartmentalization allows for easy adjustments and modifications to individual components without affecting the entire design. For instance, you can easily swap out a sofa on its furniture layer without needing to redraw the entire room. This granular control is crucial for presenting multiple design options to clients.
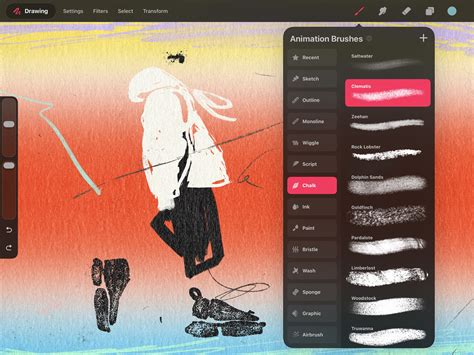
Exploring the Brush Library for Texture and Material Representation
The extensive brush library within Procreate is a treasure trove for interior designers. Explore the brush library to select suitable brushes for different textures and materials. For instance, use a watercolor brush for soft fabrics like curtains or upholstery, or a texture brush for realistic flooring materials such as wood grain or tile patterns. Experiment with various brushes to mimic the tactile qualities of different surfaces. This attention to detail helps bring your designs to life, offering a visual representation that is both detailed and appealing, communicating the intended ambiance and feel of the space.
The Crucial Role of Color Selection
Color selection is paramount in interior design, directly influencing the mood and perception of a space. Procreate’s color picker tool, along with its various color harmony features, allows you to experiment with diverse palettes until you find the perfect match for your vision. You can import color palettes from images, use the eyedropper tool to sample colors from reference photos, or create your own custom palettes. This empowers you to test different color schemes for walls, furniture, and accessories, ensuring a cohesive and aesthetically pleasing final design.
How to ACTUALLY Choose and Combine Colors for Your Home
Refining Designs with Shadows, Highlights, and Blending
Once the initial sketch and color scheme are complete, refine your design by adding shadows and highlights. These elements are critical for adding depth and dimension to your renderings, making them appear more realistic and three-dimensional. Procreate’s blending tools are exceptionally adept at achieving a more polished and realistic look, helping your designs pop off the screen. Understanding how light interacts with surfaces in a real space will inform how you apply these effects in Procreate, further enhancing the believability of your visualizations.
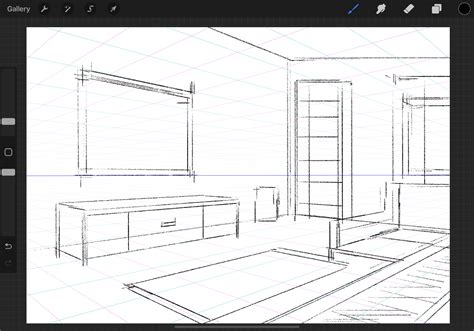
Maintaining Accuracy with Guides and Grids
In interior design, accuracy in layouts and proportions is essential. Don’t forget to utilize the grid and perspective guides available in Procreate to maintain accuracy in your layouts. These tools are invaluable for ensuring that all elements are proportionate and correctly placed within the spatial context. Whether you are working with architectural plans or creating a design from scratch, these guides provide a framework for precision, preventing common errors and ensuring that the final design is practical and visually balanced.
Exporting and Showcasing Your Work
After completing your design, the next crucial step is to export it in high resolution to share with clients or post on social media. Procreate allows for easy exporting to various formats, including PNG and JPEG, making it simple to showcase your work across different platforms. For a more dynamic presentation, you can also create animated GIFs to illustrate your design process, adding an engaging and informative element to your presentations. This can be particularly effective for demonstrating the evolution of a design from a simple sketch to a fully rendered concept.
The Power of Community and Continuous Learning
The journey of mastering Procreate for interior design is often enhanced by connecting with others. Consider joining online communities or forums dedicated to Procreate and interior design. These platforms offer a wealth of knowledge, tips, and constructive feedback that can further enhance your skills. Whether you seek inspiration for new design trends or require constructive criticism on your work, engaging with fellow designers can lead to incredible growth and a broader understanding of the possibilities within digital interior design.
How to ACTUALLY Choose and Combine Colors for Your Home
Advanced Techniques and Considerations
Beyond the foundational elements, Procreate offers advanced features that can further elevate your interior design visualizations. For instance, the ability to import 3D models or reference images can be incredibly useful for accurately depicting furniture or architectural details. You can also explore custom brush creation to develop unique textures that align with your specific design aesthetic. The use of clipping masks and layer masks provides even more control over how elements interact and are rendered, allowing for sophisticated visual effects.
Utilizing Reference Images for Realism
One highly effective technique is to leverage reference images. You can import photographs of existing spaces, furniture, or materials to use as direct references. This allows you to meticulously recreate details, capture specific lighting conditions, or accurately represent the scale and proportion of elements. By layering these references and sketching over them, or using them as inspiration for color palettes and textures, you can achieve a remarkable level of realism in your Procreate designs. This is particularly useful when trying to replicate a specific style or achieve a particular mood for a client.
Creating Mood Boards and Concept Art
Procreate is also an excellent tool for creating mood boards and concept art, which are vital in the initial stages of the design process. You can gather images, textures, color swatches, and even text snippets to create a cohesive visual representation of the intended design direction. This helps in communicating the overall aesthetic and feeling of the project to clients and stakeholders before diving into detailed renderings. The flexibility of Procreate allows for a dynamic and iterative approach to mood board creation, making it easy to refine the concept as the project evolves.
Incorporating Text and Typography
While primarily a visual medium, Procreate also allows for the integration of text and typography. This can be useful for adding labels to different elements in your design, including project titles, room names, or even brief descriptive notes. The ability to import custom fonts further expands the creative possibilities, allowing you to match the typography to the overall style of your design. This adds another layer of professionalism and clarity to your presentations.
Understanding Perspective and Scale
A deep understanding of perspective and scale is crucial for convincing interior design visualizations. Procreate’s perspective guides are invaluable, but it’s also important to develop an intuitive sense of how objects appear at different distances and angles. Regularly studying architectural drawings and real-world spaces can significantly improve your ability to accurately represent scale and proportion in your digital work. This attention to detail ensures that your designs are not only aesthetically pleasing but also practically feasible.
File Management and Organization
As your Procreate projects grow in complexity, effective file management becomes increasingly important. Develop a consistent naming convention for your layers and your artwork files. Consider organizing your work into folders within Procreate or on your iPad’s file system. This will save you time and frustration when you need to revisit or modify older projects. Backing up your work regularly to cloud storage or an external drive is also highly recommended to prevent data loss.
Integrating with Other Design Software
While Procreate is a powerful standalone tool, it can also be integrated into a broader design workflow. Designs created in Procreate can be exported and further refined in other software, such as Adobe Photoshop or Illustrator, for more advanced editing or for inclusion in larger project files. This interoperability allows you to leverage the strengths of different applications to achieve the best possible results. For instance, you might use Procreate for initial sketching and mood boarding, then move to CAD software for precise architectural plans, and finally use Procreate again for rendering and client presentations.
The Future of Digital Interior Design Visualization
The capabilities of digital tools like Procreate are constantly evolving, pushing the boundaries of what is possible in interior design visualization. As technology advances, we can expect even more sophisticated features, potentially including real-time rendering, augmented reality integration, and more advanced simulation capabilities. Procreate is at the forefront of this evolution, providing designers with increasingly powerful and accessible tools to bring their visions to life. Staying updated with new features and exploring innovative ways to use them will be key for designers looking to remain competitive in this dynamic field.
The ability to quickly iterate on ideas, experiment with different styles, and present polished, professional visuals makes Procreate an indispensable asset for any modern interior designer. By mastering its features and continuously exploring its potential, you can transform your design process and deliver exceptional results for your clients.