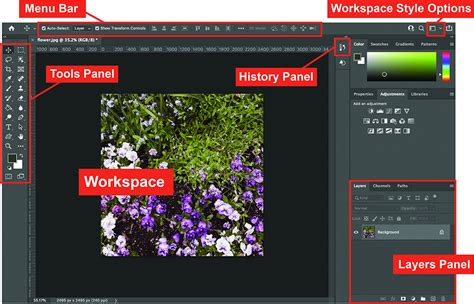
Photoshop offers a powerful and accessible toolkit for digital artists to imbue their creations with a touch of magic. One of the most captivating effects achievable within the software is the creation of dynamic sparkle trails. This tutorial will guide you through the process of crafting your very own custom sparkle brush from scratch, leveraging Photoshop's inherent flexibility. Subsequently, you will learn to wield this custom brush to add a breathtaking, ethereal sparkle trail to any photograph, transforming ordinary images into scenes of wonder. The methods detailed here have been updated for compatibility with Photoshop CC but remain fully functional for users of Photoshop CS6.
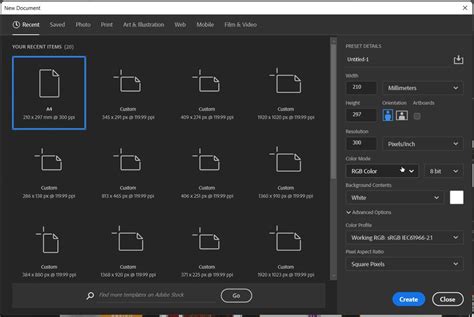
The journey begins with the creation of the sparkle brush itself. This involves establishing a new, appropriately sized canvas within Photoshop. The "New Document" dialog box, which may appear in a redesigned format in Photoshop CC or a traditional layout in CS6, serves as the entry point. For brush creation, a square document is ideal. Set both the Width and Height to 200 Pixels. The Resolution setting is primarily for print and does not impact on-screen display, so it can be disregarded. Crucially, ensure that the Background Contents are set to White.
Upon generating the new document, the Brush Tool, accessible via the Toolbar on the left or by pressing the 'B' key, becomes essential. Before proceeding, it is vital to set the brush color to black. Photoshop utilizes the current Foreground color for brush strokes. A quick way to achieve this is by pressing the 'D' key on your keyboard, which resets the Foreground color to black and the Background color to white.
The essence of our custom sparkle brush lies in a carefully curated selection of Photoshop's built-in brushes. This allows for a diverse and visually appealing sprinkle of light. The primary Brush panel, accessed through the Brush tool, is where these selections are made. For easier navigation, switch the view from thumbnails to a list format, choosing either "Small List" or "Large List."
The first component of our sparkle effect can be found by scrolling through the Brush Presets panel to locate the "Star 70 Pixels" brush. Once selected, a few clicks on random spots within your document will lay down the initial "sparkles."
To introduce further variety, we will incorporate brushes not present in the default set. This necessitates loading additional brush sets included with Photoshop. Within the Brush panel menu, you'll find a list of other available brush sets. Selecting a set, such as "Round Brushes with Size," will prompt a question about replacing current brushes; confirm by clicking "OK." With the new set loaded, find the "Airbrush Soft Round 17" brush. Similar to the previous step, click in a few random areas to add more sparkle elements. The nature of an airbrush means that holding the mouse button down after clicking will cause the brush shape to expand and fill in towards its edges, adding depth.
A third brush will further enhance the complexity of our sparkle. Navigate to the "Assorted Brushes" set. Once loaded, locate and select the "Starbust - Small" brush. After applying these selected brushes, your document will be populated with a variety of sparkle elements. The final step in brush creation is to save this composite design. Photoshop will present a dialog box for naming your new brush. Upon confirmation, your custom sparkle brush is ready for use. You can now close the document used for its creation.
How to Make Photoshop Brushes
With the sparkle brush meticulously crafted, the next phase involves its application to a photograph to create a magical sparkle trail. Open the image you intend to enhance. To ensure non-destructive editing, it is paramount to work on a separate layer. Create a new blank layer above your original image layer. This "Layer 1" will house the sparkle trail.
The sparkle trail's visual appeal is significantly enhanced by using white as the Foreground color. If your Foreground and Background colors are not already set to their defaults (black and white, respectively), press 'D' on your keyboard to reset them.
Before painting, configuring Photoshop's dynamic brush controls is crucial for achieving the desired trail effect. Access the Brush Settings panel, where various categories of brush controls are listed on the left. Begin by selecting "Shape Dynamics." Within this category, the "Size Jitter" slider influences the variation in brush tip size. More importantly, the "Control" option, technically the "Size Control," dictates how the brush size behaves during painting. Change this setting to "Fade." This adjustment causes the brush size to gradually diminish to zero as you paint a stroke, based on the specified number of "steps" (defaulting to 25).
Further refining the "Shape Dynamics" settings, increase the "Angle Jitter" to 100% to introduce random rotations of the brush tip, enhancing the organic feel of the sparkles. Adjust the "Opacity Jitter" to 50% for variations in the transparency of individual sparkles. At the bottom of the "Shape Dynamics" section, set the "Spacing" value to 50%. Spacing controls the distance between successive brush dabs, directly influencing the perceived density and length of the sparkle trail.

With the custom sparkle brush selected, the dynamic brush controls configured, a new layer prepared, and the Foreground color set to white, the creative process can commence. Position the brush cursor at the intended origin of the sparkle trail. This might be an object or area from which you want the magical effect to emanate, such as a wand or a star. Adjusting the brush cursor size to match the scale of the originating element is often necessary. Keyboard shortcuts, specifically the left and right bracket keys ('[' and ']'), offer a swift method for resizing the brush.
To paint the sparkle trail, press and hold the mouse button and drag in the desired direction. As you move, Photoshop will dynamically alter the brush size, causing it to fade out and eventually disappear, creating a seamless trail. The "Fade" setting in "Shape Dynamics" is responsible for this gradual diminution.
Perfection on the first attempt is not expected. If the trail fades too quickly or not rapidly enough, use Ctrl+Z (Windows) or Command+Z (Mac) to undo the stroke. Revisit the Brush Settings panel to adjust the "Fade" value in "Shape Dynamics" or modify the "Spacing" value to alter the trail's overall length and density.
To enrich the sparkle trail, consider painting multiple strokes or layering effects. For instance, to concentrate more sparkles near the origin, reduce the brush size and paint shorter strokes. Small clicks directly on the source can add concentrated points of light.

The sparkle trail, residing on its dedicated layer, can be further enhanced. To introduce a subtle glow, duplicate the layer containing the sparkle trail (by dragging it onto the "New Layer" icon in the Layers panel). Apply a Gaussian Blur filter to this duplicate layer. The "Gaussian Blur" dialog box allows for precise control over the blur intensity via the "Radius" slider. Adjusting this value will soften the edges of the sparkles, creating a diffused light effect. The optimal "Radius" value will depend on the image's resolution and size; typically, a value between 15 to 20 pixels works well for larger images.
To add color to this diffused glow, utilize the "Outer Glow" layer style. Access this by double-clicking on the blurred layer to open the Layer Style dialog box. Within the "Outer Glow" options, set the "Opacity" to 100% initially for easier color selection. Choose your desired glow color from Photoshop's Color Picker. Once the color is selected, return to the Layer Style dialog and reduce the "Opacity" to achieve a more subtle and integrated glow effect.
With these steps completed, the magical sparkle trail is fully realized, adding a captivating and enchanting element to your photograph. This process showcases Photoshop's versatility, enabling the creation of unique visual effects from fundamental tools and settings.
The visual phenomena of sparkles, fireflies on a country evening, shooting stars swirling through a wintry night sky, or the vibrant bursts of fireworks and sparklers on the Fourth of July, all share a common thread: they emit light, evoke wonder, and imbue scenes with a palpable sense of magic. Capturing this luminous quality in photography can present a creative challenge. It is important to note that Photoshop does not include a specific "sparkle" or "glitter" brush as a default feature. Star brushes, and custom brushes designed to mimic such effects, offer a unique avenue for artists to introduce flares, radiant lights, and an atmospheric depth to their images. Within the professional Photoshop community, a vast array of custom brushes has been developed for Creative Cloud applications. These brush sets, often created by talented illustrators and graphic designers, can generate a multitude of effects including blur, glow, motion, and light. Photoshop's core philosophy is centered around creation, and this extends to the ability to both generate and personalize your own brushes.
The process of creating a custom brush can also involve selecting a specific part of an image using a selection tool and then converting that selection into a brush preset via Layer > New Adjustment Layer > Invert, followed by adjusting various brush settings like tip size, shape dynamics, spacing, and scattering.
The aesthetic of "bokeh," characterized by out-of-focus city lights or raindrops captured with a shallow depth of field, represents another classic visual effect that can be conceptually related to the diffusion and glow achieved with sparkle brushes. While not directly part of the sparkle trail creation, understanding such effects can inform artistic choices.
Numerous pre-made brush sets exist, such as "20 Sparkler PS Brushes abr," "20 Magic Dust PS Brushes abr," "20 Glitter PS Brushes abr," and "20 Stage Laser PS Brushes abr," which can provide alternative starting points or complementary elements for achieving similar luminous and sparkling effects. These pre-made resources highlight the broad spectrum of possibilities within Photoshop for manipulating light and creating atmospheric enhancements.