Adobe InDesign is a powerhouse for professional layout and design, enabling the creation of everything from intricate magazines to dynamic digital publications. A fundamental yet powerful technique within InDesign is the use of clipping masks. These masks allow designers to precisely control the visibility of images and graphics, shaping them into custom forms and creating visually striking compositions. This guide delves into the various methods of creating clipping masks in InDesign, offering a step-by-step approach for users of all skill levels.
Understanding Clipping Masks and InDesign
Before diving into the practical application, it's essential to grasp what a clipping mask is and why InDesign's approach is unique.
What is a Clipping Mask?
A clipping mask is a design technique used to control the visibility of an object or a group of objects. Essentially, it uses the shape of one object-the "mask"-to determine which parts of another object-the "masked object"-will be visible. Anything outside the boundaries of the mask is hidden, while the content within the mask's shape remains visible. This is a non-destructive editing method, meaning the original image or graphic remains intact, and its hidden portions can be accessed and repositioned later. Clipping masks are invaluable for cropping images into specific shapes, creating sophisticated text effects, designing unique layouts, and integrating multiple design elements seamlessly.
What is InDesign?
Adobe InDesign is a professional desktop publishing and layout design software developed by Adobe Systems. It is the industry standard for creating print and digital media, including magazines, newspapers, brochures, posters, eBooks, and interactive PDFs. InDesign is specifically engineered with robust tools and features tailored for layout design, precise typesetting, and comprehensive graphic design workflows, making it the go-to application for designers producing polished, professional documents.
The Inherent Masking Power of InDesign Frames
In InDesign, a core principle is that most objects, particularly images and graphics, are placed within frames. Interestingly, these frames themselves function as inherent clipping masks. This fundamental characteristic means that InDesign doesn't require a separate, explicit "clipping mask" command as found in some other Adobe applications like Photoshop. Instead, the frame's shape dictates the visible area of its content.
This built-in functionality allows for independent manipulation of the frame and its content. You can move the image within the frame, resize the image, or reshape the frame itself, all while maintaining the clipping mask effect. This makes InDesign's approach to masking remarkably intuitive and efficient for layout tasks.
Step-by-Step: How to Create a Clipping Mask in InDesign
InDesign offers several flexible ways to create clipping masks, catering to different design needs and complexities. The primary methods involve using built-in frame tools, custom vector shapes, and even typography.
A. Clipping Masks Using the Frame Tool
The most straightforward method involves using InDesign's dedicated Frame Tools. These tools are designed to hold content and, by their nature, act as masks.
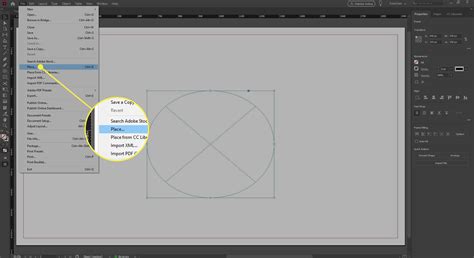
Step 1: Prepare Your Document and ImageLaunch Adobe InDesign and open your existing document or create a new one. Navigate to "File" > "Place" and select the image or graphic file you wish to use. This will place the image into your document, typically within a default rectangular frame.
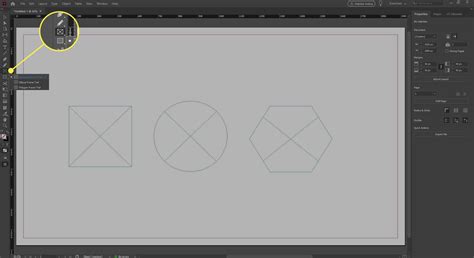
Step 2: Select a Frame Shape ToolFrom the Tools panel, choose a Frame Tool. You can select the Rectangle Frame Tool, Ellipse Frame Tool, Polygon Frame Tool, or the specific shape frame tools if you need a pre-defined shape.
Step 3: Draw Your Frame ShapeClick and drag on your document to draw the frame in the desired size and position. This shape will serve as your clipping mask.
Step 4: Place or Adjust the Image Within the FrameIf you haven't placed your image yet, with the frame selected, go to "File" > "Place" and select your image. If the image is already in your document, you can "cut" it (Edit > Cut) and then select your newly drawn frame and use "Edit" > "Paste Into."
Step 5: Adjust Image Placement and SizeUse the Selection Tool (the black arrow) to select the frame. You can then click and drag the content (the image) inside the frame to reposition it. To resize the image within the frame, select the image content (by clicking on it once with the Selection Tool, or by clicking the content grabber circle) and drag its bounding box. You can also use the "Object" > "Fitting" options for quick adjustments like "Fit Frame Proportionally."
Step 6: The Frame as the Clipping MaskOnce the image is placed inside the frame, the frame automatically acts as the clipping mask. Any part of the image extending beyond the frame's boundaries will be hidden. You can continue to adjust the frame's shape or size, and the visible portion of the image will update accordingly.
Tip: InDesign uses frames as masks by default. Placing an image inside any frame shape automatically creates a clipping mask effect, controlling which parts of the image remain visible.
B. Clipping Mask Using Customized Frame Shapes in InDesign
For more complex or unique shapes, InDesign's Pen Tool and other drawing tools allow you to create custom vector paths that can then serve as clipping masks.
Step 1: Prepare Your DocumentOpen your InDesign document.
Step 2: Select the Pen Tool or Shape ToolsChoose the Pen Tool from the Tools panel to draw custom paths, or utilize the Rectangle, Ellipse, Polygon, or Line tools to create basic shapes.
Step 3: Draw Your Customized ShapeClick and drag to create anchor points and define segments, drawing the precise shape you need for your mask. You can create complex vector paths with the Pen Tool, or combine basic shapes using the Pathfinder panel (Window > Object & Layout > Pathfinder) to create more intricate forms.
Step 4: Prepare to Insert the ImageOnce your custom shape is created, select the image you want to mask. You can either "cut" the image (Edit > Cut) or simply have it ready to be placed.
Step 5: Insert the Image into the ShapeWith the custom shape selected, navigate to "File" > "Place" and choose your image. Alternatively, if you have the image already placed elsewhere, cut it, then select your custom shape and use "Edit" > "Paste Into."
Step 6: Adjust Image Placement and SizeSimilar to using frame tools, use the Selection Tool to select the masked group. You can then click on the image content within the shape to reposition or resize it. Double-clicking on the anchor points of the shape with the Direct Selection Tool (white arrow) allows you to edit the mask's outline precisely.
Step 7: Layer Order (If Necessary)Ensure the image is positioned correctly within the layer stack. Typically, "Paste Into" handles this automatically. If not, select both the shape and the image, go to "Object" > "Arrange," and choose "Send to Back" for the image if it's on top.
Step 8: The Shape as the Clipping MaskYour customized vector shape now acts as the clipping mask, revealing only the portion of the image that falls within its boundaries. You can move, resize, or reshape the custom path, and the image will dynamically adjust within the masked area.
Benefit: One of the significant benefits of creating your own shapes for masking is the ability to precisely edit the mask's boundaries using anchor points. With the Direct Selection tool, you can double-click an anchor point and move it to refine the shape of your mask.
C. Clipping Mask Using Typeface (Text) in InDesign
A popular and creative application of clipping masks is to fill text with images, creating striking typographic effects.
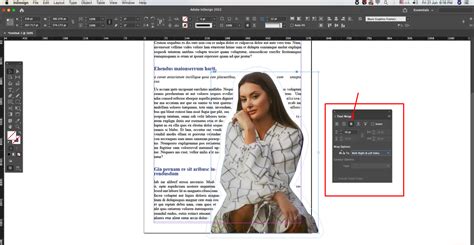
Step 1: Create Your TextUse the Text Tool (T) to create your desired text. Select your typeface, font size, and enter your content.
Step 2: Convert Text to OutlinesWith the text frame selected using the Selection Tool (black arrow), go to "Type" > "Create Outlines." This converts the editable text characters into vector shapes, which can now function as a mask.
Step 3: Prepare and Insert the ImageHave the image you want to use ready. You can either "cut" the image (Edit > Cut) or simply be prepared to place it.
Step 4: Paste the Image into the Text OutlinesSelect the outlined text. Then, go to "Edit" > "Paste Into." The image will automatically be placed and masked within the shapes of your text characters.
Step 5: Adjust Image Position and FitOnce the image is pasted into the text, you can adjust its position within the text shapes. Select the masked text object, and then click once on the image content to move it. For overall fitting, right-click on the text object, navigate to "Fitting," and choose options like "Fit Frame Proportionally" or "Fit Content Proportionally" to ensure the image is scaled appropriately within the text boundaries.
Tip: If the image doesn’t fit perfectly into your text, right-click on the text and select "Fitting" > "Fit Frame Proportionally." This helps to ensure the image is scaled appropriately within the text boundaries.
Quick Answer: How to Create a Clipping Mask in InDesign
To create a clipping mask in InDesign, draw a frame shape using a Frame Tool or create a custom vector shape. Place your image inside this frame or shape using "File" > "Place" or by "cutting" an existing image and using "Edit" > "Paste Into" with the frame/shape selected. Adjust the image within the frame using the Selection Tool. The frame or shape automatically acts as the mask, displaying only the area inside its boundaries.
Advanced Techniques and Considerations
Beyond the basic methods, several advanced techniques and considerations can enhance your use of clipping masks in InDesign.
Using Multiple Shapes as a Clipping Mask
You can combine multiple shapes to create a more complex clipping mask.
- Create Shapes: Draw all the individual shapes you intend to use for your mask.
- Group or Compound Path:
- Grouping: Select all the shapes and go to "Object" > "Group."
- Compound Path: Select all the shapes and go to "Object" > "Paths" > "Make Compound Path." A compound path can be more flexible for certain masking operations.
- Paste Into: With the grouped or compound path selected, "cut" your image and use "Edit" > "Paste Into." The image will then be masked by the combined area of your shapes.
This technique is useful for creating intricate designs where a single shape isn't sufficient. For instance, you could group several geometric shapes to form a mosaic-like mask.
Editing Masked Content
A significant advantage of InDesign clipping masks is their non-destructive nature.
- Editing the Mask: Select the masked group. Click once with the Selection Tool to select the mask shape itself. You can then move, resize, or reshape the mask.
- Editing the Content: Select the masked group. Click a second time on the image content (or use the content grabber) to select the image inside. You can then move or resize the image independently of the mask.
- Editing Anchor Points: Use the Direct Selection Tool (white arrow) to select anchor points on the mask shape and edit its contours precisely.
Clipping Paths vs. Clipping Masks in InDesign
While the terms are sometimes used interchangeably, it's important to note InDesign's specific terminology.
- Clipping Mask (InDesign's primary method): This is achieved by placing an image inside a frame or vector shape. The frame/shape acts as the visible boundary.
- Clipping Path (More common in Photoshop, but has InDesign relevance): In InDesign, a clipping path is an editable vector path that can be used to define the visible area of an image. You can import images that already have a clipping path defined in software like Photoshop. When you place such an image in InDesign, you can choose to use that path for masking. This is often found under "Object" > "Clipping Path" > "Options."
3 EASY InDesign Clipping Techniques You Should Know | Episode 2
Considerations for Image Quality and File Types
- Resolution: Always use high-resolution images for your designs. When an image is masked, only a portion is visible, but if that portion is too small or the original image is low-resolution, the visible area can appear pixelated or fuzzy.
- File Types: InDesign generally handles common image file types (JPEG, PNG, TIFF, PSD, AI, EPS) well. However, certain vector file types (like some complex SVGs) or specific CMYK PNGs might occasionally present compatibility issues.
- Solid Colors: InDesign clipping masks often work best with solid color or black and white fills for the mask shape itself, ensuring clean edges.
InDesign vs. Photoshop Clipping Masks
It's worth noting the difference in workflow between InDesign and Photoshop:
- InDesign: Primarily uses frames and vector shapes as masks. Placing content into a frame or shape is the core mechanism.
- Photoshop: Has a dedicated "Clipping Mask" command where you place one layer above another, and the top layer masks the bottom layer. Photoshop also utilizes paths and layer masks more extensively for pixel-level manipulation.
While the end result can be similar, the process in InDesign is more integrated with its layout-centric frame-based system.
Conclusion: Unleashing Creative Potential
Mastering clipping masks in InDesign is a fundamental skill that significantly expands your design capabilities. Whether you're using simple frame tools, intricate custom shapes, or creative text effects, clipping masks provide precise control over image visibility, enabling professional and visually compelling layouts. The ability to easily edit both the mask and the masked content makes it a flexible and powerful technique for any designer working with Adobe InDesign. By practicing these methods, you can elevate your designs and create truly unique and eye-catching compositions.
Frequently Asked Questions
How do you create a clipping mask in InDesign?To create a clipping mask in InDesign, draw a frame shape using the Frame Tool or create a custom vector shape. Place your image inside this frame or shape using "File" > "Place" or by "cutting" an existing image and using "Edit" > "Paste Into" with the frame/shape selected. Adjust the image within the frame using the Selection Tool. The frame or shape automatically acts as the mask, displaying only the area inside its boundaries.
Can you make a clipping mask in InDesign like Photoshop?InDesign does not use a separate "clipping mask" command like Photoshop. Instead, it uses frames and vector shapes as masks. Placing an image inside a frame or shape automatically creates the masking effect.
How do you mask an image in InDesign?To mask an image in InDesign, create a frame using a shape tool or draw a custom vector shape. Place your image into that frame or shape and reposition it as needed. Only the portion of the image inside the frame remains visible.
What is the shortcut for clipping mask in InDesign?InDesign doesn’t have a dedicated clipping mask shortcut. However, you can quickly place an image into a frame using Ctrl + D (Windows) or Command + D (Mac) to import your image into the selected frame. For pasting into a shape, "Edit" > "Paste Into" is the command.
How is a clipping mask different from cropping in InDesign?Cropping permanently trims part of an image, removing pixels outside the crop area. A clipping mask, however, only hides areas outside the frame or shape; the hidden parts of the image remain intact and can be repositioned or revealed later.
Where is the clipping mask option in InDesign?There is no separate "clipping mask" menu in InDesign. Frames and vector shapes themselves act as clipping masks. Placing an image inside any frame shape or vector path automatically creates the effect. For imported images with pre-defined paths, the "Clipping Path" options are under "Object" > "Clipping Path."
Can you use multiple shapes as a clipping mask in InDesign?Yes, you can group multiple shapes together or create a compound path from them, and then use this combined shape as a single clipping mask for an image.