Adobe Photoshop's Brush Tool is a cornerstone of digital art and design, offering unparalleled flexibility and creative control. This in-depth tutorial series aims to demystify the intricacies of Photoshop brushes, starting with the fundamental knowledge required to build a strong foundation. Part 1 of this series will focus on the essential settings and options available within the Brush Tool and its associated panels, empowering both beginners and seasoned artists to harness their full potential.
Accessing and Understanding the Brush Options Toolbar
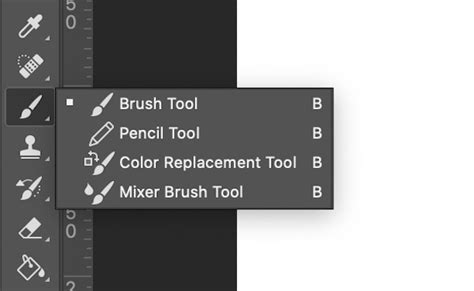
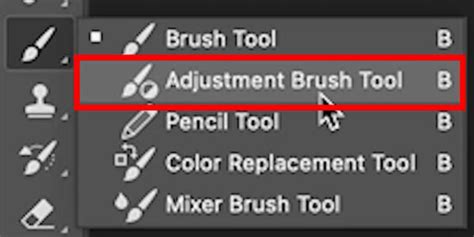
Clicking the brush icon in the toolbar, or pressing the 'B' key (if default hotkeys are active), reveals the Brush Options Toolbar. This is your primary interface for interacting with brushes. From here, you can assign a color to your brush tip using the Color Picker, and access a multitude of other settings that profoundly influence how your brush strokes appear on the canvas.
The Brush Preset Picker: Your Gateway to Brush Selection
One of the most prominent features in the Brush Options Toolbar is the Brush Preset Picker. This is where you choose your desired brush. Photoshop 2022, for instance, comes with several default brush folders, many of which are expertly crafted by Kyle T. Brushes are essentially digital stamps, and the preset picker allows you to browse and select from a vast library of these stamps. The menu behind the gear icon within the Brush Preset Picker has undergone significant changes in recent Photoshop versions, with some options serving as toggles for the picker itself. You can also adjust the size of the preview within this picker to better visualize your chosen brush.
Essential Brush Settings: Size, Opacity, and Flow
Brush Size: Adjusting the size of the brush tip is a fundamental operation. You can do this directly within the Options Bar. For expedited adjustments, Photoshop offers convenient hotkeys: the bracket keys ([ and ]) by default, or by holding Alt/Option and dragging your mouse.
Opacity: This setting controls the transparency of your brush strokes. A lower opacity number results in more transparent strokes, while a higher number leads to more opaque marks. Opacity determines the "coat" of paint laid down with each single stroke until you lift your stylus or mouse.
Flow: Flow is a more nuanced setting, designed to mimic traditional painting more accurately. Think of it as a smoother, more gradual version of opacity, specifically for painting. While opacity applies a full coat of color at its set level in one pass, flow allows for a build-up of color with repeated strokes over the same area. Working with a low flow setting creates a distinct "painterly" effect, where layering strokes produces a subtle pattern of overlapping streaks-a hallmark of digital art. Some specialized media brushes have programmed Flow functions that can more accurately replicate the behavior of traditional tools like pencils when used lightly, or nearly dry paintbrushes. For instance, with certain brushes, as Kyle T. has noted, if you're painting, it's often recommended to leave flow at 100% and use pressure to control flow and size instead. The Pressure-Flow control setting is found within the Transfer section of the Brush Settings panel, which will be covered in a later installment of this series.
Build Up (Simulating Airbrushing): The "Build Up" setting, often associated with airbrush simulation, determines whether the brush continues to paint even when stationary. With this off, holding your stylus in one spot with a low flow setting will produce a single, pale dot. However, with Build Up enabled, holding the stylus in place will continuously spray color until it reaches 100% opacity, much like a traditional airbrush.
Blending Modes: Adding Depth and Dimension
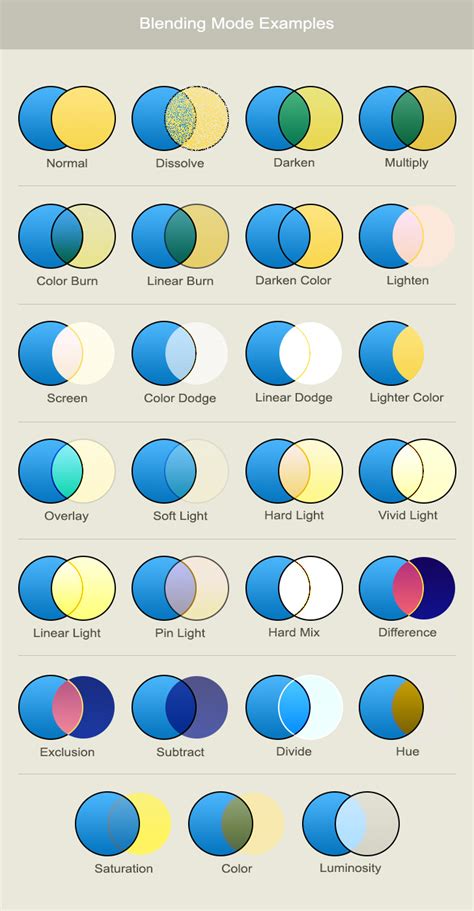
Just as layers have blending modes, so too do brushes. The critical distinction is that brush blending modes are destructive. Once applied, they cannot be altered like layer blending modes. These modes dictate how the color you're painting interacts with the existing pixels on the canvas. Common modes like Multiply, Screen, Overlay, and others offer a vast palette for creative expression, allowing for sophisticated color interactions and effects.
Brush Smoothing: Achieving Fluid Strokes
Photoshop's smoothing engine aims to create more fluid and consistent brush strokes. The default smoothing works similarly to other digital art software, where a higher percentage generally results in smoother lines. Photoshop's engine, however, has unique modifiers. The "Pulled String Mode" is a somewhat misleading name, as all smoothing in Photoshop utilizes an invisible "pulled string" whose length increases with the smoothing percentage. To visualize this, you can enable "Show Brush Leash" in the Cursors preferences (Edit > Preferences > Cursors > Show Brush Leash). This will make the string visible, allowing you to observe how it influences your strokes. The smoothing percentage can also be adjusted using the number keys on your keyboard for quick adjustments.
Brush Angle and Dynamics: Precision and Variation
Brush Angle: For precise control, you can set the exact angle of your brush tip by entering a numerical value in degrees or by clicking and dragging the associated icon. This offers far greater precision than the arrow found in the Brush Preset Window. Understanding why you'd want to change the brush angle opens up possibilities for creating directional textures and patterns that align with your artwork's flow.
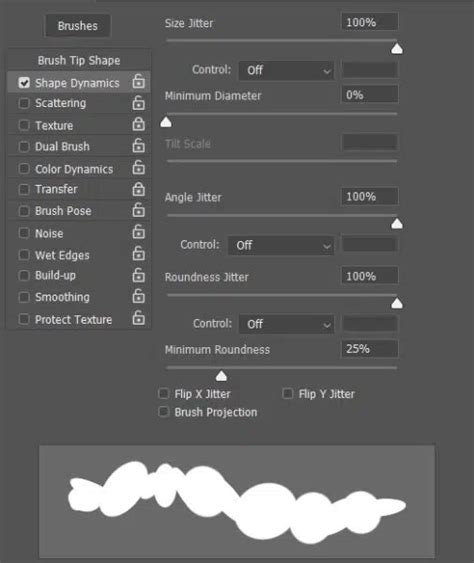
Shape Dynamics: This crucial setting within the Brush Settings panel allows for dynamic control over various aspects of the brush tip as you paint. This includes Size, Angle, Roundness, and Axis jitter. By setting the "Control" dropdown for these options to "Pen Pressure" (if using a tablet), "Pen Tilt," or "Stylus Wheel," you can introduce organic variation to your strokes, making them feel more natural and less mechanical. For instance, the Hard Round brush and many others default to using pen pressure for size. However, many other brushes do not, making Shape Dynamics essential for nuanced control.
Symmetry Painting: Creating Mirrored Designs
Photoshop offers powerful symmetry painting tools that replicate your brush strokes across various axes. Options like Vertical, Horizontal, Diagonal, and Curve mirror the drawing in a straightforward manner. Dual Axis replicates strokes in quadrants, while Parallel Lines create repetitions in columns. Radial and Mandala modes allow you to define a number of axes and replicate your stroke multiple times around a central point, perfect for creating intricate patterns and mandalas.
Paint In Symmetry | Photoshop CC 2018 Tutorial (NO PLUGIN)
Beyond the Toolbar: The Brush Settings Panel
While the Brush Options Toolbar provides essential controls, the true depth of Photoshop's brush engine lies within the Brush Settings panel (Window > Brushes). This panel is the "big brother" to the Brush Preset picker, offering granular control over every aspect of a brush's behavior.
Brush Tip Shape: This section allows you to select a base brush tip and control its fundamental properties. * Spacing: This setting determines the distance between the individual "stamps" of your brush tip as you create a stroke. A lower spacing creates a smoother, more continuous line, while higher spacing reveals the individual stamps, useful for creating textured or patterned effects. For a smooth stroke, the default spacing is often too high and should be reduced. * Hardness: This controls the sharpness of the brush tip's edge. A hard edge is crisp, while a soft edge is feathered and blends more gradually.
Dual Brush: This advanced feature allows you to combine two different brush tips, creating complex and unique marks. The second brush's texture is applied within the stroke of the primary brush, and only where both strokes intersect will paint be applied.
Texture: This setting allows you to apply a pattern to your brush strokes, simulating painting on textured surfaces like canvas or paper. You can select from a library of patterns and control their scale. The "Texture Each Tip" option ensures that each individual stamp of the brush receives a fresh application of the texture.
Scattering: Scattering introduces randomness to the placement of brush marks. You can control scattering along the X and Y axes, and the "Count Jitter" adds randomness to the number of marks within a stroke, creating a dispersed effect.
Color Dynamics: This fascinating setting allows for variation in the color of your brush strokes. * Hue Jitter: Introduces random variations in the hue of the color being applied. * Saturation Jitter: Adds randomness to the saturation of the color. * Brightness Jitter: Varies the brightness of the color within a stroke. These jitter settings can be controlled by factors like "Pen Pressure," "Fade," or "All Layers," allowing for subtle or dramatic color shifts within a single stroke.
Transfer: This section, which includes "Pen Pressure" controls for opacity and flow, offers further refinement of how your brush interacts with the canvas, especially when using a graphics tablet.
Noise: Adding noise to your brushwork can create a more textured and visually interesting effect, subtly altering the pixels within the stroke.
Wet Edges: This option simulates the effect of watercolor or gouache paint, where pigment builds up along the edges of a stroke, leaving the center slightly lighter.
Build-up: As mentioned earlier, this simulates airbrush behavior, where paint accumulates with sustained pressure.
Smoothing: This advanced smoothing option in the Brush Settings panel provides further control over stroke smoothness, working in conjunction with the smoothing setting in the Options Bar.
Protect Texture: When working with textured brushes, this option ensures that the same pattern and scale are applied to all brush presets that utilize texture, regardless of their individual settings.
Creating Custom Brushes: Unleashing Your Creativity
One of Photoshop's most powerful features is the ability to create custom brushes from any image or shape. This process unlocks a universe of unique artistic possibilities.
Step 1: Prepare Your Brush Tip ImageFind an image or create a shape you wish to turn into a brush. For example, an image of birds. You'll need to isolate the desired element and remove any background. This can be done using the Eraser Tool or Layer Masks. The key principle is that white areas in your source image will become transparent in the brush, while black areas will be opaque.
Step 2: Define the Brush PresetWith your isolated image ready, select the Brush Tool. Then, either right-click (Windows) or Control-click (Mac) within your document to open the Brush Preset picker. Navigate to the bottom of the picker and select "New Brush Preset."
Step 3: Name and Save Your BrushA dialog box will appear, prompting you to name your new brush. Ensure "Include Tool Settings" is checked if you want to save current brush settings like opacity and flow along with the tip shape. Click OK to save. Your new custom brush will now appear in the Brush Preset picker, ready for use.
Important Considerations for Custom Brushes:
- Size: Photoshop allows brushes up to 2500x2500 pixels. However, creating brushes at this size is often unnecessary and can strain your system's resources. For typical work, much smaller dimensions are recommended. The size at which you create the brush becomes its default size.
- Resolution Independence: Custom brushes are pixel-based. While they remain crisp when scaled down, enlarging them significantly beyond their default size can lead to softness and a loss of detail. It's best to create brushes at a size that suits your intended use, with a little trial and error.
- Grayscale Nature: Remember that Photoshop brushes are grayscale. White areas become transparent, and black areas are opaque. Shades of gray create varying levels of transparency.
Installing and Managing Brushes
To use downloaded or custom-made brushes, you first need to install them.
- Navigate to the location where you extracted the brush set.
- Select the
.abrfile (the standard Photoshop brush file format). - You can typically double-click the
.abrfile to install it directly into Photoshop, or use the Import Brushes option within the Brush Settings panel.
Managing Brush Presets: The Brush Settings panel also allows for robust brush management. You can organize brushes into folders, rename them, delete unwanted ones, and load or save entire brush sets.
Lazy Nezumi Pro: An Alternative Smoothing Tool
For users of older Photoshop versions that lacked integrated brush smoothing, or for those seeking advanced stabilization, a third-party plugin called Lazy Nezumi Pro is available. While it comes with a cost, its advantage lies in its compatibility with a wide range of graphics applications, not just Photoshop. This makes it a valuable tool for artists who switch between different software.
Practice and Experimentation
The true mastery of Photoshop brushes comes through consistent practice and experimentation. Don't be afraid to explore the vast array of settings, create your own unique brushes, and push the boundaries of what's possible. Understanding these foundational elements is the first step towards unlocking the full creative potential of Adobe Photoshop for your digital art and design projects.