Photoshop, a powerhouse of digital image manipulation, harbors a vast array of tools, many of which remain underutilized even by seasoned designers. Among these often-overlooked gems is the Dodge tool. This potent instrument, alongside its complementary counterpart, the Burn tool, offers a nuanced approach to image editing, allowing for the creation of remarkable depth and rich texture. While other adjustments might alter brightness or hue universally, potentially leading to a flat aesthetic, Dodge and Burn enable selective manipulation, carving out contours, shadows, and highlights to imbue photographs with a captivating, almost three-dimensional quality.
The Art of Selective Lightening
At its core, the Dodge tool functions by selectively lightening specific pixels within an image. This capability is crucial because it allows photographers to emulate the masterful use of light seen in classical painting, where artists like Caravaggio employed light and shadow to create profound richness, texture, and depth. Photography, often described as "painting with light," can achieve similar artistic effects, but instead of a paintbrush, it utilizes the literal manipulation of light.
In scenarios where perfect studio lighting is not feasible, or when shooting in natural environments, the Dodge tool becomes indispensable. It empowers users to precisely introduce highlights and lowlights, thereby enhancing richness and depth, even on subjects not perfectly illuminated. This can transform a photograph from a simple representation into an artistic statement, drawing the viewer's eye to specific points of interest.
Bringing Black and White Images to Life
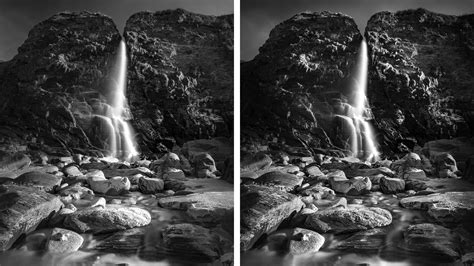
While both Dodge and Burn can enrich color photographs, their impact is perhaps most profound on black and white images. Many monochrome photographs can suffer from a lack of true contrast, appearing as a muted spectrum of grays. The Dodge tool can elevate these images by transforming dull grays into crisp, vibrant whites, adding a boldness that revitalizes the entire composition. When judiciously applied alongside the Burn tool, Dodge has the power to elevate the most mundane black and white photograph into a striking work of art.
Highlighting Subjects and Accentuating Details
Beyond its broad applications in contrast and texture, the Dodge tool excels at subtle enhancements. It can be used to gently lighten faces that are cast in shadow, introducing subtle highlights that make the subject stand out more prominently against the background. Imagine wanting to capture the delicate shimmer of blonde hair under a beam of sunlight, or to create a focused "spotlight" effect on an engagement ring to draw attention to its brilliance. The Dodge tool is perfectly suited for these precise, detail-oriented tasks.
Understanding the Historical Roots: Darkroom Techniques
The principles behind Photoshop's Dodge and Burn tools have their origins in traditional darkroom photography. In the pre-digital era, photographers would manually manipulate the development process to lighten or darken specific areas of a print. "Dodging" involved holding back light from reaching certain parts of the photosensitive paper, thereby lightening those areas. Conversely, "burning" involved allowing extra light to expose specific areas, thus darkening them. These techniques were fundamental to achieving artistic control and enhancing the visual impact of photographs.
Dodge & Burn - ILFORD PHOTO Darkroom Guides
The Challenge of Destructive Editing and the Non-Destructive Solution
A significant drawback of directly using Photoshop's native Dodge and Burn tools is that they can cause permanent changes to your image's pixels. In the world of digital editing, the golden rule is to preserve the original image data whenever possible, a practice known as "non-destructive editing." This approach ensures that you always have an untouched original to return to, offering maximum flexibility and preventing irreversible mistakes.
Fortunately, Adobe provides several methods for achieving non-destructive dodge and burn effects. One highly effective technique involves creating a new, empty layer and setting its blend mode to "Overlay." This method allows you to paint with black and white on this new layer to darken or lighten your image, respectively, without altering the underlying pixels of your original photograph.
Implementing Non-Destructive Dodge and Burn
To implement this non-destructive workflow:
- Create a New Layer: In the Layers palette, click on the "Create a new layer" icon. To access the New Layer dialog box for more options, hold down the
Alt(Windows) orOption(Mac) key as you click the icon. - Name the Layer: In the New Layer dialog box, give your layer a descriptive name, such as "Dodge and Burn."
- Set the Blend Mode: The crucial step is to change the "Mode" (Layer Blend Mode) from "Normal" to "Overlay."
- Fill with Neutral Color: Ensure the option "Fill with Overlay-neutral color (50% gray)" is checked. Click "OK" to create the layer.
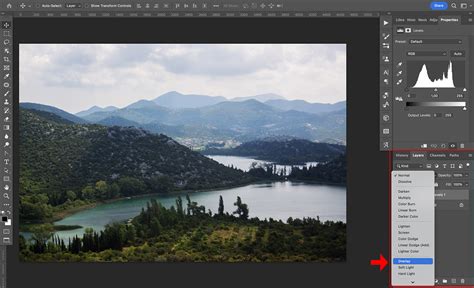
When a layer is set to the Overlay blend mode, any areas painted with 50% gray become transparent, meaning the layer below is unaffected. Areas lighter than 50% gray will lighten the image, while areas darker than 50% gray will darken it. This provides a clean canvas for selective adjustments.
Painting for Light and Shadow
With your "Dodge and Burn" layer active and set to Overlay:
- To Lighten (Dodge): Set your Foreground color to white. Select the Brush Tool (
B). Adjust the brush opacity to a low setting, typically between 10-20%, to allow for gradual build-up of the effect. Use a soft-edged brush for smoother transitions. Paint over the areas you wish to lighten. You can build up the effect by painting over the same area multiple times. Use the[and]bracket keys to adjust brush size, andShift + [to soften the edges. - To Darken (Burn): Set your Foreground color to black. Using the same low opacity brush technique, paint over the areas you wish to darken.
If you accidentally paint in an area you didn't intend to, you can reset that area to its original state by setting the Foreground color back to 50% gray (by clicking the Foreground color swatch and selecting a neutral gray) and painting over the affected area.
This method effectively replicates the results of the Dodge and Burn tools while ensuring that your original image remains completely untouched, providing a safe and flexible editing process.
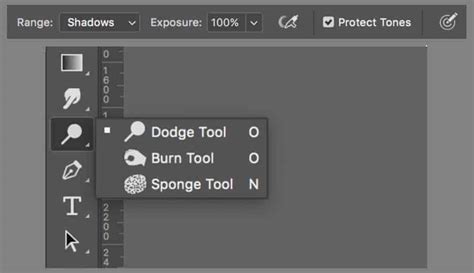
Dodge Tool Properties and Options
The Dodge tool itself, when accessed directly, offers several properties that allow for fine-tuning its application. Understanding these options is key to achieving precise and desirable results.
- Brush Size: This property allows you to adjust the diameter of the brush tip, determining the area over which the lightening effect will be applied. Larger brushes are suitable for broad areas, while smaller brushes are ideal for detailed work.
- Brush Hardness: While not explicitly listed in the provided text, brush hardness (controlled by the bracket keys as mentioned in the non-destructive section) is a critical aspect of the Dodge tool. A softer brush edge creates a more gradual, natural transition, whereas a harder edge creates a more defined, distinct highlight.
- Midtones: This option specifically targets the mid-range gray values in your image. Adjusting this allows you to lighten the middle grays without significantly affecting the pure whites or deep blacks, offering a balanced approach to lightening.
- Exposure: This setting dictates the intensity or strength of the Dodge tool's effect. A higher exposure value will result in a more pronounced lightening with each brush stroke, similar to increasing the exposure on a photograph. Lowering the exposure allows for more subtle, gradual lightening.
- Airbrush: Selecting this option simulates the effect of an airbrush, applying a softer, more diffused spray of light. This can be useful for creating very subtle, atmospheric highlights.
By mastering these properties, users can leverage the Dodge tool to sculpt light and shadow with remarkable control, enhancing the visual narrative and aesthetic appeal of their photographs.